|
|
| Podcast |
| Live Help |
| Repairware |
| Hotline |
| Repair Forum |
| Beer Fund |
| Cool Stuff |
| Home |
|
|
Ahh, Grasshopper, you are about to embark on the artistic side of appliance repair. There's more to changing a fridge door gasket than just turning a few screws...not much more, but enough so that if you're not aware of them, you'll do a crappy job. Finesse, man, finesse, that's the name o' dis game.
This Appliantology article explains how to replace the door gasket on your home fridge. If you need a replacement gasket for a commercial fridge, I can custom make you one.
When you get the new gasket, it'll come in a box, all twisted up with wrinkles and puckers. If you were to just install the gasket as it is right outta the box, you'd have more gaps in the final gasket seal than Clinton's memory during the Lewinsky deposition. Stick that sucker in the dryer on medium heat for about 10 minutes. That'll give you enough time to do some prep work on the fridge door.
First thing you gotta do is take all the food off the door shelves. If'n you don't, you'll probably have a hard time making door square up right with the cabinet when you're all done.
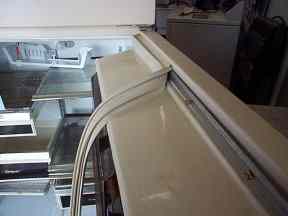
 Next, loosen all them billion and a half retaining screws all around the perimeter of the door like you see here. You can also see what these look like in relation to the gasket. One of those Versapak screw drivers with a long 1/4" nutdriver attachment takes away alot of the drudgery here. Don't take 'em out all the way, just back 'em out about 2 full turns. Then pull the old gasket out all the way around.
By the time you finish pulling the fool thing apart, your new gasket should be nice and warm and soft from its ride in the dryer. Wash your hands at this point so you don't get gookus from the old gasket on your new one. Take the new gasket outta the dryer and untwist it.
Lay the new gasket up around the door like it's supposed to go on and start at a corner working the lip into the retaining bracket. On some fridges, there are no retaining brackets, they just use the whole plastic shelf piece to hold the gasket in. Either way, same idea. Get the gasket in all the way around and situated like it's supposed to be before you tighten any of the retaining screws.
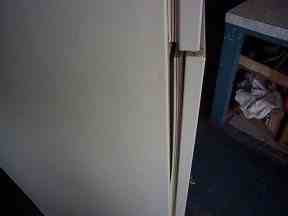
 Now, here's the finesse part. Some of these doors get really floppy when all the retaining are loosened. Start tightening the new gasket from the top working down to the bottom of the door. Periodically, eyeball the door or check it against the cabinet to make sure it ain't warped, like what's shown here. If it does seem to be warping on you, just hold the bottom half with your leg and warp it back into place.
Once you got it looking right, go ahead and tighten the retaining screws. I like to put a little silicone lube along the surface of the gasket that's next to the door hinge so it don't squeek so damn much.
To learn more about refrigerators or to order parts, click here.

|
Back to Refrigerator Repair Manuals |
Podcast | Live Help | Buy Parts | Repair Forum | Beer Fund | Cool Stuff | Home
 Your Appliance Guru:
Samurai Appliance Repair Man
URL: http://www.fixitnow.com
© copyright 1997-2004 Live It Up LLC
No part of this website may be reproduced or copied without the prior written permission of Live It Up LLC.