|
|
| Podcast |
| Live Help |
| Repairware |
| Hotline |
| Repair Forum |
| Beer Fund |
| Cool Stuff |
| Home |
|
|
| Buy Appliance Parts Here! |
| Search the vast repository of wisdom at Fixitnow.com: |

|
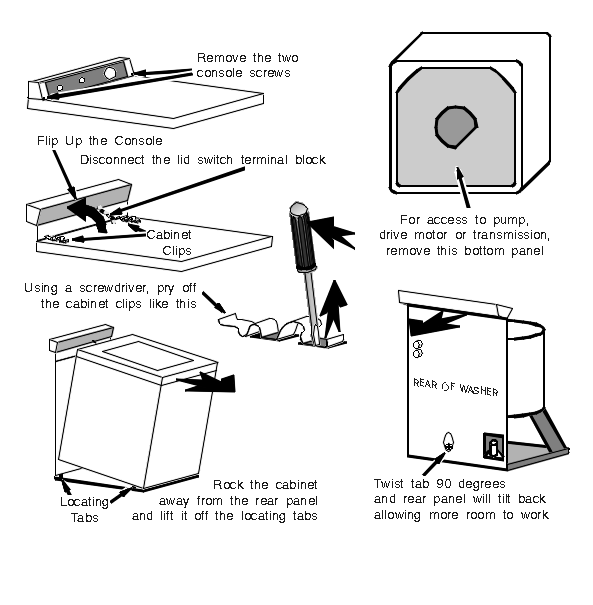
Most repairs on this washer require that you remove the cabinet. It's really easy to do and makes working on this washer a real pleasure. That's what I love about Whirlpool--their stuff is generally very technician-friendly.
The picture below shows all the steps involved. I'll just give a few extra tips.

Ok, start by unplugging the washer and then removing the two, #2 phillips screws holding down the console.
Unclip the 3-wire harness, shown above. HINT: If you're going to run the washer with the cabinet off, then you'll need to jump out this harness to makes the washer run. Also, a very common re-assembly mistake is to forget to re-connect this harness. No connect == no run. If the washer doesn't run after you re-assemble it, this is why.
Awwite, next take out those two curly clips, shown below, that connect the cabinet to the back panel. Remember how they go in 'cause if you don't, it can be a moron's IQ test to get 'em back in (voice of experience talking).
Ok, it's victory street now, just pivot that cabinet toward you and give a little USMC Ooo-RAHH to lift that sucker right outta there. Nice job, Slick, now go to work.
Well, if you have any appliance questions that can't be answered at our website, go ahead and click the LivePerson box. If I'm on-line, you'll see a face in the box and we can chat real-time. Otherwise, leave me a message.
Well alright then.
To learn more about your washer or to order parts, click here.

|
Back to Washer Repair Manuals |
Podcast | Live Help | Buy Parts | Repair Forum | Beer Fund | Cool Stuff | Home
 Your Appliance Guru:
Samurai Appliance Repair Man
URL: http://www.fixitnow.com
© copyright 1997-2004 Live It Up LLC
No part of this website may be reproduced or copied without the prior written permission of Live It Up LLC.