Monthly Archives: August 2004

Online Microwave Oven Diagnostic Guide

Microwave Oven Diagnostic & Repair Guide
Problem Possible Causes
It’s completely dead.
  • Check the circuit breaker and make sure you have 120v at the outlet, Hoss.
  • Fuse blown in the control panel. Sounds easy and it is if you know how to take the thing apart without getting your gluteus flabbeous shocked off by the capacitor in there that holds 2,000 volts (yes, even with it unplugged). Have fun, Homer.
  • Control board fried. Test for power going to board. If exists, problem lies on board somewhere. On the GE/Hotpoints using the "smartboard," it is sometimes possible to locate a bad soldering connection on the board that can be repaired, restoring function to the board. Otherwise the entire board must be replaced.
Microwave seems to run but does not heat.
  • Magnetron is fried. Resistance between the magnetron terminals should be less than 3 ohms. Resistance from the magnetron terminal to ground should be infinite.
  • Fried HV capacitor. Use your ohm meter to test it.
  • Fried control board. If power is going to the board but not going off to the other components, the board is bad and needs to either be replaced or track down the bad connection (GE/Hotpoints).
  • HV Rectifier is shorted or open. Test forward and reverse bias with a megohmmeter. If continuity in both directions, rectifier is shorted, replace. If no continuity in either direction, rectifier is open, replace.
  • More help on testing specific components inside your microwave oven in this handy chart.
Microwave sparks while in use.
  • You let grease accumulate on the oven ceiling and this starts frying during use. Clean up your act!
  • Microwave stirrer is not working because either the blower motor is fried or the stirrer belt is broken. Without the stirrer, microwave energy will concentrate on one part of the oven and cause burning, sparking, etc.
  • Again, the HV Rectifier is shorted or open. Test as described above.

There’s loads more microwave oven repair information in this highly recommended reference:

Repair-Master Microwave Oven Repair Manual
covers all American brands
Specific repair help for most American-made brands.

To learn more about your microwave or to order parts, click here.

Appliance Repair Revelation: The Mysteries of Dryer Cord Wiring

appliance tip of the day archiveWiring in a new power cord for your electric dryer? Upgrading your electric dryer outlet from the old three-prong to the new four-prong outlet? Well, grab hold of those two large lumps at the base of your spinal cord and let’s romp through the wild and wacky world of dryer cords and outlets.


three-conductor dryer terminal--click for larger viewfour-conductor dryer terminal--click for larger viewThese two pictures illustrate the power wiring on a the terminal of an electric dryer. The one to the left here is the old-style three-wire configuration. Most people have this type in their homes. New code changes, though, require that dryers now have a four-wire cord, shown to the right. These are just just thumbnail pictures that you can click for a larger view. But I’ll bet you already figured that out, didn’t you?

Besides the number of wires in each cord, there are two important things to notice. First, in the four-wire configuration, notice that the dryer’s grounding strap is folded back on itself. The whole point of the four-wire cord is to separate the ground from the neutral. The green wire (the “new” extra wire in the four-wire cord) is attached to the dryer cabinet. In the three-wire configuration, the grounding strap is left intact and the neutral and ground are tied together.

anatomy of a three-prong dryer outlet--click for larger viewanatomy of a four-prong dryer outlet--click for larger viewIf you need to re-wire the outlet, these pictures will explain the anatomy of the three-prong (left) and four-prong (right) outlets. Once again, these pictures are just thumbnails–click ’em for a larger view.


One more thing. All these pearls of dryer cord wisdom apply only to electric dryers–gas dryers use a standard 120v wall outlet.

Recommended reading: Electrical Requirements for Appliances.

For more information on your dryer or to order parts, click here.

the master revealing the mysteries of dryer cord wiring to his grasshoppers

Appliance Repair Revelation: Water Flows into the Washer but the Tub Never Fills Up

appliance tip of the day archiveThis is a pretty common problem and the solution is blindingly simple. It’s caused by the drain hose siphoning water out of the washer tub. There are two common causes for siphoning and I’ll explain both of them below.


minimum washer drain height
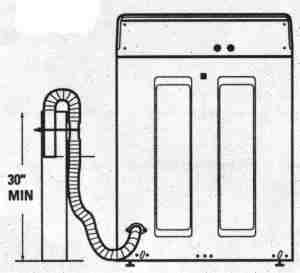
One cause for siphoning is simply that the drain hose discharge is below the fill level of the washer tub. This picture shows the minimum drain height needed to avoid siphoning.

Another common cause for siphoning is not having an air break between the drain hose and the drain stand pipe. Usually, this isn’t a problem since the drain hose diameter is usually much smaller than the diameter of the drain stand pipe. But sometimes folks will inadvertently remove the air break by duct taping the drain hose to the stand pipe. They might do this because the drain hose keeps popping out of the stand pipe when the washer pumps out the tub. Other times, the drain hose might fit into the stand pipe with a tight interference fit.

The other day, I talked to a guy on Skype who was having this problem with his washer. Since he didn’t know what caused it, he had taken is whole washer apart, thinking there was something wrong with the pump! I thought I could hear him kicking himself after I explained this siphoning business to him!

To learn more about your washer or to order parts,
click here
.

the master revealing the mysteries of hydrostatics and fluid dynamics to his grasshoppers

Online Dryer Diagnostic Guide

Dryer (Gas and Electric) Diagnostic & Repair Guide
Problem Possible Causes
[Gas and Electric]
Dryer drum won’t turn.
  • The belt’s broken. Turn the drum by hand. If it turns reeel easy, you gotsa broken belt, Hoss. Also, look for contributing causes for the belt to break such as worn drum rollers, damaged felt kit, or stiff idler roller. For belt replacement help on most major brands, click here.
  • The motor’s burned out. If you hear it "Hummmm…CLICK!" when you try to start it, you probably got a fried motor. Remove belt from motor pulley and start dryer to see if it still does it.
  • The thermal fuse is open. Check continuity with….your ohm meter.
[Gas and Electric]
The thing runs but it’s noisier ‘n my mother-in-law.
  • Could be worn drum rollers, idler pulley>, or drum front slide kit. Whirlpool/Kenmore problems will usually be in the rear drum rollers or idler pulley, Maytag problems will usually be the front slide kit. GE/Hotpoint problems will usually be the front slide kit or rear drum center bearing.
  • It’s fairly common for the blower wheel to wallow out and rattle around on Maytags and Magic Chefs. This type of noise is most noticeable when first starting the dryer and then when the stopping it.
  • If the idler pulley bearing is burned out, you’ll usually hear a high-pitched squealing noise.
[Gas and Electric]
Takes forever to dry a load of clothes.
  • Dryer vent is too long, kinked/restricted, or full of lint. I’ll betcha your using a big ‘ol run of white vinyl–that’s a Bozo no-no unless you want to burn down your house. Oh sure, don’t believe me. I only see this about every frikkin’ day. Do yourself a favor change out the cheesy vent system. For best results, vent length should not exceed 12 feet.
  • Your dryer lint filter is clogged with crap ’cause you’re too freakin’ lazy to clean it out each time you run a load of clothes.
  • Check them operating thermostats!
[Gas and Electric]
Lazy thing won’t run at all.
  • No power at the outlet, duh! Measure for 120v (gas dryers), and 240v L1 to L2 plus 120v L1 or L2 to neutral in an electric dryer outlet. More information on electric dryer outlet anatomy in this enlightening repair revelation.
  • The door switch is broken. Sometimes you can just look at it and tell, other times you gotta check the continuity using a meter (*gasp*).
  • The thermal fuse is open. Locate it with the help of the dryer’s wiring diagram and test it electrically. You gotta use the wiring diagram, Hoss. How in tarnation you gonna fix anything if you don’t use the wiring diagram? Don’t know how to read it? Well then, you shouldn’t be reading this repair guide, either–go call a professional.
[Electric Only]
My electric dryer runs but it won’t heat up.
  • One leg of the 240 volts AC at the dryer outlet is missing. Oh, I can hear you now, "Yo, Mr. Smarty=pants Samurai Guy, I know it has power because the motor runs. Dontcha get it?" Listen, knucklehead, the circuit breaker for an electric dryer is a two-pole, 30 amp breaker. One leg can break disabling the heating element leaving the other leg to run the motor. I only see this about every frikkin’ day, so try not running your mouth so much and learning something for a change. ‘K? ‘K.
  • The heating element is open. Ohm it out, Hoss. You should get between 12 to 35 ohms.
  • One of the thermostats are open. Check continuity.
  • Bad timer contact in heater circuit. You gotta use the wiring diagram here. If you can’t do this, call a pro.
  • Bad temperature selector switch…you know what to do.
[Gas Only]
My gas dryer runs but it won’t heat up.
  • First off, consult the much bally-hooed Gas Dryer Problem Solver.
  • Fried ignitor. This is definitely the case if the ignitor is visibly broken. Measure for 120v at the ignitor terminals. If you get 120v, it’s a bad ‘n.
  • Failed gas valve or holding valve coil. Check the resistance on each valve coil. You may also need to actuate each valve with a test cord since they may only fail after being actuated a couple of times. This can be tricky, Hoss, but I gots face in ya.
  • One of the thermostats are open. Check continuity.
  • Bad flame sensor. If flame fails to ignite at all and the ignitor is not getting 120v, suspect the flame sensor.
  • Couple links here on dryer gas burners: Dryer Gas Burner Know-How and How to Check the Components in a Gas Dryer Burner.

Recommended Reading: Dryer Disassembly for Most Common Brands and Models

Order Parts for Your Dryer

Hillstomping Updates: Mt. Liberty; North and South Twin

‘Twixt running appliance service calls and hiking, I haven’t had much time to post Hillstomping Updates. Well, Budrow, urine luck ‘cuz here ya go…

Stephen and Sam on the summit of Mt. Liberty.  That's Mt. Flume in the background.  Did you know that if you were to click your mouse at this very moment, you'd get a larger, stunning view of this picture?  Yes, grasshopper, it is true.  These and many more wonders await you with a mere click of your mouse.  Cleeck it, leetle girly-man.  Ya, cleeck it!Me and the boyz (Stephen, Sam, and Bubba) hiked up Mt. Liberty one fine Thursday (July 29). Here, the boyz are reveling in their pre-manhood tumidity and flexing their inchoately bulging muscles, made strong by hiking up what is now their eighth White Mountain 4,000-footer.


Click for larger view--as if you haven't figured that out by now, you clever surfer you.Then, the following Monday (August 2), also a fine day for a hike, Ivey joined us for a serendipitous trek up North and South Twin. This was a longer hike than Mt. Liberty (11 miles vs. seven miles) but wasn’t much more difficult. The official peak-bagging tally after this hike: Ivey has hiked six, Stephen and Sam have hiked 10 of the New Hampshire 48, 4,000-footers.

Take a moment from your insipid appliance repair ruminations and feast your bleary squinties on the pictures from these hikes. You might decide that it’s finally time to dump that piece of junk you’re working on; hey, life’s too short–take a hike.

Appliance Repair Revelation: How Does that Dryer Belt Go Back On?

appliance tip of the day archiveWhen your dryer drum isn’t turning anymore, it’s usually a broken belt. Tearing the dryer apart is usually straight-forward enough but stringing the new belt on the motor and idler pulley can be tricky. This handy little picture shows the proper belt configurations for eight different makes of dryers. Your dryer is most likely included in this picture.

Didn’t see yours? No worries, mate. Check out the complete encyclopedia of dryer belt configurations.

I have more detailed photos illustrating the dryer belt configurations here for

Need a belt for your dryer? We got ’em for every brand and model you can imagine right here.

grasshoppers sitting with the master, wearing freshly washed robes free of unsightly link.

Online Disposal Diagnostic Guide

Disposal Diagnostic & Repair Guide
Problem Possible Causes
Disposal is completely dead.
  • The circuit breaker for the disposal is tripped. At least check it and make sure you’ve got 120v to the disposal before you freak out. And how do we check for voltage? Can we look at it and see that it has voltage? Nyet, comrade, we must measure for voltage using our voltmeters. Look, if you’re not willing or able to do at least that, you shouldn’t be fooling with this stuff. Really.
  • The disposal’s internal circuit breaker is tripped. Look for a little red button underneath disposal and press it in. If it was out, you’ll hear it click when you press it.
It hums but it don’t grind.
  • Your grinding wheel is jammed. Use the wrench that came with it (or use a 1/4" allen wrench) in the socket underneath and wriggle the snot out of that thang. You may need to reset the circuit breaker, too. If the disposal sounds rough after running for several minutes, then you’re on borrowed time and you’ll need to replace it soon.
It runs and seems to work but it’s noisier than my mother-in-law.
  • A piece of metal went down the disposal. It may eventually work itself out.
  • The main bearings are wearing out and disposal will need to be replaced soon.

Order Parts for Your Disposal

Appliance Repair Revelation: Dishwasher Mythology

appliance tip of the day archiveOf all appliances, the humble dishwasher is the most misunderstood. In the course of servicing and repairing all types of appliances for our customers, I’ve heard more crazy myths about dishwashers than any other appliance. This article will shine the light of truth on some of the more common dishwasher myths I’ve heard.

Myth #1: You can clean your dishes better by hand.

Truth: Dishwasher wash dishes and utensils at 140ºF, which kills many bacteria. Try doing that by hand.

Myth #2: For best performance, you should rinse your dishes clean before loading them in the dishwasher.

Truth: Removing all food soils from the dishes and utensils prior to loading increases the alkaline concentration of the dishwashing detergent and increases the possibility of etching your glassware. Etching is a permanent pitting or eroding of the glassware surface. Initially, etching appears as shades of blue, purple, brown, or pink when the glassware is held at an angle to the light. In more advanced stages, the glassware appears cloudy or frosted. To avoid etching, you should only scrape the food chunks off the your dishes and load them into the dishwasher with the remaining food residue still on them.

Myth #3: If your metal utensils are showing signs of pitting after washing in the dishwasher, it means you have "corrosive water."

Truth: When two different metals (such as silver and stainless steel) contact each other in the hot, wet dishwasher environment, electrolysis can occur and cause pitting. This is not caused by "corrosive water." To prevent the problem, load silver and stainless steel in the silverware basket so they do not touch each other.

Myth #4: If your dishwasher isn’t washing the dishes very well, it means the pump is bad.

Truth: The most common causes for poor cleaning in a dishwasher are:

  • using old detergent that doesn’t dissolve all the way;
  • water temperature too low to dissolve detergent or remove soils;
  • debris caught in the spray arm holes, impairing proper spray action of the spray arm;
  • insufficient water fill in the basin from a variety of causes;
  • improperly loading the dishes into your dishwasher.

While a defective pump would certainly prevent proper cleaning in the dishwasher, it is a far less common causative factor than the aforementioned list. Even if the pump really is defective, they can usually be rebuilt for much less cost than buying and installing a whole new dishwasher.

To learn more about your dishwasher, or to order parts, click here.

the master sitting with his grasshoppers dispelling bogus notions about dishwashers

Appliance Repair Revelation: Icemaker FAQ

appliance tip of the day archiveBreakdown Diagram of a Typical Icemaker--click for more detailsIn most refrigerators, the icemaker is a completely independent appliance that just happens to live inside the freezer. The one exception to this is the gawd-awful flex-tray icemaker that has the refrigerator’s defrost timer built into it making it an integral part of the fridge. All icemakers work with a water fill valve which supplies household water to the icemaker. On most refrigerators, the water fill valve is located down in back, in the compressor service compartment. On Sub-Zero refrigerators and other built-in models, the water fill valve is in front, behind the grill at the floor. This illuminating and inspiring Appliance Tip of the Day will answer all your burning questions about the humble, yet ever-so crucial icemaker.

Q. How do icemakers work?

A. All icemakers are based on a fundamental thermodynamic property of water where, below 32ºF (or, for those of you trapped in a communist country, that’s 0ºC), water becomes a solid that we Ameedicans call ice and those infernal godless Swedes call früzen glaza.

You want the boring answer? Ok. First, the icemaker signals the water fill valve to open and allow water to flow into the icemaker tray. Note that the water is not “pumped” in–the only pump in your refrigerator is the compressor and you don’t wanna be drinkin’ what it’s pumpin’, you dig? The water fill valve simply opens and lets water flow in under household water supply pressure. The amount of water that comes into the icemaker is controlled by the icemaker itself.

Once the tray is full, the water sits there until the thermodynamic state change from a liquid to a solid occurs (that means “until it freezes” but it was more fun to say it thata way). When the water tray thermostat senses the ice tray has reached a certain temperature, it starts the harvest cycle–that’s when it dumps the ice into your bucket. This keeps on going until so much ice mounds up that it raises the metal arm on the side of the icemaker. Then the icemaker stops until you use up some of the ice.

Here’s a bonus Fun Fact to Know and Tell: icemakers won’t make ice if the freezer temperature is above 17ºF (that’s -8ºC for you pinko-commies). So, if your icemaker stops making ice, the first thing to check is the freezer temperature because it could be an early warning that there’s something wrong with your fridge, such as a defrosting system failure.

Q. Why do my ice cubes smell or taste bad?

A. Impurities in the water, dirty fridge, old ice…these are just a few of the reasons your ice can smell or taste foul.

Try cleaning out your freezer once in a while. You’d be amazed at the oozing crud you’ll find lurking in there underneath all that frozen stuff that’s been in there for years. Sanitize the inside of the freezer with an antibacterial cleanser. Throw out all those old fad diet food packs that taste like the bottom of my shoe and all those semi-melted pop-sickles and cans of orange juice concentrate. As a bonus, you’ll probably find you won’t get sick as often.

Use a filter to clean up the water–garbage in, garbage out. Here’s a newsflash: all water has some impurities in it, even water that tastes fine when you drink it. But when you freeze this same water into ice cubes, these impurities are magnified and can become noticeable, sometimes disgustingly so. So, even if the water in your house tastes good when you drink it, this same water can make stinky ice. Come git you a water filter.

Q. How long can I ignore changing the water filter for my icemaker?

A. This really depends on the strength of your body’s immune system. You see, as the filter removes the impurities from your water, it not only becomes saturated with those very impurities, but it is transformed into a veritable metropolis for bacteria. These little creatures multiply and grow to such an enormous extent that they actually begin to clog up the filter with their dead corpses. New little bacteria babies begin living and feasting on the rotting corpses of their fallen parents and cousins, clogging the filter, causing low water pressure, and the resulting hollow ice cubes. At this point in the filter’s life, millions of dead and living bacteria, the mixture variously called scum or puss, normally not visible but in extreme cases may cause the ice cubes to appear cloudy, begin sloughing off and traveling with the water to your icemaker. As you use the ice, you ingest these little creatures where they attempt to make their new home deep inside your intestines. The results could range from simply bad tasting ice, to a feeling of a sour stomach, to mild nausea, to violently vomiting up the entire contents of your stomach along with much bile and other slimy secretions.

For optimal ice quality and minimum health effects, change your icemaker water filter at least every six months.

Q. Why won’t my icemaker make ice?

A. I dunno–mine works fine so I’m all set, thanks. But you might try reading through the diagnostic guide in the icemaker diagnostic section. I know, I know, I’m always telling you to read stuff. Sorry about that. I’m still waiting for Microsoft to come out with those new electrodes that you shove deep into your skull and then plug into your computer so you can download stuff from the internet directly into that fermented brown mush ‘twixt your ears. Hope you don’t get one o’ them nasty viruses. Ahh-CHOO!

Q. Can I add an icemaker to my refrigerator/freezer?

A. Ya sure, ya betcha! Picking out the right kit for your fridge can be a little confusing so let this venerable Appliance Tip of the Day be your guiding light through the maze of choices. As a special bonus to my loyal grasshoppers, brand-spankin’ new icemakers are on sale now through August 22, 2004–come git you one!

And, hey, if you need help installing your new icemaker and even a new water supply line for it, we got installation help for you ratcheer, Hoss.

For more pearls of wisdom on icemakers, click here.

grasshoppers chillin' with the master and swillin' frozen margaritas made with pure, odorless ice cubes

Callgrave Glitches

I use the Callwave (more aptly named, Callgrave) internet answering machine service to run the Toll-free Appliance Repair Hotline. Here’s a heads-up on a glitch I’ve been having with the Callgrave service.

When you call the Toll-free Appliance Repair Hotline phone number, it only rings my phone three times, even though you’ll hear it ring in your phone more than that. But if I don’t answer the phone within the first three rings, Callgrave stops ringing my phone and I lose the ability to answer your call at my cell phone. This means there’s a lower likelihood of my answering your call in-person and and you’ll have to leave a message for me to call you back.

I’ve contacted Callgrave about this problem but, as you might expect, I got a canned reply that didn’t even address my problem, as though the Customer Disservice Rep at Callgrave just scanned my email and pigeon-holed it into the wrong problem category.

So, until I finally get someone at Callgrave with an attention span long enough to read more than a single sentence, we’ll have to put up with this diminished level of service. But, be persistent and, as we sing in that time-honored spiritual, “We shall overcome!”

Mailbag: No-Spin and a Burnt R43 on a Maytag Neptune Washer

Jamie wrote:

I just wanted to let you know that your site is awesome. I
have a maytag neptune and your site pointed me in the right
direction to fixing the problem. I had the same no spin
problem. I also had a burnt out R43. I believe that the R43
gets burnt out if there’s another problem with the machine.
After finding this, I then checked the motor control board
and found that the fuse had completely melted. I tried
replacing the fuse but that didn’t work. Anyhow after
contacting repairclinic.com they told me to replace the
motor control board AND to get the motor replaced because a
new motor and a AC filter was needed to stop the problem
from happening again. Just thought you would like to know!
All the best. Jamie

_______________________________
The above message was sent when you were offline, via your LivePerson site.

Message sent from IP: 68.239.102.85

This is a great update to my War Story on this very problem. As chronicled there, I also saw a burnt R43 on the machine control board in a Maytag Neptune stack laundry unit with a no-spin complaint.

Maytag lists the common-fail resistors on the machine control board and their associated washer components in Technical Bulletin TDL-0052-B. R11 is associated with the door latch switch and is almost always found to be burnt when diagnosing the infamous and pervasive no-spin complaints on this washer that dares not speak its name; R43 is not even listed in the bulletin.

Apparently, this problem with the burnt R43 on the machine control board has eluded even those titans of engineering at Maytag–actually not too surprising considering that this machine is a monument to contemporary appliance engineering incompetence. So, this means we’re all on a journey of discovery together–thanks for adding your glimmer of light to the dim flicker of understanding that we all have about this machine. Hey, maybe if some Maytag engineers read this they’ll explain the burnt R43 problem in a future service bulletin…if they figure it out.

Mailbag: Washer Keeps Filling Even When Unplugged

Ron wrote:

1997 GE washer keeps filling with cold water, even with
machine unpluged. Recently cleaned plugged inlet screens.
Why?????

_______________________________
The above message was sent when you were offline, via your LivePerson site.

Message sent from IP: 64.12.116.81


the bamboo reveals all

Washer keeps filling.

Unplugged–still trickle, trickle.

Replace inlet valve.

Appliance Repair Revelation: Fixing Washer Water Flow Control Problems

appliance tip of the day archiveWasher water control problems just gotsta be in the top five most frequent appliance complaints I get. The complaint is either:

  • very slow water flow into the washer (usually on the cold water only), or
  • water keeps trickling in even with the washer unplugged.

Thang about it is that the solution is just so gawd-awful simple to fix that I’m reluctant to give away the secret to this great cash cow. Yeah, I know, I shouldn’t reveal this treasured trade secret that all appliance repair techs swear an oath to defend. What? You say you want me to tell you anydamnway? Well…ok then.

Most of the time, your water flow complaints will be about either the cold or the hot water being restricted to near nothing. Sometimes, both the hot and cold water flow are restricted and the water just trickles in no matter where you got the temp control set at. Either way, 90% of the time, the problem is because of sediment built up on the inlet screen of the washer inlet valve. Almost always, the cold water flow is most affected by sediment because your water heater acts as a settling basin and removes most of the sediment. (This also means that sediment is accumulating inside your water heater and its tank is rotting out even as you read this.)

Typical Washer Fill ValveHere’s a typical two-solenoid inlet valve. This is the most common, although some Whirlpools use a three solenoid arrangement and front loaders get even more funky, but the diagnosis and correction are the same. Most of the time, what happens is that sediment builds up on the inlet screen of the solenoid valve and restricts the water flow into the valve.

Now, here’s where you can benefit from my lifetime experience as a certifiable appliance guru. There’s something I call the stupid plumber’s trick where the unsuspecting appliance owner calls in one o’ them real hairy, stinky plumbers to fix their washer. Well, Buttcrack Bubba correctly takes a look at the inlet valve and figgers he’s being reeeel clever by just removing the inlet screen altogether. Most of the time, Buttcrack Bubba does this ’cause he ain’t even got a washer valve on his truck so it’s the difference between making something off the job ’cause he "fixed" it, or making next to nothing ’cause he didn’t have the part and he’d have to come back to do the repair. Buttcrack Bubba’s in, what we in the trade call, "the horns of an enema." Yessir, so he goes ahead and removes that screen. The customer don’t know any better; heck, all he knows is that water’s flowing to his washer again. It’s a freakin’ miracle!

exploded diagram of a washer water inlet valve gutsWhat happens next, though, is a sad tale to tell. Y’see, after a while, the innards of the valve get so gunked up with sediment that the valve can no longer stop the flow of water when it’s supposed to (like, when the washer is unplugged). You can see here that they’s a whole buncha delicate leetle bitty parts in there, da, comrade? Little, itty-bitty pieces of dirt and pipe scale can stick that plunger guide wide-ace open. So, water just keeps on flowing into the washer. Meanwhile, you’re outside playing frisbee with the dog, knockin’ back a fohty of Old Milwaukee and the gottdayam washer overfills making one helluva mess in your house. All cause o’ that stupid plumber’s trick. Now, how smart was that to call in a plumber to do an appliance tech’s job?

Other times, problems with no water can be the pressure switch or a burned-out solenoid in the water valve. If there ain’t much sediment on the inlet screen of the water valve, you gotsta measure the continuity of the solenoid coil at the terminals. If your meter says there’s no ohms in the solenoid coil, that sucker is slap-open and it’s gotta be replaced. That’s the name o’ that tune, Hoss.

If solenoid continuity is OK, then you may need to measure the voltage at the solenoid coil. This is a live test, meaning the circuit will have 120v on it, so you can get your big ol’ gluteus flabbeous shocked off if’n you ain’t careful, Slick. If you ain’t getting 120v to the valve during the fill portion of the cycle, then you need to check the pressure switch, or fill switch. This diagram shows how the pressure switch (fill switch) talks to the water inlet valve.

Well alright then. That’s about all the rocket science involved with this little gig. All that’s left for you to do is order a new water fill valve. While you’re at it, how ’bout upgrading those cheesy black rubber fill hoses to burst-proof stainless steel-braided fill hoses. Hey, Slick, it’s the cheapest flood insurance you’ll ever buy. Since we’re talkin’ about washer floods, come read more about how to prevent ’em ratcheer.

And, of course, your loving donations to the United Samurai Beer Fund would be received most joyously.

To learn more about your washer or to order parts,
click here
.

a couple of grasshoppers resting with the master after mopping up a washer flood