Monthly Archives: June 2005

Field Notes: Maytag MAV Washer Won’t Run, Just Buzzes

Had an interesting one the other day. This was the newer Maytag MAV top-loading washer. Complaint was that the washer wouldn’t run; it just made a horrible buzzing noise when you pulled the timer knob to start it. What’s worse, the tub was full of rancid washer water.

I verified the complaint and placed the source of the noise as coming from inside the cabinet, not the control panel. This is an all-important first step because, in accordance with Samurai’s 6th Law of Appliance Repair, “Begin troubleshooting directly at the problem,” it tells me that I should begin by checking the mechanical drive system of the machine. So I began this excursion into appliance repair excellence by removing the front panel of the washer.

Using a flashlight, I located the clips in the top seam of the front panel. Then I used my putty knife to push in the clips and pop the hood. With the hood raised, I located and removed the two 5/16″ black hex screws on the inside holding the front panel to the rest of the cabinet using my magnetic hex driver. The front panel tilted out, up, and off. Once the front panel was removed, I had access to all the mechanical guts.

I pulled the timer knob again and the buzzing noise was definitely coming from the motor. To eliminate the possibility that the motor was having blocked rotor effect from a seized transmission, I pulled off the drive belt and ran it again. Same noise. So the problem was definitely related to the motor or its power circuitry.

Next step was to open the control console and get the schematic diagram for the washer so I could do some basic electrical tests. I removed the motor’s wiring harness and tested the motor’s start and run windings for continuity. Both checked good.

Ok, it was time to take it to the next level.

The next weapon in my arsenal of troubleshooting tricks is the live electrical test. This is where I measure voltage in a live circuit. Please, I AM a professional so don’t try this at home. My objective here was to see if the motor was getting the right voltage, meaning 120vac (nominal), to the right places. With the harness still disconnected, I used the schematic diagram for the washer to locate the pins on the wiring harness corresponding to the motor’s start and run windings. Once located, I pulled the timer knob to energize the circuit and measured the voltage at the pins using my multimeter. Voltage to the run winding was good but the start winding voltage was AWOL. Things were getting curiouser and curiouser.

Now here’s where the parts changing monkeys get separated from the Master Appliantologists. At this stage, monkey boy would think the timer was bad and order a new one. But, alas, he would choke and gag on the bitter herb of disappointment. For the problem, in this case, was not the timer; nay, nay, young Grasshopper, behold:

Click for larger view

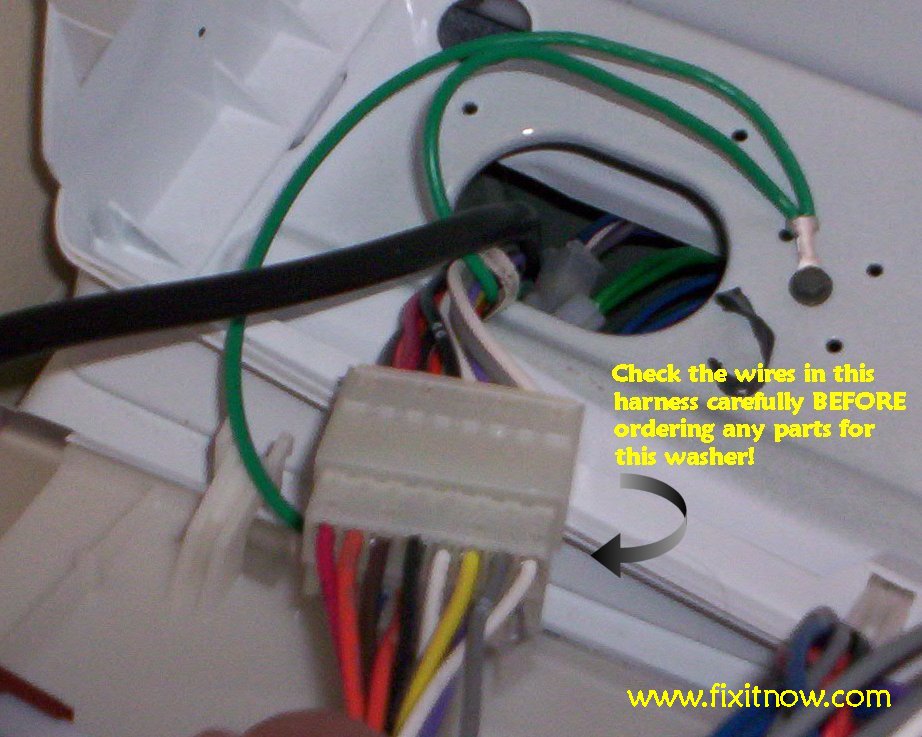
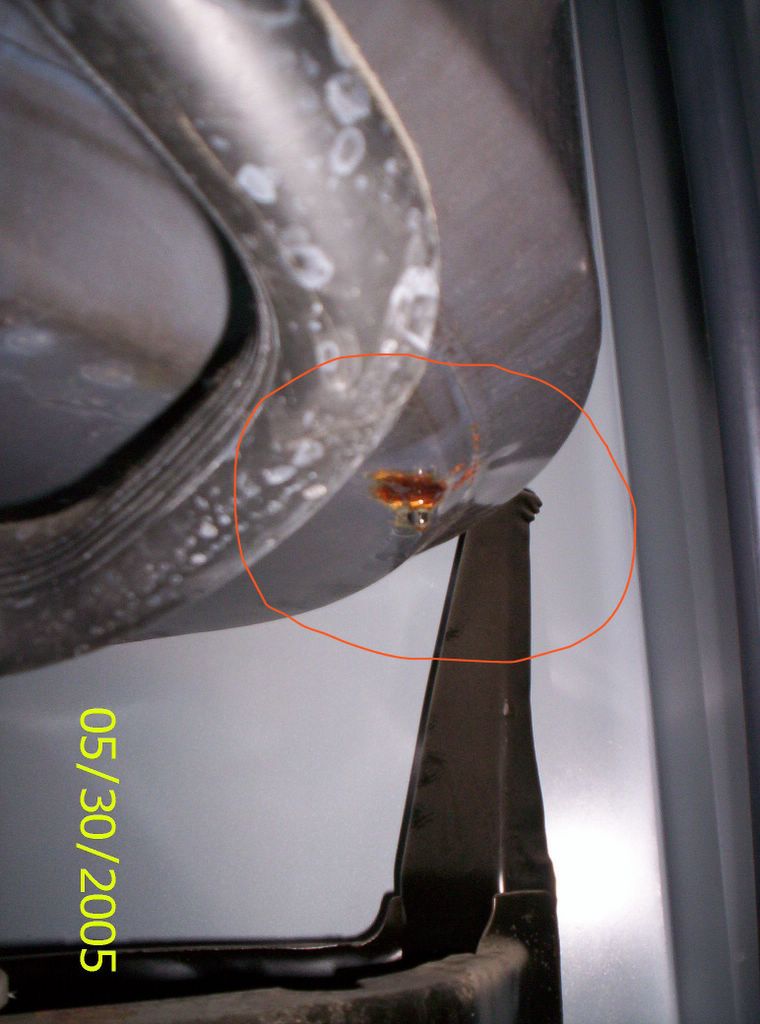
Wiring harness on the Maytag MAV top-load washers. If the motor won’t run and the washer makes a buzzing noise when you start it, check this harness before you replace any parts!

I pulled the harness apart and noticed a teentsy-weentsie black spot on the end of the male spade on the white wire. “Hmmm,” I said, whilst scratching myself in my most ponderous fashion, “what’s this?” I removed my bifocals and stuck my face up close and personal to that harness and, yea verily, that black spot was revealed to be a tiny electrical arc. Being a certifiable appliance guru, I knowed that electrical arcs occur because of loose connections. So I looked at the female side of the harness assembly and saw that the number nine white wire was pulled out of the harness by the barest fraction of an inch. Here’s a detailed diagram of the harness:

Click for larger view

Wiring harness connector in the console of the newer Maytag MAV washers. If the motor won’t run, check the 9 White wire in this harness.

I re-seated the white wire and re-connected the wire harnesses at the console and motor. Now it was time for the moment of truth. I pulled the timer knob and… that bad boy fired right up! I let the washer pump out all that putrid water, received glowing accolades (in the form of a check) from my grateful customer and went skipping and plucking on my merry way to the beer store. And drank heavily ever after. The End.

Field Notes: Maytag Side-by-Side Refrigerator Warming Up

I’m starting to see problems with the Maytag-built (includes Jenn Air) side-by-side refrigerators where the beer compartment gets warm, but the ice cream compartment stays very cold. (Home refrigerators have two compartments, the colder one for ice cream and the warmer one for beer. Many folks store frozen food in the ice cream compartment and fresh food in the beer compartment.) This differs from the typical defrost failure complaint which, in these fridges, is usually a bad Adaptive Defrost Control (ADC) board because 1) there’s no fuzzy ice built up on the back, inside wall of the freezer and 2) the freezer temp is good (around 0°F).

Having established that the sealed system is intact (evidenced by the cold freezer) and that the defrost system is working, this means the problem is in the air distribution system. “Uh, say what?” Awwite, grab ‘hold of those two large lumps at the base of your spine and read this post for some background scoop on how the cold air is distributed around your fridge.

So, applying my keen, razor-sharp powers of Samurai deduction, my katana-like mind sliced through the fog and concluded that I need to check for air flow into the beer compartment. In these refrigerators, incoming cold air is ported in at the top left-hand side of the beer compartment. I felt no air coming in. Then I opened the freezer door and the cold air started gushing in! Therefore, the problem had to be with the return air vent inside the beer compartment. How did I know there was a return air vent? Because fans don’t suck; they blow. (As a side note, pumps are the opposite because they suck. Take your mind outta the gutter for five minutes in your decadent life, ok? In fact, pumps are sized according to Net Positive Suction Head (NPSH). Fun fact to know and tell.)

I pulled the crisper drawers out to inspect the return air vent. Sho’ ’nuff, it was sealed tight by a curtain of frozen condensate. I busted it open and the cold air started gushing in. Here’s the return air vent, click it for a larger view:


The return air port in a Maytag side by side refrigerator located behind the crisper drawers in the beer compartment. Condensation can freeze in a sheet over this port blocking the return air flow, creating warm beer.

To learn more about your refrigerator, or to order parts, click here.

The Way of the Samurai

Went out on a service call for an old-style Hotpoint (GE) top-loading washer. Complaint was that it leaked. When the customer called, I explained my fee structure: I charge a flat professional fee of $149 (for most repairs) which includes all trip charges, service call charges, diagnostic fees as well as the services to implement the repair, no matter what the repair or if I need to order a part and come back. Parts are extra. I also give a one hour window for arriving at the customer’s house, accept payment by cash, check or any major credit card, and guarantee my work for one year, parts and labor. She was fine with this and just wanted her washer fixed ASAP. I got out the same day.

Upon arrival, I pulled the washer out from the wall, removed the back panel and added some water to the tub in order to locate the leak in accordance with Samurai’s 14th Law of Appliance Repair, “All leaks are visual.”

The source of the leak soon became evident. It was a rust hole in the outer tub of the washer, as shown below. Click the picture for a larger view.


Rust hole in an old-style GE/Hotpoint washer tub.

I advised the customer that it was in her best interest to buy a new washer. Obviously, I couldn’t charge $149 for just diagnosing the problem and determining that it would be in the customer’s best interest to purchase a new washer. Since I was effectively condemning this washer, I only charged her a $65 fee for diagnosing the problem. I so rarely condemn appliances while at the customer’s home that I almost never discuss that possibility with them on the phone while setting up the service call. Ain’t I special? I love me!

Now that most of you are no longer reading this post, I’ll go ahead and share with you my reasoning for charging the way I do. I used to charge using the Blue Book flat rate guide. I would charge a $69 diagnostic fee for which I would schedule an appointment with the customer to diagnose their appliance and give them a quote for the repair. The repair fee would come out of the Blue Book flat rate guide. If the customer declined the repair, they would only owe the $69 diagnostic fee.

The problem with this fee structure is that it creates an unrealistically low price expectation in the customer’s mind for what the repair will cost. Inevitably, after troubleshooting the appliance and quoting the repair cost, I would get asked, “How much is a new one?” I got asked this question so frequently that I wrote an article about it that I would hand out to customers. Worse yet, about half the time, the customer would decline the repair, pay the $69 fee, and be left feeling soiled, as if I was trying to pull a fast one, and I walked out with $69 for “just looking at it.”

Funk that noise!

Here’s a fun fact to know and tell: the average repair price under this new fee structure is actually less than what it was using the flat rate book! But all some people hear on the phone is $149 and they’re off searching for someone who’ll tell them something misleading because, the fact is, most people need to be lied to when it comes to paying what it really costs for in-home service. But those folks are not my customers. The nice thing about my new fee structure is that it automatically selects people who are my customers: they have a realistic expectation of what it will cost to get it fixed; they value their time and so appreciate that I schedule one-hour windows for arriving at their home; and they like that I stand behind my work for one full year, parts and labor.

So, I decided instead of letting people know how much it’s gonna cost to repair their low-brow, cheesy appliance after I’ve already wasted a chunk of my life rolling around on their filthy kitchen floor or in their nasty laundry room, why not give ’em a good idea right up front, on the phone? So that’s what I do now and life is mucho better. I schedule far fewer service calls but end up grossing about the same amount of money and my job average has doubled from under $100/job to almost $200/job. But, here’s the kicker: fewer service calls means lower variable costs and a correspondingly healthier bottom line. And, most importantly, it means more time off for the really important things in life, like hiking.

Technique of the Master: Wiring in a New Defrost Thermostat


Splicing in a new defrost thermostat on a refrigerator evaporator coil. Note the heat shrink on the splice connection. This is to prevent moisture from migrating into the splice connection and rotting it out. An alternate technique would be to use a dab of silicone in the open end of the terminal crimp connector. Pigtail wire nuts are not a reliable splice connector in this environment, crimp connections only.

Hillstomping Update, Mt. Monroe 06082005

This was one of the most spectacular hikes so far this year, rivalled only by the Edmands Col hike a week ago. There is an Edmands on this hike, too: Edmands Path. Bubba and I hiked Edmands Path for three miles up to the ridge where we picked up Crawford Path. Mt Eisenhower was just to the south of us and Mt. Monroe, our objective, was two miles to the north.

This was also a charmed hike: the weather forecasts threatened afternoon thunnderstorms and, for once, they were correct. And although an ominously dark thunderhead did take firing position directly overhead on the hike back down Edmands Path, it didn’t bust loose until the exact moment we reached the trail hog van and closed the door. I shi’ite you not!

The four pictures below are thumbnails– click ’em for a larger view. They were selected from the full set of photos of this hike, which you can see here.

Happy trails!


Heading up Edmands Path to the ridge. That’s Mt. Monroe in the center. Mt. Washington is to the left, partially occluded by the spring buds.


Looking back at Mt. Eisenhower. You can see Edmands Path cutting off to the right.


The view from Mt. Monroe. Mt. Washington looms before us. Glacial remnants on the right, the AMC Lakes of the Clouds hut on the left.


AT Thru-Hiker, Just Mark. He’s from Arizona. Started the AT February 22 in Georgia. About a month left ’till Katahdin. Go, Just Mark!

Fisher Paykel Dishwasher, DD602, Won’t Start

Went on a service call for a Fisher Paykel dishdrawer yesterday. Complaint was that the lower drawer would not start up. Diagnosis confirmed the complaint, the drawer would act as though it wasn’t closed all the way, would just give not-ready beeps when you closed it and pressed start.

I put the drawer into diagnostic mode by pressing and holding the Key Lock and Start buttons simultaneously. In diagnostic mode, I could review the current and previous error codes. Current code showed U2, drawer not closed error. The prime suspect in this case is always the drawer limit switch. On the DD602’s, the limit switch is located on the very back of the left drawer guide which means, you guessed it, the drawer needs to come out.

If you’ve not removed a drawer from a DD602, you’re in for a joy ride. This article has details on how to do it. Fisher Paykel has made several improvements in the DD603 models which have been gratefully received by Fisher Paykel servicers. The drawer linkage is chief among them. It’s actually not that bad, you just have to be patient and methodical.

Anyway, with the drawer out, the problem was plainly visible, as seen in the thumbnail photo below. Click it for a larger view.


Fisher Paykel DD602, broken drawer limit switch. You can see that the actuating lever on the switch has been broken and bent upwards, so it can no longer depress the switch button. Consequently, the dishdrawer’s CPU never knows the drawer is closed.

Hillstomping Update, Mt. Garfield 06032005

Took two of my little Samurai reproductive units on a hike up Mt. Garfield. We’ve all done this hike many times but it’s one of those that never gets old. It’s a mellow five mile trek to the summit on the Garfield Trail and you get rewarded with expansive views of the Pemigewassett Wilderness. And on the way back, there are several ice-cold mountain streams to cool off in. Good times, good times.

The photos below are just thumbnails– you can click ’em for a larger view.


My two nads givin’ the Thumbs Up on the last push up to the Garfield summit. They’re standing on about 2 feet of packed snow– that’s June in the White Mountains!


Stephen takin’ in the views on Mt. Garfield. This is what it’s all about!


Sam on Mt. Garfield summit.


Stephen on the summit of Mt. Garfield.

Hillstomping Update, Edmands Col 06012005

Route: Up via Lowe’s Path and Randolph Path to Edmands Col. Headed north on Gulfside Trail to Thunderstone Junction then took Lowe’s Path all the way back down. Total of about 11 to 12 miles.

Weather: Reports called for mostly cloudy skies with partial clearing by the afternoon. I know from experience that these type of days can yield some of the most dramatic views, which this hike provided in abundance, as you can see below.

Trail Conditions: Wet, wet, wet! Although the lower elevations were clear of snow, there’s still plenty at the upper elevations that’s still melting, making for lots of water running down the trails. Chronically wet rocks, slick with new bio-growth, made for tricky footing. Above about 3,000 feet, the trail had long stretches of slick ice. Randolph Path was mostly covered with slick ice. Long stretches of Gulfside Trail still had over 4 feet of snow which made for treacherous travel because you would posthole up to your crotch. I was especially concerned for Bubba because of the sharp, jagged rocks below that could wrench his paws. But no injuries other than bruises to both man and canine.

The four photos below were selected from the full set of 13 pictures, which can be seen here. You can click the thumbnails below for a larger view.


Bubba leads the way up Randolph Path to Edmands Col. That’s Mt. Jefferson in the background.


Bubba prances at Edmands Col.


A moody view of Mt. Washington and its massive headwall from the Gulfside Trail. The thin, black wisp of smoke to the right of the summit is the infernal Cog rail ride that flatlanders pay $50 to ride up to the top of Mt. Washington and then triumphantly pose for photos by the summit sign as though they’ve accomplished something noteworthy.


Heading back down on Lowe’s Path. Git you an eye-full of Big Sky!

Hillstomping Update, Cannon Mountain 05242005

Just a quick run up to Cannon Mountain and back. The weather was calling for rain but it had already been raining steady for so long that I no longer cared, I just wanted to hike. So, I took my chances.

Went up via the Hi Cannon trail, which including climbing the long ladder shown below. No sweat for bipeds with opposable thumbs but quite a feat of agility and dexterity for a canine. However, Bubba isn’t just any ordinary canine, nawsir; he’s the mostest awesomest hiking puppy the world has never seen.


My Semper Fi Hiking Partner, Bubba

Yes, this ladder is as long as it looks and, yes, Bubba climbed it like a fireman!

Mt. Lafayette and the Franconia Ridge from Cannon Mtn.

Lonesome Lake from Cannon Ball

Trail coming down from Cannon going to the AMC Lonesome Lake hut was still very socked in with snow and ice. It’s a tough little stretch of trail even in the best of conditions with large boulders and steep drop offs to negotiate the entire way. But the snow and ice gave it just what it needed to give it that element of bust-ass fun. Oh yeah, took some world-class spills on that trail, yee-ha!

From the Lonesome Lake hut, I took the Cascade Brook trail back down for a total round trip of nine miles. A short little hike. The weather ended up being beautiful with only the barest, briefest spritzer during my short sojourn at the AMC hut. Perfect!

Check out the rest of the pictures from this hike here.