Monthly Archives: March 2006

Appliance Repair Podcast Update

If I can't help you fix your appliance and make you 100% satisfied, I will come to your home and slice open my belly, spilling my steaming entrails onto your floor.A doubleheader! Just uploaded two more episodes of our award-winning appliance repair podcast.

First, we completed the dramatic conclusion of the riveting blockbuster trilogy on the Samurai’s 12 Laws of Appliance Repair. You don’t wanna miss this one… unless you had something better to do, like pulling hair outta the drains, or something. But if your drains are clear, download this episode now!

And, by popular demand, we made another episode devoted to all listener emails! In this exciting docudrama: Butros Butros has a GE front-load washer that won’t spin and Tomo has a one year old Kenmore HE3t that won’t spin, either. Hmmm… Next, Alyson has had to replace the gas valve twice in her Frigidaire Crown Series gas range and now it’s apparently gone bad again. And she’s thinking about just buying a new one. What’s a grasshopper to do? The Samurai illumines her path. Download this episode now!

If you’d rather listen online, just pop on over to our podcast homepage. You can also subscribe to our podcast RSS feed.

Kenmore Elite and Whirlpool 27″ Electric Dryers: Run but Doesn’t Heat

If the dryer runs but doesn’t heat, don’t even think it’s the thermal fuse. If the thermal fuse was the problem, the dryer wouldn’t run at all.

First thing to do is verify your source voltage for the dryer; for those of you in Manhattan, this means to use your multi-meter to measure the voltage at the dryer outlet to make sure you have 240v. Y’see, Slick, the dryer motor only needs 120v supplied by one of the lines to run. But the heating elements, on the other hand, need 240v supplied by both lines to get hot.

If the source voltage is ok, then the most likely bad parts are listed below. As always, you should use your meter and the tech sheet supplied with your dryer (and cleverly hidden inside the control panel) to verify:

1. Even Heat Board

2. Heater Relay

3. Thermostat

4. Sensor

To learn more about your dryer, or to order parts, click here.

How NOT to Replace the Drive Coupler in Your Kenmore or Whirlpool Direct-Drive Washer

Every now and then, someone posts a botched repair story that’s just so messed up that it’s worth sharing here. In this one, our hapless grasshopper is attempting to replace the drive coupler in his washer and employs a technique that we professional appliantologists call, “Going around your elbow to get to your azzhole.” Let’s enjoy:

Motor coupler broke. Unplugged the washer and raised it up on automotive jack stands. Pried off clips to loosen water pump. Removed screws and clips to loosen motor. Removed three bolts that hold the gearbox assembly to the stuff above it. This allowed it to drop down and twist so I could easily remove the pump and motor. Removed old coupler and replaced w/new. Re-installed motor and water pump. Then, I was unable to raise the gearbox assembly back high enough to re-thread the three bolts. It’s about half an inch too low for the bolts to thread.

Opening up Whirlpool (or Kenmore) Direct-Drive Top-Loading Washer-- click for larger viewHoooold on there, Bubbalouie! This is one of the easiest repairs in the whole appliance universe. All you gotta do is remove the cabinet, pop off the pump and motor and, budda-bing budda-boom, you’re right there at the coupler! This is a 15-minute repair even if everything goes wrong! Compare our grasshopper’s report with the elegant simplicity of doing it the right way.

Whatever became of our hoodooed grasshopper and his star-crossed washer? You can read all about his current mis-adventures here.


Whirlpool – Kitchenaid – Kenmore Dishwasher: Poor Cleaning

If you have a newer-model Whirlpool or Kitchenaid dishwasher (also sold under the Kenwhore label), that’s not washing dishes very well, here’s whatcha do:

First, make sure your water fill level is adequate, should be just below heating element. The proper fill is 1.8 gallons, so if you want to see what a proper fill looks like before you proceed, use a pitcher and add 1.8 gallons of water to the empty dishwasher basin. Some other things to check for poor washing results on this page.

Ok, if that checks out, the next thing is to determine whether or not the wash motor is runnning. You’ll have to pull the kickplates off so you can check the voltage supply to the wash motor underneath. If the motor is getting voltage but it’s not running, or maybe it’s just making a humm noise but not circulating water, then you need a new wash motor. Or, for a few more shekels, you can save yourself some headache and replace the motor already assembled into the plastic housing as a complete assembly.

Kitchenaid-Whirlpool Dishwasher Mascerator AssemblyON THE OTHER HAND, if the wash motor is running (and you have the proper fill level in the basin) but the dishwasher is leaving crud all over the dishes, then you can probably get by with just replacing the chopper (mascerator) and the check valve, shown here to the right (click the picture for an annotated view).


If you need help getting to the chopper assembly, grab some popcorn and enjoy this illustrative slideshow.

To learn more about your dishwasher, or to order parts, click here.

Kenmore HE4t Washer Error messages F11 and Fdl

This washer was made by Whirlpool, so the following tidbits also apply to the Whirlpool Duet washer. But, since it has a Kenmore label slapped on it, you’ll have to deal with Sears if this is a warranty issue– this is a good thang because you’ll learn what good service is by experiencing really crappy service.

F11

Communication between the Central Control Unit (CCU) and the Motor Control Unit (MCU) cannot be sent correctly.

F DL

A Door Lock Error occurs if the door cannot be locked. It will try to lock it six times before displaying the error code.

This is from the tech sheet found under the top of the washer… or you can borrow mine, just be sure to return it. 😉

Thanks to Pegi for posting this in the repair forum.

To learn more about your washing machine, or to order parts, click here.

Maytag dishwasher upper arm not spinning, poor washing

A Sublime Master of Appliantology provides some good tips in the repair forum on troubleshooting this problem.

*Water level on this unit should be up to the bottom of the heating element (using the element as a face of a clock, use the 9 & 3 positions) when the water shuts off if filling correctly. When the unit is done filling and you get the pause prior to the motor kicking on, look at the float switch on the left hand side behind the kick plate. The float is down to fill and will rise allowing the plunger of the switch to extend and stop the fill. If you are not getting a pause between fill and motor operation, you might not be filling with enough water. If the float is still down, add until it raises and breaks the contacts. Shut the door and start the unit, do the arms now move? If so, could be clogged screens in the valve

* Filter in the sump. Remove the lower arm, remove the torx screws holding the top part of the pump housing on. This will expose a micro-mesh filter that could be clogged to the point you are starving the pump of water. This will allow water to come out the arms but not enough pressure to move them. If they are clogged, inspect the back wash arm, that is the 4 armed spinner in the middle of the filter. The arms have verticle slots in the end of them that spray water out to clean the filter. If they have become clogged, clean them and the filter.

To learn more about your dishwasher, or to order parts, click here.

Appliance Repair Podcast Update

I just uploaded another steamy installment of our appliance repair podcast, which you can download here.

With this episode, we’re trying out a new format. Instead of talking about a range of different topics in the appliance world, we focused on one topic.

This episode is the first of a trilogy wherein the Samurai explains his famous 12 Laws of Appliance Repair which have enlightened grasshoppers all over the planet. The Samurai discusses the first four laws in this episode.

And then, of course, is the listener emails– there’s always room for listener emails. 😎

Podcast homepage: podcast.fixitnow.com

Whirlpool-Built Dishwasher (includes KitchenAid and some Kenmores) Won’t Start, Clean LED Blinks Seven Times

AFFECTED MODELS:

Whirlpool: DU1050XTP, DU1100XTP, DU1101XTP, DU1145XTP, DU1148XTP, DUC600XTP, DUL240XTP, GU2400XTP, GU2500XTP, GU2548XTP, GU2600XTP, GU3200XTP;

KitchenAid: KUD x 01-6 (where “x” is any letter);

Kenmore: Whirlpool-built models.

All serial codes.

NUTSHELL:

Whirlpool has issued a service bulletin on this problem. Seems the heater fault-detection circuit is buggy. The condition can also apply to a dishwasher that has had the electronic control replaced.

The cause of the problem is an insufficient rise in water temperature during a pre-set time period. The heater fault-detection program that was added to the electronic control is designed to shut down the dishwasher if the board-test for proper water temperature rise is not sufficient.

GORY DETAILS:

The dishwasher run cycle was modified to add 8 minutes 45 seconds of heat at the beginning of the main wash cycle. If the inlet water at the thermistor is below 110°F, the thermistor looks for a water rise of 4°F. If the inlet water is over 110°F, the test is for an increase of 2°F. If the temperature rise is below specifications, the unit will drain and the clean light will blink seven times.

The detection described above is ignored if the temperature is out of the normal temperature range of 64°F to 160°F during this heat period. This thermistor temperature test is not done to increase water temperature for better washability, but to only assure that the heater is functioning.

Proper incoming water temperatures should be between 120°F to 140°F.

CORRECTIVE ACTION:

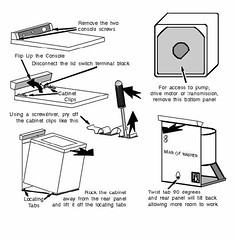
You will need to identify possible causes of insufficient temperature rise. These causes may include checking the wiring to/failure of the control, the heating element, the thermistor, the inlet valve, door switch, motor or capacitor. Make sure that water is not siphoning during fill. Once the heater fault detection is triggered and the condition resolved, the electronic control must be reset by initiating a special diagnostic cycle. Use the Product Tech Sheet shipped with each dishwasher — you’ll find it behind the kickplates — to identify the correct cycle sequence. The rapid advance cycle will not properly reset the electronic control.