Monthly Archives: January 2007

How to Replace the Door Switch on a Whirlpool Duet or Kenmore HE3t (and HE4t) Front Loading Washing Machine

Replacing the door lock latch assembly is a common repair on this washer. Fortunately, it’s also an easy and inexpensive repair… relative to, say, replacing the entire drum assembly. I’d rate this one a single mug on the world-famous SUDS-o-meter.

Broken Door Latch on a Whirlpool Duet or Kenmore HE3 Washer
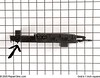
Lots of times, you can tell the door lock assembly is bad by noticing if this little nub is broken off– click the pic, Slick. If it is, well, slam-dunk: come git you a new door lock latch assembly.

The door latch could also be bad electrically, meaning that one of its little inner switches finally switched off for good. But to know that, like, fer sher, Dude, you’ll need this service manual and a multi-meter.

Otay, Buh’weet, replacing the door lock latch assembly is about as easy as cleaning out the p-trap under your sink, but not nearly as interesting. Just download this pdf file from the forum– it lays it all out for you, complete with “purdy pitchers.” You’ll need to be a member of the forum to download the file; this link explains how to join.

Locating the Tech Sheet in a GE Dishwasher

At some point, the electronic controls on your GE dishwasher will go squirrelly and you’ll need to troubleshoot them. How do I know this? Because GE dishwashers, along with just about every other dishwasher on the market today, violate the 5th Law of the Prophecy; repeat after me, “Electronics and wet appliances do not mix.”

OK, so the day of reckoning finally arrives and your GE dishwasher shi’ites the bed. First thing you gotta do is locate the dishwasher’s tech sheet. Every, and I mean every, GE dishwasher is shipped with a tech sheet. The tech sheets are carefully hidden in the dishwasher body to keep homeowners from finding them.

So, let us attend to the sage instruction of Jedi Appliance Guy on the proper technique for locating and extracting the tech sheet in your GE dishwasher:

Take out the 4 1/4 inch screws that hold the two parts of the service panel in place. Lay down on the floor on your left side and look under the dishwasher. You’ll notice there is a piece of sheet metal lining the underside of the tub.

The tech sheet is tucked between the tub and the sheet metal on the right side of the machine toward the front. Grab the sheet with your left hand.

Now suppose you go and search for the tech sheet as instructed but you still can’t find it.

“But, Samurai, my dishwasher never came with one!”

Yea verily, Grasshoppah, this is bullsheist that doth stinketh in my nostrils. If the dishwasher has never been serviced by anyone other than you, then the tech sheet is indeed there, you just ain’t lookin’ hard enough.

If, on the other hand, your dishwasher has been visited by a “professional” appliance tech and you really, really can’t find the tech sheet, then that can only mean one thang: the sorry sumbeech done stole it from you!

You should always use the specific tech sheet made for your exact model number. For example, if you have a GE Quiet Power III, Model GSD5610D02AA, and you just can’t find your tech sheet, you can borrow my copy (just be sure to return it):

Tech sheet, page 1

Tech sheet, page 2

Tech sheet, page 3

You can order a replacement tech sheet for your model directly from GE for a nominal fee.

No Paypal Account but Need Personal Help from the Samurai on an Appliance Repair Problem

MESSAGE SENT THROUGH YOUR WEBSITE

IP Address: 64.172.176.75
name: Robert

I would like your help fixing a washing machine. I don’t have a paypal account and want to make alternate arrangements.

How do we do that?

Your appliance is broken and you know you need Live Help from the Samurai. Only problem is that you don’t have a Paypal account. Hey, nolo problemo, Budrow! Use Google Checkout instead:

Come, read more about the Samurai’s unique Live Help program.

If you want an alternative way of making your love-offering to the Samurai Appliance Repair Forum, use this Google Checkout button:


The Genesis of Samurai Appliance Repair Man

Samurai! Whoa, dude, you are something else. Every time I get on the site to look something up I end up getting sidetracked by a lot of other stuff you’ve written. Haikus?!? Kinda weird, man. I can’t help but wonder – have you always been an appliance tech?

_______________________________
The above message was sent when you were offline, via your Timpani site.

Message sent from IP: 68.237.130.186

Ah, Grasshoppah, your query warms my cockles. My real beginning in learning the ancient martial art of Fixite Do goes back to the Navy in the late 70’s where I repaired aircraft navigational appliances as a snot-nosed teenaged enlisted puke.

After my sentence in the Navy, I went to collitch so I could learn how to spell words like “collitch.” Afterwards, I took a Dilbert detour and led a life of quiet desperation working in cubicle farms designing industrial refrigeration appliances.

About 12 years ago, someone shared the Gospel according to St. Applianopoulous with me. I accepted the Lord Fixus as my personal guru and I converted to the Appliantology faith. After my baptism, I was renamed to Samurai Appliance Repair Man. The old me is dead, all things are made new in Fixus! My new faith has informed my particular style of Fixite Do ever since. Amen.

Wolf Oven Goes BANG!

Dear Samurai Repair Man:

I have a question regarding my new Wolf wall oven. Within a few minutes of turning the oven on to bake or broil, it makes a loud bang. Is this due to heat expansion and is it a problem?

Thank you for your time.

Best regards,
Tracy

_______________________________
The above message was sent when you were offline, via your Timpani site.

Message sent from IP: 69.37.154.88

The operative word here is “new,” as in, “still under warranty.” If this is a gas oven, call Wolf and stay on their corporate azz until they completely and utterly eliminate this problem. This could be caused by improper ignition of the gas fuel in the burner. If left uncorrected, this condition can get progressively worse until, one day, after you try to light the oven, the door blasts across the kitchen like a cannon shot. In that day, may St. Applianopoulous, patron saint of appliance techs all over the world, be watching over you.

If the wall oven is electric, you should still insist that Wolf correct this. It most likely does not present any kind of danger but, given the price tag on these ovens, it is reasonable for you to expect that this oven is perfect. If they give you any grief, ask them why Whirlpool can make a $600 wall oven that doesn’t bang and clang but Wolf can’t do this even at four times that price!

Mega-trends in Appliance Repair

I can’t remember the last time the major news media deigned to spill a little ink on us humble, hardworking (but damn good-looking) appliance repair guys. But the Washington Times recently ran an article about interesting trends in the appliance repair trade. And it wasn’t in the Obituary section, either! One of the outstanding features of this article is that it features some quotes by yours so very truly:

“It’s a dying trade,” said Scott Brown, Webmaster of www.fixitnow.com and self-proclaimed “Samurai Appliance Repairman.

”The reason for this is twofold,” Mr. Brown said, “The cost of appliances is coming down because of cheap overseas labor and improved manufacturing techniques, and repairmen are literally dying off.”

This is true as far as it goes, but he omitted the other side of the equation here, which is people’s perception of appliance repair technicians. Perception is important because if a person doesn’t trust the appliance servicer, then he will opt to buy a new appliance simply to avoid getting slimed by what he believes to be a sleazy servicer. To quote from my widely-acclaimed screed, Appliance Repair: A Dying Trade

Appliance techs are already behind the eight ball the moment they walk in the customer’s house. Most people have been conditioned by 60 Minutes and other tabloid TV shows to view appliance repair techs as morally deficient cretins whose main objective in a service call is to screw the customer.

Granted, there are lots of charlatans and cretins out there, like this jive-turkey from Sears A&E. I get horror stories everyday by email or in the repair forum. But most independent appliance servicers are conscientious and highly skilled tradesmen who’ve invested thousands of hours learning the basic skills, keeping up with the new models, and honing their craft in the field.

The Washington Times article includes some interesting and revealing quotes from appliance service companies:

“Nowadays appliances are cheap, so people are just getting new ones,” said Paul Singh, a manager at the Appliance Service Depot, a repair shop in Northwest. “As a result, business has slowed down a lot.”

“The average repair cost for a household appliance is $50 to $350,” said Shahid Rana, a service technician at Rana Refrigeration, a repair shop in Capitol Heights. “If the repair is going to cost more than that, we usually tell the customer to go out and buy a new one.”

But wait! This is only true for cheap appliances! What if the customer has a $4,000 Dacor wall oven or a $3,000 Sub-Zero refrigerator? In these cases, even if the repair costs $700, you’re still better off repairing than buying a new one. Granted, you won’t be happy about it, but that’s the simple, economic reality. The mistake the Wash Times article makes is in not recognizing that low-end appliances and high-end appliances are two different worlds. In the former case, the trend is going exclusively to replace or DIY repairs; in the latter, there are ample opportunities to build a profitable service business provided your business is located in an area with lots of high-end appliances.

Appliance service companies who place absolute dollar limits on the cost of a repair without regard to the type of appliance being repaired deserve to go out of business. And building a service business around repairing lower-end appliances is a recipe for bankruptcy– these companies will go the way of the dinosaur and the VCR repair company. And they should. That’s why the free-market is so efficient at delivering goods and services– losers get pruned from the money tree. That’s another reason I recommend that service companies focus on servicing high-end appliances and leave the bottom-feeders to DIYers.

What we’re really seeing here is a stratification of the customer base: there are those who buy only the cheapest products and there are those who are willing to pay more. If you choose to buy lower-end appliances, plan on doing your own repairs because it simply won’t be cost-effective to have a professional technician repair it for you. That’s where Fixitnow.com comes in!

But suppose you pay $4,000 for a Miele or Dacor wall oven and it needs a repair after two or three years. In this case, throwing it out and getting a new one is simply not a reasonable option. And often, finding skilled technicians who work on the high-end brands can be difficult and will doubtless be more expensive. Once again, Samurai Appliance Repair Man gallops to the rescue by helping you fix it yourself. In addition to saving big bucks, fixing it yourself often results in a more timely, better quality repair than if you had hired a professional. How ‘bout them apples?

The Wash Times article continues:

It’s not uncommon for today’s repairmen to condemn an appliance instead of fixing it for the sake of their customers’ wallets.

If they decide to repair an appliance that is likely to break down again, repairmen are criticized by their customers and often lose business because of a damaged reputation.

Mr. Jones said he based his repair decisions on the 50 percent rule: “If the cost of service costs more than 50 percent of the price of a new machine, I’ll tell my customers to get a new one.”

More silliness. Mr. Jones’ rule-of-thumb fails to take into account the age of the appliance. If you have a two year old washing machine that cost $400 new and the repair costs $200, how does it make sense to junk it and buy a new $400 machine? Not only are you spending $200 more than you would for the repair, but what makes you think the new washer will last any longer than your existing one? Buying a new appliance in this situation is like cutting off your nose to spite your face.

The proper framework in which to think about the repair vs. replace question is by thinking in terms of Appliance Half-life®:

Appliance half-life is defined as the number of years after which it would not be cost-effective to repair half of the appliances in the group. For example, if the half-life of all dryers is 13 years, this means that in a group of 10 dryers, all 13-years old, it would be cost-effective to repair only five of them. The other five would be too badly deteriorated from abuse, poor quality, heavy use…whatever, to cost-effectively repair them. I have repaired dozens of 25-year old Whirlpool dryers that only needed minor repairs. I’ve also seen 10-year old Whirlpool dryers that were so far gone and would have needed such extensive repairs that I recommended the customer buy a new one. By the way, I’ve also seen 4-year old GE dryers that were ready for the trash heap the day they were built.

(For a more detailed explanation of Appliance Half-Life®, see this article.)

Continuing with the Wash Times article:

Mr. Brown acknowledged this trend. “Lower-end appliances which you can buy for $200 to $300 are basically throwaway appliances,” he said. “They are so inexpensive that you shouldn’t pay to get them repaired.”

He accurately quoted what I said you should not do in this case, but he omitted what I said you should do: fix it yourself! Doing the repair yourself definitely tilts the entire repair vs. replace question squarely into the repair camp, even for low-end, bottom-feeder brands and models. You can save hundreds of dollars doing your own repairs and that’s exactly what Fixitnow.com is all about.

Modern, energy-efficient refrigerators can cost as much as $5,000 to $10,000, and with such a hefty price tag, throwing one away is not an option.

In some cases, repairmen can help consumers reduce the amount of aggravation that a broken appliance will cause.

Consider the time and effort it takes to shop for a new appliance, wait for its delivery, remove the old one and get the new one installed.

In addition, certain appliances such as ovens and washing machines can be a bigger hassle to replace because they are connected to gas and water lines.

“It takes your time, it takes your effort, and if you don’t install the new appliance, you’ll have to hire a service technician to install it anyways,” Mr. Brown said.

I label this cost as “aggra-dollars.” That is, the aggravation and time spent that goes along with shopping for a new appliance, having it delivered, getting it installed, and disposing of your old one. If you’ve not experienced this joy recently, you’ll realize that the aggra-dollar factor can be a very significant cost.

Interestingly, the Reason.com blog picked up on this story and posted a commentary on it. I’m usually impressed with Reason’s analysis of economic issues and am squarely in the small-L libertarian camp on all issues, social and economic. But, in this case, Reason’s Nick Gillespie missed the bigger picture:

Every revolution has its casualties, and this fascinating Wash Times article points to a quiet, barely-noticed increase in the quality and longevity of household appliances.

Hello? This statement makes me wonder if Mr. Gillespie really owns any appliances! The reality is that, for appliances built today, you’ll be doing some type of repair on them every two to four years, regardless of brand. This is an industry average across all brands so some models will require more frequent repairs and others less. The real variable among brands is how severe that repair will be. For example, will you be replacing the motor in your dryer ($100 part) vs. just the thermal fuse ($25 part). Anyone who’s purchased a new appliance in the last ten years has experienced this first-hand. And we professional appliantologists have been seeing this trend for about ten years now.

So, tip o’ the hat to Bryce Baschuk at the Washington Times for starting a serious conversation on this topic. Also, the few times I’ve seen appliance techs discussed in Big Media was for the sole purpose of portraying us as a bunch of slimey, thieving cretins out to screw the customer. Kudos to Bryce for bucking that trend and portraying us techs in a sympathetic, if not positive, light.

Magic Serial Number Decoder for GE Appliances

If you are one of the millions of victims who own GE appliances, then at some point you may need to know when they were manufactured. Fun fact to know and tell: the year of manufacture is not the same as the model year of the model number. GE does it this way to help confuse and befuddle you when you’re trying to find information about your appliance… such as how old it is.

Fret not, my leetle grasshopper; as always, the Samurai is here to illumine your steps and make straight your path.

Magic GE Serial Number Decoder - click for larger viewThe serial number consists of two letters followed by six digits. The two prefix letters indicate the month and year the appliance was manufactured. Look up the two-letter serial number prefix in the magic serial number decoder, shown here– click it so you can actually read it, Homer.

Notice that the code sequence repeats every 12 years as an occult message to the Illuminati, Skull and Bones, and other secret societies about the emergence of the Anti-Christ. Either that or they just ran out of code combinations. But the occult message scenario is much more interesting.

Maytag Neptune Washer Tripping GFI Circuit Breaker

Affected Models: MAH2400AW*, MAH2440AW* and MAH2440BG*

So, your nearly-new Maytag Neptune washer is tripping the GFI outlet for no apparent reason. If you’re sure the GFI outlet itself isn’t at fault, then the problem may be moisture running down the wire harness and into the motor harness connector. This can cause corrosion of the terminals, premature motor failure and, by the way, trip the GFI.

Maytag Neptune Motor Wiring Harness - click for larger viewIf the wire harness and terminals in the motor connector are still in good shape, Maytag recommends wrapping the wire harness with special foam tape to keep water out of the harness. The better fix is to replace the entire wire harness because it includes a drip loop for additional protection.

Do I really need to say, “Click the thumbnail for a larger view?”

Whirlpool Duet Front Loading Washer Walks or Vibrates During Use

Affected Models: GHW9150P_0, GHW9160P_0, GHW9300P_0, GHW9400P_0, GHW9460P_0 with serials numbers CSR2600001 through CST0600001

Here’s a punch list for tracking down this emerging problem with this otherwise decent washer.

NOTE: If the washer is installed on a pedestal, begin at Step 1. If the washer is not installed on a pedestal, start at Step 3. For more detailed information, start a new topic in the repair forum.

Whirlpool Duet Washer Footing1. Make sure that each of the washer footings has a foot pad– see photo. I know, this seems like such a no-brainer that it’s hardly worth listing. But after running this site for 10 years, I’ve learned not to over-estimate my grasshoppers.

2. Make sure the four screws attaching the washer and pedestal together are tight.

3. Check the levelness of the washer. Now, level means more than just bubble level, although that’s part of it. It also means to ensure that each footing is bearing about 25% of the machine’s weight. How to do this? Keep reading…

4. Verify that all four feet are in firm contact with the floor. To do this, push and pull on the opposite corners (left rear/right front, right rear/left front) of the washer. If there is any movement front to back, you will need to adjust the feet. Adjust the appropriate front leveling foot to eliminate the movement. If the right front corner is moving, adjust the right front foot. If the left front corner is moving, adjust the left front foot. Is easy, da?

5. Ensure that the leveling feet locknuts are tight against the bottom of the washer or pedestal cabinet, not the footpad. See the photo.

6. Tighten the leveling foot locknuts, if necessary.

7. Run a test load consisting of 11-12 medium-size towels in the Rinse/Spin cycle and determine if the washer is a vibrating or walking. If the washer is not walking, proceed to Step 11.

8. If the washer is walking, clean the floor and leveling footpads thoroughly and be sure they are dry.

9. Repeat step 7 to confirm improvement.

10. If the washer does not walk, but there is vibration that is still unacceptable, skip to Step 12.

11. If there is only vibration, is it an acceptable amount of vibration felt in either the home or washer? This is obviously a subjective call; you can get as anal as you want here. Just remember that when you have something big like a washer drum spinning at 1,000 rpm, you’re gonna have some vibration, Hoss. As Scotty told Capt. Kirk, “I canno’ change the laws of physics, Captain!”

12. If you’re still not satisfied, replace the suspension dampers and tub springs with this kit. It comes with an instruction sheet.