Monthly Archives: May 2008

Refrigerator Blowing Warm Air in the Icebox

Bob Kazmerchek wrote:

Hi,
My 2001 Whirlpool refrigerator has stopped cooling anything. It still runs and I believe the fan must be still working – but the air being blown into the icebox is not cold. Nothing freezes and nothing is cold in the main part of the refrigerator. Is it worth it for me to pay a repairman $65 just to come look at it or should I just buy a new one.
Thanks!
Bob K.
P.S. I vacuumed any dirt that was on the coils but that didn’t help.
7 years for a fridge seems so short.

My first move on this fridge would be to see if the compressor is actually running and not just doing the infamous hummm-CLICK. Once I verify that the compressor is starting and running normally, then it’s time to tear apart the freezer. Everything comes out and the back wall gets removed so I can feast my calibrated eyeballs lovingly upon the evaporator coil while the compressor is running. What I’m looking for here is the frost pattern on the coil. Based on your complaint, I’d expect to see one of three situations (doesn’t matter if your fridge is a side-by-side or top-and-bottom, the frost patterns are the same in all configurations so don’t let the variations in the pictures confuse you):

Evaporator Coil in a Side by Side RefrigeratorNo Frost At All
This is bad. Remember, we’re looking at this coil with the compressor running, so if everything was peachy, I’d expect to see a light sheen of frost on 2/3 of the coil. No frost at all means either the compressor is “plum wore out” (that’s a technical term, please don’t use it unless you have a valid EPA refrigeration certificate) or the freon has leaked out. Either way, for most refrigerators today, that means you’re going shoppin’.


Inefficient RefrigeratorSingle Glob of Frost or Iceball
This is also bad, and same deal as above. Same remedy, too.


Iced-over Evaporator from a Failed Defrost System
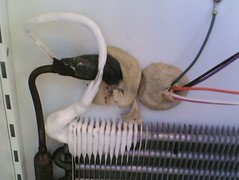
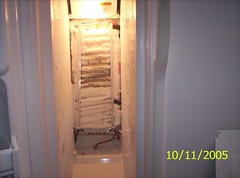
Heavy Frost on the Coils
This is good! This indicates a defrosting system failure which is a simple control problem. It also means that the sealed system (compressor, evaporator coil, and all associated tubing) is fine as wine in summertime. Defrost system problems are easy fixes that anyone with a pulse can do with maybe just a little help from their friends. The problem will either be the defrost timer (or Adaptive Defrost Control board, if so equipped), the defrost thermostat, or the defrost heater. To locate these parts in your fridge, check out these cool, interactive parts diagrams.

If you’re still confoosed about disassembly or about what you’re seeing, come talk to us in the Samurai Appliance Repair Forums for personalized, interactive help from Master Appliantologists, including yours so very freaking truly.

To learn more about your refrigerator, or to order parts, click here.

Electric Clothes Dryer Power Cord Conversion

susan wrote:

I need to change the wiring on Electric clothes dryer from 4 wire to 3 wire plug. original 4 wire was color coded but the 3 wire is not. am i to assume that the middle one is the neutral and the other two can go on either post? Hope you can help me – thanks!

When it comes to electrical stuff, I follow this hard and fast rule: NEVER ASSUME ANYTHING! And the truth is that in this modern age of readily available, inexpensive (even after accounting for inflation), and easy-to-use multimeters, you don’t have to!

Let’s take a look at your three-wire power cord, like this one ratcheer. 3-Wire Dryer Power Cord, click it to git it, Slick. Notice that it has two straight spades set at an angle and the middle spade is L-shaped; this is so that it can only fit into special electric dryer outlets like this one. That L-shaped spade is for the neutral connection and should correspond to the middle conductor. Note that I said “should.” This is where we get to the part about not assuming anything; and we don’t have to ‘cuz it’s easy enough to verify using our multimeter.

What’s that you say, you don’t even have a multimeter much less know how to use one? Well, now, that’s a problem that’s easily remedied! Kommen zie hither, bittë, and grok ye on my world-famous quick ‘n eazy guide to making basic electrical measurements. Go on, click it and read it over real quick-like, I’ll wait. Pay particular attention to the part about making continuity measurements ‘cuz that’s where we’re going with all this.

See? Was easy, da tovarish? Now, just take your multimeter and set it to measure resistance so we can do a continuity check. With one probe on the L-shaped spade and the other probe on the middle terminal at the other end of the cord, you should read full continuity. If you do, then you’re good to go– you have just verified that the middle wire of the cord is the neutral wire.

To learn more sweet mysteries of dryer cord wiring, come hither. And if you need parts, repair manuals, or accessories for your dryer, come git you some!

To learn more about your dryer, or to order parts, click here.

Kenmore / Frigidaire Front-Loading Washing Machine Fills with Water but Won’t Run

william pearson jr wrote:

Have a kenmore front load washer that will not start only fill with water model # 41741042000 can you help me

The first thing I’ll help you with is punctuation. Start with this handy, concise punctuation guide; go ahead a bookmark it now. In particular, focus your bloodshot squinties on the first step in the guide:

The question mark ( ? ), used at the end of a sentence, suggests an interrogatory remark or inquiry.

This is especially important when you’re writing to someone at their website and requesting their expert advice. Contrary to the opinion of the Great Unwashed Illiterati (GUI), the Internet is still largely a written medium despite the proliferation of Youtube and porn sites.

And commas are nice, too.

As for your washer, the problem could be one of several things. But rather than write a bunch of techno-twaddle that no one bothers to read, I’m going to tell you how to start troubleshooting this yourself and how you can get more help if you need it.

If you’ll remove the bottom quarter panel from the front of the washer (two 1/4″ hex screws at the very bottom) and then peer intently into the dark compartment using appropriate artificial illumination, you’ll find a large envelope pasted to the inside of one of the side walls. Therein ye shall find detailed tech sheets, complete with troubleshooting guide and wiring schematics. Extract from envelope using your preferred hand and grok said material intently whist consuming your flavorite fermented grain beverage.

If, after consuming sufficient quantities of aforementioned beverage, you find yourself no closer to a solution, come ye hither and pour out your love-libation to the Samurai Appliance Repair Forum, start a new topic in the Laundry Appliance Repair Forum and we shall gladly assist you. And ye shall know the truth, and the truth shall make you free.

To learn more about your washing machine, or to order parts, click here.

Desperately Seeking Chill

Temple Romberg wrote:

I am desperate. They say my refrigerator is not fixable due to a clogged defrost line. i don’t believe them and want to try to fix it myself. we can’t aford a new one. My husband is a football coach and not very good atthis stuff, but i want to give it a try. I am desperate. Thanks.

Awwite, darlin’, time to roll up your sleeves, grab ‘hold of them fem-nads and dominate that beast! Then come grok ye on this repair tome to kick some cool back into your box… er, icebox, that is.

To learn more about your refrigerator, or to order parts, click here.

Replacing the Door Latch Assembly in a Kenmore / Frigidaire Front Loading Washing Machine

paul cowan wrote:

I have a Sears 417.42142100 front loading washer. I have the tech sheet and I have followed it. I am pretty sure that I have a problem with the door switch.
How do i replace it? Getting the back off and performing electrical checks is easy, How do I get the front off to get at the door switch?

Ahh, Grasshoppah, this is one of those repairs where less is more. If you were to actually remove the front panel, you would find yourself wallowing in the Pit of Perpetual Despair (POPD) and lamenting the resulting mess that you had created.

Come with me now on a Journey of Grand Illumination (JOGI) and observe the Technique of the Master (TOTM)…

You mentioned that you have already procured the Door Switch Assembly (DSA) for your model. For others reading this post, you should use your model number and look up the door switch assembly for your specific model since there are a couple different versions out based on model number.

Mounting Holes for the Door Latch Assembly (superceded) in a Frigidaire / Kenmore Front Loading WasherWisdom! Let us attend! Here, now, I present the TOTM that you’ve all been longing and panting for. Wallah! Uhhh… you know you can click the little pic to enlarge it and read the illuminating commentary, don’t you? Oy! Anyway, once you remove the Top Panel (TP) and peel back the Door Boot (DB), it’s all plug n’ chug. Reattach the DB to the front panel with a couple strategically-placed dabs of rubber cement.


Speed Control Board, Shown with the Revised Door Latch Wiring Adapater, in a Frigidaire / Kenmore Front Loading WasherNow, if Allah has not grinned down upon you and it turns out you have the older style DSA for this machine, well, let’s just say that there ain’t no virgins waiting for yo azz in Paradise, if’n you get m’drift, Slick. Nawsir, you’re in for a bit of Weeping and Gnashing of Teeth (WAGOT). You’ll have a bunch of wire chasing to do and chances are you’ll screw it up the first five tries. The DSA kit comes with instructions but, of course, they suck. The anatomy layout picture shown here will hepya but, dayyam, I’m glad I ain’t you. Been there, done that.

To learn more about your washing machine, or to order parts, click here.

Latest Bosch Dishwasher Use and Care Manual

For Models: SHE44C / SHE46C / SHE47C / SHE56C / SHU43C / SHX46A / SHX46L / SHX43E / SHV46C / SHE43F / SHE43M / SHX43M / SHE45M / SHV45M / SHX45M / SHE55M

In case you lost yours, you can borrow my copy. Just be sure to return it when you’re done. Domo!

If’n you need parts for your dishwasher, come git you some! And if you’re having a problem with it, come start a new topic in the Samurai Appliance Repair Forums and we’ll hepya whup-up on that bad boy.

To learn more about your dishwasher, or to order parts, click here.

Frigidaire / Kenmore Washer Makes Loud Noise in Spin

cl jansen wrote:

I have an almost 6 yearold kenmore frontload model 907C4106200 that has just in the last month started leaving grease or somthing on my clothes and gets very loud in the spin cycle. I was told that is was the rear bearing? cost 800.00 to fix. this was diagnosed over the phone. What do you think?

I think it’s time to stop relying on phone or Internet diagnoses and do your own!

Rear Drum in a Frigidaire (Kenmore) Front Loading WasherRemove the back panel. If you see a scat-job looking mess back there, like shown in the thumbnail (click to enlarge), then you have the infamous failed drum bearing. This is one whopper of a job, even for seasoned techs. Now may be a good time to go shopping. But, if you’re looking to indulge your inner masochist, this topic in the repair forum will get you started with the repair.

Maytag Appliance Use and Care Manuals

Roni Finkelstein wrote:

Your Precious Words: I own a Maytag Neptune clothes washer but have lost the manual. What does the “colors” button do as opposed to the “whites” button?

Normally, you could just download a new manual from the Maytag website. But the clever webmeisters at Maytag, ever thinking of you, the consumer, have added something special. Note with awe their slick Adobe flash presentation. If you move your mouse over the block that says, “Manuals and Literature,” the words move up and more words appear saying, “Download PDF owner manuals & product brochures.” Now click your mouse and… nothing happens! It’s brilliant! I need to do stuff like that here at my site: slick-looking but non-functional visuals. Awwwesome!

Use the Forum, Luke!

One of the main features of this site is the whirled-flamous Samurai Appliance Repair Forum. Grasshoppers by the buttload, er, I mean, boatload come to the forum for expert help from Master Appliantologists with their insolent appliances.

Recently, Grasshopper Ed joined the forum and sent me a private message (PM) from within the forum:

I have a sub zero ref model 561 serial number M739803.

Freezer is working fine but the refrigerator set at 10 on the thermostat isn’t cooling teh refrigerator it only get to around 52 degrees and I believe it should get cooler than that? Any suggestions?

Ed

I politely reply and tell him he should post his question in the forum because, afterall, this *is* a forum and that’s how things are done… in a forum. He then emails me:

from Edward Gronske egronske@g****.com
to samurai
date Sat, May 3, 2008 at 6:18 PM
subject RE: New PM from Samurai Appliance Repair Man

If I wanted to do that why would I have sent a private message – how do I go about getting a refund, I didn’t know I had to do this via the common message board.

So, lemme get this straight: he comes to an appliance repair FORUM for help, pays five measly beans for a lifetime forum membership and then cops ‘tude because *GASP* he has to actually post a question in the forum to get help!? It’s not like he would have had to divulge that he wears his mother’s underwear or licks urinals at the Texaco or anything personal and private. I mean, c’mon, it’s appliance repair not True Confessions!

Folks, puh-leaze, don’t be a cheesedork like our dearly departed Ed. If you need appliance repair help, start a new topic in the appropriate forum. PMs are great for questions about how to use the forum, what kinda beer ya drinkin’, how’s your momma an’ them, etc. But the real power of a forum is that others can come along and add to the discussion and/or benefit from it.

Domo!

Maytag SE1000 Dryer Flashing Error Code 6E

The 6E error code on this dryer part of this pretty decent stacked laundry unit means there’s a temperature control problem. Le Manuél identifies three suspects: thermistor, wire harness, and control board. Now, if you were to put on the blinders and go by only what Le Manuél says, you may miss something else altogether that’s causing the problem. A clever DIYer posted the results of his struggles with this very problem. I’m posting his report here for your edumucation not so much for what he found, but to illustrate the process of troubleshooting and problem-solving needed to fix anything, whether it’s a broken dryer or a broken economy. The mental skills are the same: you need to be willing the see the problem as it really is so that you can apply the correct remedy. In other words, the first step to problem solution is problem identification. And not all problems have cookbook solutions. The single best tool you have in appliance repair– or in any other problem you’re grappling with– is that oil-based computer betwixt your ears.

I thought the following may be of interest to anyone tussling with the Maytag SE1000 stacked dryer-washer unit. I have been experiencing an intermittent problem of the unit dying with the cryptic message 6E on the dryer readout. I discovered this was fixed by jiggling the connectors to the microprocessor board. But finally, it died and didn’t come back to life, no matter how I harassed it.

So I took the microprocessor board out of the unit and looked it over very carefully with an Optivisor, in the hope of finding a bad connection or something else which might explain this behavior. Because the message 6E is supposed to mean that the ambient temperature is too low, I concentrated on the wiring to and from the thermistor. Then I found that the thermistor, which is off the board, is connected in series with a small potentiometer, which is mounted on the processor board on the opposite side to where the connectors are. So it is hidden until you remove the board and panel unit.

This potentiometer was faulty. It registered a much higher resistance than it should have, and I found it was prone to go open circuit when I stressed the board slightly. So I presume that the frequent temperature changes in the dryer cabinet have, over the years, caused the potentiometer to wear a dead spot in its track. By simply turning the potentiometer very slightly, I was able to get it off the dead spot and found it working properly again.

It doesn’t surprise me at all that a potentiometer in that environment would be a weak link with a high expectation of eventual failure. But tweaking a pot sure beats paying $300 for a new processor board!

To learn more about your dryer, or to order parts, click here.