The Samurai’s 12-Step Program for Replacing the Shock Absorbers in an Asko W600 Washing Machine

by Samurai Appliance Repair Man on December 9, 2009

in Washer Repair

Asko W600 Washer Shock Absorber Replacment.jpg

1. Buy the replacement shock absorber kit here.

2. Front Shock Absorbers: Remove the front panel or lower cover panel. Rear Shock Absorbers: Remove the rear panel (12, #20 torx screws around the rear panel).

3. Remove the shock absorber nuts under the rear plate.

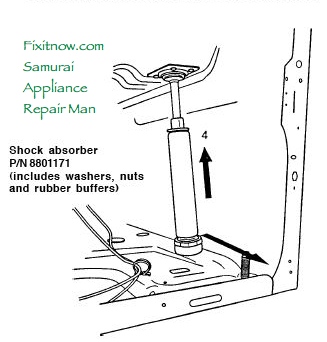
4. Support the holder from underneath or secure it with a hook from above.

5. Compress the shock absorber. Angle it outwards and pull it off downwards.

6. Take off the piston rods.

7. Remove the rubber buffers.

8. Install new rubber buffers (included with the new shock absorber kit).

9. Compress the shock absorber and put it into position in the bottom plate.

10. Fit the nut on the underside and tighten it.

11. Front Shock Absorbers: Replace the front panel or the lower corner. Rear Shock Absorbers: Replace the rear panel.

12. Pop a cold one and buy me one while you’re at it. Domo!

To learn more about your washing machine, or to order parts, click here.


You may also like...

  1. Removing/Replacing the Shock Absorbers in Kenmore Elite HE3/4 and Whirlpool Duet Washers
  2. Replacing the Door Latch Assembly in a Kenmore / Frigidaire Front Loading Washing Machine
  3. Replacing a Water Inlet Valve for Some Common Top-Loading Washing Machines
  4. Asko W600 washer fills, clicks…
  5. Step-by-step instructions on replacing the door boot seal on Frigidaire, Electrolux, Crosley and Kenmore front-load washers
  6. Replacing the Transmission in a GE Top-Loading Washing Machine
  7. Replacing Motor Brushes in Washing Machine Motors
  8. The Famous Three-Step Samurai Appliance Repair Program
  9. Replacing the Agitator Dogs in a Whirlpool Direct-Drive Washing Machine
  10. Service Manual for the Kenmore Front Loading Washing Machine

Previous post:

Next post:

Real Time Web Analytics