Monthly Archives: December 2009

Apprenticeships in the Samurai Appliance Repair Forums

Anyone can surf into the Samurai Appliance Repair Forums, search topics and read all they want absotootly free. You can even register as a Grasshopper for free. But if you want to start a new topic, reply to existing topics, send private messages, and download any of the thousands of illustrative and illuminating attachments, you have to be an Apprentice Appliantologist.

Back in March 2009, I unveiled the new forum Apprenticeships available to seekers of higher appliantological wisdom. Here they be:

After you’ve registered in the forum, you can select your type of apprenticeship on the subscriptions page.

As indicated, the Permanent Apprenticeship is the best value because not only does it never expire (so you never pay again, even if we have to raise the fee) but you get access to the Samurai’s coveted repair manual stash. I’m adding new manuals all the time and the file collection continues to grow. We’re busting at the seams! As you probably guessed, the repair manual stash uses a huge amount of disk space for storage and bandwidth to serve all those files. For now, my costs for this are stable and I don’t anticipate having to raise the fee. Hopefully this won’t change too much when the mis-named Dollar (really just a Federal Reserve Note, read the back of one) finally takes the nose-dive that everyone’s expecting.

I’ve had several people email me complaining that full access to the forum should be free, “… ‘cuz it’s on the innernet, an’ all.” And I thought to myself, I said, “Self, that’s a ding-dang good line, I’m gonna try that one on my web host and file service provider and my other site-related vendors that I use to keep my sites running.” Well, guess what? They all told me to go jump in a frozen New Hampshire lake. And I guess my time running the site (which is considerable) shouldn’t count for anything either.

Nevertheless, since the Samurai is merciful and compassionate, slow to anger and of great gootness, I recognize the tough financial times we live in and so created the Appliantologist Merit Exam as a way for folks to earn an apprenticeship without having to pay anything.

Lots of folks have taken the exam. As they say in the Dojo, “Many have tried; many have died.” Nah, it’s not that hard– the exam has a pass rate of about 60% so most folks who take the exam pass it. You have to score over 75% on the exam to pass and you’ll become a Merit Apprentice Appliantologist. If you ace the exam, you’ll join a small, elite group of Buckaroo Banzai Appliantologists— less that 5% of examinees achieve this distinction.

But there are a couple of downsides (aren’t there always?) to going the exam route vs. paying:

  • The exams are graded by hand, which means you won’t have full access until I grade your exam. Since I’m just one guy (albeit, one very talented and good-looking guy) and I get slammed with lots of exam results every day, it could be a few days to a couple of weeks (sometimes more *gasp*) before I get to your exam. But, maybe the wait is worth five measly beans to you. Your call.
  • The current Merit Apprentices (but not the Buckaroo Banzais) will all expire when the new exam is released. I originally intended to write a new exam every quarter but, as usual, that was waaay too unrealistic. However, a new exam will be written sooner or later. When that happens, the Merit Apprentices will all revert back to Grasshopper status with its limitations. At that time, you can either take the new exam or purchase an Apprenticeship.

The Appliantologist Merit Exam is meant as an alternate route to Apprenticeship. So if you’re already an Apprentice Appliantologist of one flavor or another, help save what’s left of a senile Samurai’s sanity and don’t take the exam– I barely have enough time to grade all the exams from Grasshoppers as it is. Muy domos, compadre!

Warning: Appliantology Newsletter Has Escaped!

appliantology winter 2010 thmb.pngWe are issuing this urgent warning to the general public: the latest issue of our newsletter, Appliantology: The Oracle of Appliance Enlightenment, has somehow escaped the plantation. It was last seen running naked and screaming incoherently across the Web. If you happen to come across it, please DO NOT approach it; keep your distance as it may be armed with lethal ideas which could endanger the health and well-being of the statist control grid. Please contact the Internet Newsletter Authority (INA) immediately.

Domo!

The Concerned Crew at Fixitnow.com Samurai Appliance Repair Man

Safely Subscribe to Appliantology

Removing the Front Panel on a Maytag SDE5401AYW Dryer

Kameron Lyne wrote:

your website is fabulous but I’m having trouble trying to find disassembly for my Maytag dryer model #SDE5401AYW. Ther does not seem to be any screws in the front. I tediously removed screws from back and around the bottom last night, but that didn’t get me to the drum. I think I need to replace my belt, but I can seem to access the drum easily. All the diagrams you have on your site don’t match my dryer. HELP! husband is at laundry mat drying clothes right now as I try to fix…doesn’t that seem backward? Thanks for any input I hope the picture helps.

Ahh, grasshoppah, this is indeed a sublime repair kata that the Samurai is pleased to impart to you. So let’s fire up a spliff, er, I mean, a stick of your favorite incense and contemplate the zen of dryer disassembly.

Before starting, make sure the dryer is unplugged. To remove the front panel, you first need to “pop the hood.” The top panel is attached to the front panel by C-clip springs, which you can see in this picture labelled Item 8. Use your short katana to press the C-clips in at the locations shown here. A stiff putty knife will also work but isn’t nearly as artistic.

Now you can prop up the top panel and remove the two screws– one on each side– holding the front panel to the side panels. Stick your head in and look at each side up top, you’ll see ’em.

Can you snatch this pebble from my hand, grasshoppah?

Related Post: Dryer Disassembly

To learn more about your dryer, or to order parts, click here.

PF Fault Code in a Whirlpool Direct Spark Ignition (DSI) Gas Range

JIM wrote:

we are trying to repair a model gw395leps03 gas range.the control panel went dead so we bought a new one,installed it and it now shows pf code which means power fail.we turned breaker off and waited ands turned it back on still the same pf. we called whirlpool tech line and told them of the problem the said they have never heard of that happening and will get back to us in 3/5 days. can u figure it out? thank you

Looking at the tech sheet for your range, I see that you are another victim of the infamous direct spark ignition system. Personally, I’m not a big fan of these because they have a history of being finicky. I much prefer the good ol’ hot surface ignition system because of their simplicity and robustness. But, we can’t always pick our battles. So let’s unsheathe our katanas and kick some insolent appliance butt…

I’m surprised the Whirlpool tech line didn’t tell you that this is known problem with these DSI ranges. Whirlpool even put out a tech bulletin on this very problem waaay back in aught-two. Turns out one of the unique problems with this ignition system is that the spark module is susceptible to noise on the electrical line.

Transients, spikes, and harmonics are the more common types of garbage on household electrical circuits today. These power quality problems are increasingly common today due to the prevalence of computers and other devices that crank out electrical noise. But that’s a topic for another post, which you can read more about ratcheer.

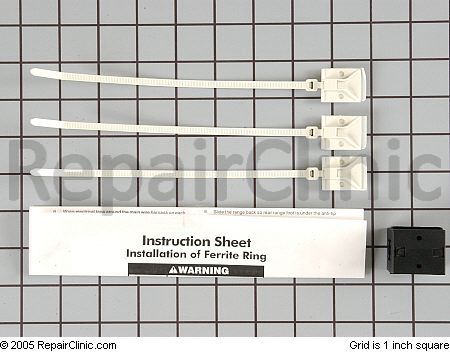
Fortunately, there’s a reasonably simple solution to this problem… at least in so far as it affects your range. Whirlpool recommends that you install this noise filter kit.

To learn more about your range/stove/oven, or to order parts, click here.

Kenmore Gas Range, Oven Won’t Fire Up

nancy sheeley wrote:

i was given a kenmore gas range with solid stae ignition ,it worked before but since we hooked it up and plugged it in the pilots won’t work, i can light the top burners with s match but the oven won;t come on becouse of the electric ignition, i don’t even know where to find a fuse and i can’t light it with a match

Gas ovens with electric ignition come in two flavors: hot surface ignition and direct spark ignition (DSI). Since you didn’t give a model number, I have no way of knowing which type yours is. But don’t you fret none, li’l darlin’, ‘cuz the Samurai has posted pearls of wisdom on each type of electric ignition system used in gas ovens today. Just click the links below and grok on.

Hot Surface Ignition Systems

Direct Spark Ignition Systems

To learn more about your range/stove/oven, or to order parts, click here.

Samurai Dryer Repair School: Now Accepting New Students

Dryer no workee but you have no idea how to even begin fixing it? No worries, grasshoppah, the Samurai’s got just whachoo be needin’ with the Samurai Dryer Repair School. Learn how to repair your own dryer in the comfort of your own garage. But space is limited so enroll today!

Samurai Dryer Repair Class

(Live action shot from our webcam of a Samurai Dryer Repair class now in session. This could be you!)

Washing Machine Plastic Outer Tub Sprang a Leak!

Jason wrote:

My clothes washer has begun leaking water. It’s a combo washer/dryer. It’s model number FEX831FS0 by Fridgidaire. I’ve taken it apart and noticed where the water was leaking from but am too unfamiliar with how clothes washers work to know why it’s leaking from this particular spot.

I would really appreciate any sort of assistance you can provide. Thanks!

This is the hole it’s coming from which unless I’m mistaken is the tub. Could it be the seal has broken as this hole looks like it’s supposed to be there?

Thanks very much!!

Domo for sending along a photo of what you’re seeing. I’ve marked it up and included it below:

Washing Machine Tub Hole

As you surmised, that’s a hole in the washing machine plastic outer tub. It ain’t supposed to be there. Slap a dab of J-B Weld epoxy putty on there. Fix ya right up!

To learn more about your washing machine, or to order parts, click here.

The Samurai’s 12-Step Program for Replacing the Shock Absorbers in an Asko W600 Washing Machine

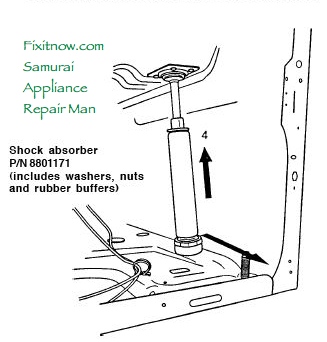
Asko W600 Washer Shock Absorber Replacment.jpg

1. Buy the replacement shock absorber kit here.

2. Front Shock Absorbers: Remove the front panel or lower cover panel. Rear Shock Absorbers: Remove the rear panel (12, #20 torx screws around the rear panel).

3. Remove the shock absorber nuts under the rear plate.

4. Support the holder from underneath or secure it with a hook from above.

5. Compress the shock absorber. Angle it outwards and pull it off downwards.

6. Take off the piston rods.

7. Remove the rubber buffers.

8. Install new rubber buffers (included with the new shock absorber kit).

9. Compress the shock absorber and put it into position in the bottom plate.

10. Fit the nut on the underside and tighten it.

11. Front Shock Absorbers: Replace the front panel or the lower corner. Rear Shock Absorbers: Replace the rear panel.

12. Pop a cold one and buy me one while you’re at it. Domo!

To learn more about your washing machine, or to order parts, click here.