Monthly Archives: March 2011

Replacing the rear bearing in a GE / Frigidaire dryer

Frigidaire used to make dryers for GE (example model number: WSM2700HBWWW) back when GE was too busy building shoddy Mark 1 nuclear power plants to build their own shoddy dryers; those came later… and they’re pretty damn shoddy. The Frigidaire-built units were better, though not nearly as good as the Whirlpool units with the lint filter in the top panel.

Anyway, if your Frigidaire-built GE dryer– or if your Frigidaire-built Frigidaire dryer– is making a squealing noise in back, you probably need to replace the rear bearing kit.

Here’s the link to the bearing kit which includes a how-to video:

Drum Bearing Kit
(click it to git it, Hoss)

To learn more about your dryer, or to order parts, click here.

Whirlpool Duet electric dryer- three fast beeps when you press the start cycle button

Example model number: GEW9200

This problem is caused by a bad door switch. Here’s the link to the door switch, click the picture:

Posted Image
(click for larger view)

You can test using an ohmmeter. There are 3 prongs on switch, identified as C,NC, and NO.

C-NC should be closed circuit until you push switch and then it should be open.

C-NO should be open circuit until you push switch and then read closed.

Buying the switch through this site is a risk-free proposition because you can return the switch for a refund if that doesn’t fix it. :dude:

Tips for installing the anti-drip kit in an older Whirlpool or Kitchenaid refrigerator

The dispensers on some of these older Whirlpool-built refrigerators are famous for the annoying and potentially floor-damaging drip-drip-drip problem where water will continue to drip for some time after dispensing water. Changing the water inlet valve or checking house water pressure are probably wild goose chases on this one.

Turns out there’s a design flaw in these units that use a coil of tubing for the water “tank” inside the refrigerator. When water is dispensed, it’s immediately replaced by warmer water from outside the refrigerator. As the water cools, it expands. In the coiled-tube tank, there’s no place for it to expand except to force its way out the nozzle, much to the dismay of many owners of these refrigerators.

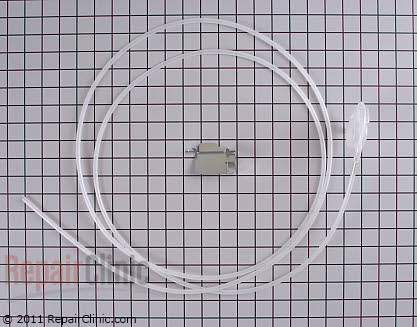
Fortunately, there is a fix and it’s not too bad of a spanking. You need to install this tubing kit, sometimes called “the slurp kit.”

anti-drip tubing kit

The kit comes with instructions but they don’t apply to models made between 2000 and 2001. But not to worry, Grasshoppah, because the Samurai shall be your beacon of appliantological wisdom in this dark time of your appliance morass.

First, you’ll unsnap the dispenser frame off. Underneath the bottom edge of the frame, you will see two slots. Just take a flathead screwdriver and pop that plastic frame off, then you can get good access to it.

Whirlpool Refrigerator Dispenser Disassembly
(click for larger view)

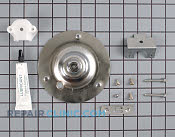
Depending your manual finesse level, you may need to remove the control bracket, called out in the diagram. The dispenser nozzle is also labelled in the diagram.

Next, drop down on your knees and pull the toe grill off. Undo the union connector behind the grill. Remove the nozzle retaining screw and pull the tubing up from the front dispenser.

When installing this new one, push the new tubing down through the channel hole that the old one was in all the way down. Then just get something small to fish up in the bottom of your door channel, like a stubby screwdriver or pocket screwdriver and pull the tubing down. Another pair of hands can save some adult language that might otherwise be forthcoming to push down on the tubing while you fish it through the bottom.

Don’t worry, I’ve changed lots of these and never even came close to breaking the line half way through the door when pull it out from the front dispenser.

To learn more about your refrigerator, or to order parts, click here.

Return policy on appliance parts purchased through all Samurai Appliance Repair Websites: 365 Days. Period.™

No harm in buying and trying! Electrical parts? Out of stock parts? No problem! Get a free replacement or your money back if you return a part within one full year. This is the best return policy in the industry and applies to all parts purchased through any of the Repairclinic banners and links at all Samurai appliance repair websites: www.appliantology.org, www.fixitnow.com, www.applianceguru.com, and fixitnow.posterous.com.

Disassembling an LG electric dryer to test or replace the thermostat and thermal limiter

Let’s listen with amazement as Sublime Master john63 from the Samurai School of Appliantology unveils the mysteries of disassembling an LG dryer. This particular procedure was for model number DLE7177WM but is largely applicable to all current LG models.

1) Unplug the dryer.

2) Remove 3 “phillips” screws from the TOP COVER of the dryer. These screws are at the rear of the top cover.

3) Slide the top cover rearward about an inch & lift-off.

4) Open the DOOR of the dryer & remove 2 screws under the *opening*. Roughly located at the 5 and 7 O’clock locations.

5) Standing in front of the dryer & looking behind the control panel—unplug all wire connections to the MAIN BOARD.

6) Now remove the screws from the *corners* of the CONTROL PANEL (Note: Some dryers only have one screw on the right side

7) Grasp the top of the CONTROL PANEL & forcefully “peel” the panel off (This plastic is tough).

8) With the CONTROL PANEL removed—you’ll notice 4 screws that secure the FRONT COVER. Remove those & slowly tilt the FRONT COVER towards you—disconnect the DOOR SWITCH PLUG. Set aside the front cover. Step back & look at the front of the dryer. On the lower right side is a *white* plug. Squeeze the tab on this plug & pull apart to disconnect. This is the plug for the MOISTURE SENSOR. (During re-assembly—don’t forget this little guy).

9) Grab a FELT-TIP MARKER & place a *dot* next to the 2 screws on the front of the *silver* bracket that the CONTROL PANEL *snaps* onto. Then remove the 2 screws. Remove the other 2 screws at the top of the *silver* bracket and remove the silver bracket by pulling upward.

10) Remove 4 screws at each corner (or ear) of the FRONT DRUM SUPPORT ASSY.

11) Pull the SUPPORT ASSY upward & towards you–set aside.

12) Grab the DRUM & rotate counterclockwise while pulling towards you. The belt will slip off. Remove the DRUM.

13) You’ll see a silver/square box on the right-hand side. Pull off the wires to the THERMAL LIMITER & test it for *continuity* with the test meter. If “open”—replace the THERMAL LIMITER and the other THERMOSTAT next to it.

14) If the THERMAL LIMITER has failed—the home exhaust vent *must* be cleaned. 100%.

15) Use a shop vac to clean everything up.

To learn more about your dryer, or to order parts, click here.

“What’s that wire thing dangling from under the icemaker in my LG refrigerator?”

That would be the temperature sensing thing called a thermistor. The icemaker uses it to make decisions about when to make ice.

LG LRSC26923TT Refrigerator - Dislocated Icemaker Sensor
(click for larger view)

This particular example is from an LG refrigerator model LRSC26923TT but all the LG models are similar. Samsung’s icemaker’s use the same thermistor arrangement, too.

Usually the thermistor can be clipped right back in place as shown below:

LG LRSC26923TT Refrigerator - Icemaker Sensor
(click for larger view)

If yours is broken for some reason, you’ll need to replace the icemaker, which you can get right here for the LG model LRSC26923TT ==> http://www.repairclinic.com/PartDetail/Ice-Maker-Assembly/1266867?modelNumber=LRSC26923TT

For other models and brands, you can look up the icemaker using your model number on the icemaker page, right here ==> http://www.repairclinic.com/Ice-Maker-Parts

Rehabilitating the Door Latch Assembly on an Old Kitchen Aid (Hobart) KDC-20A War Horse Dishwasher

This vintage dishwasher was from back on the good ol’ days when Kitchenaid dishwashers were made by Hobart. These were the heavy artillery, the battle tanks of the kitchen. If you’re blessed to have one these old war horses, you’ll want to hang on to it as long as you can because all dishwashers made today suck. The problem you’ll run into is that many of the parts are no longer available– NLA, as we professional appliantologists say with a wizened look while shaking our heads at the parts counter. One such NLA part is the door latch assembly. If yours craps out, this DIY guide will help you restore it back to service.

Rehabilitating the Door Latch Assembly on an Old Kitchen Aid (Hobart) KDC-20A War Horse Dishwasher

To learn more about your dishwasher, or to order parts, click here.

Easy way to test the sensors / thermistors in LG refrigerators

These sensors are also called thermistors. They’re used in lots of the recent brands to sense temperature. The old way was with a mechanical thermometer with a capillary tube. Ahh, those were the days.

The idea behind these newfangled sensors is that their resistance increases as temperature decreases. On LG refrigerators, the sensor should have a resistance 16 K-ohms ±5% at 32℉. To test the sensor:

– Measure the temperature of the sensor or the space the sensor is in. I use an infrared temperature sensing gun for this.

– Measure the sensor resistance. Make sure your meter is zero’d out and calibrated. You’re looking for readings in the k-ohms range. Note the resistance.

– Place the sensor in a glass of ice water. Let it sit for a minute or two to stabilize.

– Measure the resistance again.

You’re looking for two things:

1. That the sensor resistance did change, either up or down depending on whether you’re starting from a temperature higher or lower than 32℉. If you’re starting from a temperature higher than 32℉, then you should see the sensor resistance increase; if the starting temperature was lower than 32℉, then you should see the sensor resistance decrease.

2. The sensor resistance should be 16 ohms ±5% at 32℉.

This same procedure can be used to test any sensor in any refrigerator (many ovens use the same kind of temperature sensing technology) as long as you know the specification of the sensor at a given temperature that you can reliably produce. That’s why 32℉ is a nice test temperature to use because it’s easy and reliable to produce with ice water.

To learn more about your refrigerator, or to order parts, click here.