Category Archives: Dryer Repair

Kenmore Dryer Model 110.86872100 Schematic Diagram

Kenmore Dryer Model 110.86872100 Schematic Diagram

Kenmore Dryer Model 110.86872100 Schematic Diagram
(click to enlarge)

Samurai Appliance Repair Man
http://fixitnow.com

Parts==> http://parts.fixitnow.com
Forums==> http://applianceguru.com
Facebook==> http://facebook.fixitnow.com
Twitter==> http://twitter.fixitnow.com
Newsletter==> http://newsletter.fixitnow.com

Frigidaire Stack Washer-Dryer Model FEX831CS0 Schematic

Frigidaire Stack Washer-Dryer Model FEX831CS0 Schematic

Model number variations: FEX831CS, FEX831C

Frigidaire Stack Washer-Dryer Model FEX831CS0 Schematic
(click to enlarge)

Samurai Appliance Repair Man
fixitnow.com

Parts==> parts.fixitnow.com
Forums==> applianceguru.com
Facebook==> facebook.fixitnow.com
Twitter==> twitter.fixitnow.com
Newsletter==> newsletter.fixitnow.com

Usage tips for an LG combo all-in-one washer-dryer

You may have seen the LG combo washer dryers the last time you were looking at appliances. They’re all the rage among city dwellers where space in those tiny studio apartments is a rare and precious commodity because the washer and dryer are combined into one machine. While they do save on space, don’t expect it to act exactly like a stand-alone washer dryer set.

A Grasshopper in the Samurai Appliance Repair Forums recently scored a good deal on a used LG WM3431HW combo washer dryer and asked about some noticeable differences in how these machines run compared to stand-alone washers and dryers. Sublime Master john63 gives a good summary of the differences. Let’s listen in…

I was wondering if i have a problem cause the clothes are not coming out dry like a standard dryer does.

*******************************

This is a combo washer and dryer all-in-one.

The dryer is of the condensate-dry type (no external dryer exhaust vent system).

The dry cycle can take (depending on fabric type) 3 to 6 hours to dry laundry.

Open the door to the tub—you’ll notice a black slash mark near the opening which indicates 2/3rd full.

Dry laundry should not be loaded into the tub higher than this mark—or the wet laundry will take an abnormal amount of (for a condensate dryer) time to dry—or not dry completely.

If the unit is more than a year old—it may be necessary to clean out the condensate DUCT.

Remove the rear access panel. On the left side of the tub—remove the DUCT where it attaches to the bottom of the tub & remove any / all lint accumulation.

********************************

Also i was wondering if you should be hearing the water turning on and off in the dry cycle ?

********************************

Normal.
During the dry cycle—a special cold water misting valve sprays into the condensate DUCT. This converts steam from the wet laundry in the tub back to liquid—to be drained by the drain motor—which turns on & off intermittently.

*********************************

I was doing some reasearch on a “Cd” error. From what i have been reading it is a cool down process not an error am i correct ?

*********************************

Correct.

Need parts for your LG washer, dryer or combo unit? Get ’em here==> http://parts.fixitnow.com

Samurai Appliance Repair Man
http://fixitnow.com

Parts==> http://parts.fixitnow.com
Forums==> http://applianceguru.com
Twitter==> http://twitter.com/fixitnowsamurai
Facebook==> http://facebook.com/fixitnowsamurai
Newsletter==> http://newsletter.fixitnow.com

– Posted using BlogPress from my iPad

Dryer repeatedly blowing thermal fuses? Here are some things to check.

The number one cause for this is poor dryer venting. We professional appliantologists are always telling people this but they never believe us. As Sublime Master kdog so wisely observed, “We get to explain poor dryer venting situations to non-believing consumers on a daily basis.” http://applianceguru.com/forum2/27937-2.html#ixzz12xe1tMnD

I’ve got a dozen or so posts on this site dealing with dryer venting problems and explaining why proper venting is Numero Uno importanté for your dryer to run properly. Come check ’em out.

If your dryer vent exhaust looks like this, don’t be surprised if that thermal fuse keeps blowing over and over again…

Clogged dryer vent exhaust
(click to enlarge)

Need parts for your dryer? Get ’em here==> http://parts.fixitnow.com

Weird idler pulley on a Whirlpool-Kenmore series 80 dryer

Phil the insurance guy wrote:

Oh Mighty and Wise One, I have a Kenmore 80 Series dryer. After replacing the igniter, I am ready to put the drum and belt back on, but I have a part, and I think it may be incomplete. In the diagrams I’ve seen online, it shows the idler bracket attached to an idler wheel, which pulls the belt tight. However, mine does not have a wheel – it only has a “C” guide with no moving parts, which would seem to create too much friction. It looks very smooth, like it may have had a belt running over it for ten years, but this just kinda goes against my grasshoppah intuition. Does this look right? Am I missing a wheel or something? (see photo uploaded) Thanks for replies.

Cheap-ass Whirlpool dryer roller-less idler pulley

Yea verily, the Samurai is well-acquainted with the abomination of which you speak (and show in your photo).

This was one of Whirlpool’s many brief forays into engineering dementia when they thought they could save a shekel and a half by eliminating the roller on the idler pulley. Net result? Boocoo premature belt failures.

Finally, after years on the market and under overwhelming screaming and kvetching from servicers and customers alike, Whirlpool finally caved and went back to the tried and true roller-style idler pulley.

For more info, read my post on this which includes other photos and a link to the proper, roller-style idler pulley:

http://fixitnow.com/wp/2009/05/08/crappy-idler-slider-pulley-on-whirlpool-built-dryers-causing-noise-and-broken-belts/

– Posted using BlogPress from my iPad

To learn more about your dryer, or to order parts, click here.

Maytag Dryer MDG8400AWW will only tumble in the “Extended Tumble” cycle and does nothing on any of the other ones

Model number variations: MDG8400

This is a classic bad timer condition; if the dryer runs in one cycle it should run in the rest. Replace the timer and problem solved!

Part link for the timer==> http://www.repairclinic.com/SSPartDetail.aspx?s=t-MDG8400AWW-%3d%3dc13i1002865&PartID=1002865

To learn more about your washing machine, or to order parts, click here.

Whirlpool-Kenmore “Even Heat” dryer: lights come on but the motor won’t run

Don’t let all the fancy electronics on this dryer fool you; behind all the glitz and glam and beep-beeps of the fancy-pants electronics, it’s still just a dumb dryer and it does the bidness of drying clothes like even the simplest (and more reliable) dryers out there.

If you’re dealing with a problem where the lights come on and the controls seem awake but the motor won’t run, sure, it may be a problem with the control board or the motor relay. But take a look at the highlighted motor circuit in the schematic below. What else do you see in the motor power circuit? Well, there’s some pretty dang simple stuff like the door switch, belt switch, and the thermal fuse. If any one of these is open, you’re gonna have a dead motor situation. You feel me?

Whirlpool-Kenmore Even Heat Dryer Schematic Diagram with Motor Power Circuit Highlighted
(click to enlarge)

To learn more about your dryer, or to order parts, click here.

Whirlpool Cabrio dryer WED6400SW1: drum won’t tumble but the heater still fires up

This can be a head scratcher because the heating element in a dryer should only come on when the drum is tumbling. There’s still power to the display and you can run diagnostics but the motor won’t turn on. In fact, this is one of those cases where simply running the diagnostics without any insight into how dryers work can only lead to more confusion.

For example, in a recent topic in the repair forum, running diagnostics gave the following results:

Diagnostic Mode: 3 errors Displayed
F28 – Moisture Sensor – performed test on Moisture sensor and got the all clear. Not an issue.

F30 – Air Flow – checked lint filter and vent hose. Lint filter filthy, wife obviously hadn’t cleaned it in several cycles.

F31 – The mystery code. The tech papers do not list this code for this model. Only info available on F31 is for a Whirlpool Duet (L2 Line Voltage) and a post here on these forums (Bad thermal fuse)

Read more: Whirlpool Cabrio WED6400SW1 no tumble but has power – The Laundry Appliance Repair Forum – Do-It-Yourself Appliance Repair Help – ApplianceGuru.com: The Samurai Appliance Repair Forums http://applianceguru.com/forum2/27493.html#ixzz10BPfhKDe

What’s a grasshoppah supposed to do with this? What’s anyone supposed to do with this? This doesn’t help narrow down the problem.

But what does help is keen insight into how dryers work. A big clue here is that the heat still comes on even when the drum isn’t tumbling. This means the heating element is getting power through “illegal” means. In this case, a grounded heating element was letting the element get power when it wasn’t supposed to. A grounded element just means that the element wire has broken and one end is contacting the element housing, like this:

Grounded Dryer Heating Elemement
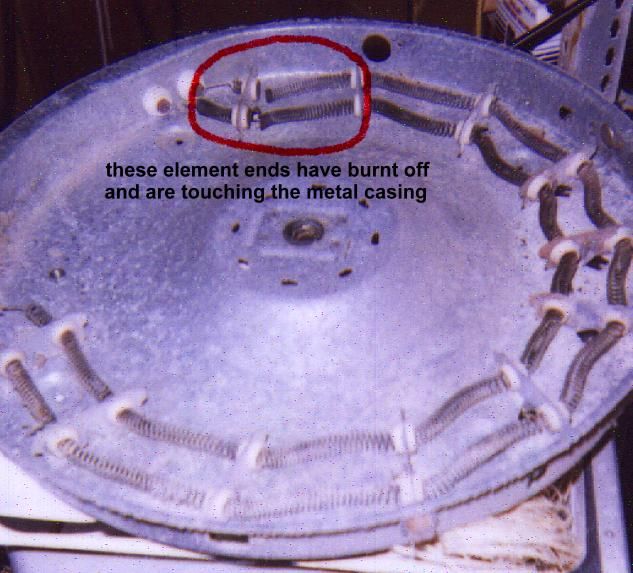
(photo courtesy of ApplianceAid.com)

The element shown above is not the same one that goes in this dryer, but they’re all basically the same, just different shapes.

The fact that the motor isn’t running but the control panel still gets power is a sure sign that the thermal fuse is open.

The fix is to replace both the thermal fuse and the heating element. Easy job. Here are the part links:

Thermal fuse:

http://www.repairclinic.com/SSPartDetail.aspx?s=t-WED6400SW1-%3d%3dc44i1455409&PartID=1455409

Heating element:

http://www.repairclinic.com/SSPartDetail.aspx?s=t-WED6400SW1-%3d%3dc42i1201501&PartID=1201501

To learn more about your dryer, or to order parts, click here.

How to put your Whirlpool Duet gas dryer into diagnostic test mode to help troubleshoot it

Example model number: WGD9550WL

Diagnostic mode is your first kata when you’re doing battle with a weird problem with this dryer, such as stopping mid-cycle. These dryers have so much electronic ca-ca in ’em that it’s hard to troubleshoot without running the test mode. So, here’s the keyboard dance:

DIAGNOSTIC TEST MODE

1. Be sure the dryer is in standby mode (plugged in with all indicators off,
or with only the Done indicator on).

2. Select any one button (except Pause/Cancel and Controls Lock/ Unlock)
and follow the steps below, using the same button (remember the button):
a. Press/hold 2 seconds.
b. Release for 2 seconds.
c. Press/hold 2 seconds.
d. Release for 2 seconds.
e. Press/hold 2 seconds.

3. If this test mode has been entered successfully,
all indicators on the console are illuminated for 5 seconds
with 8:88 showing in the Estimated Time Remaining three digit display.

If there are no saved fault codes or active fault codes,
all indicators on the console will momentarily turn off,
then stay on with 8:88 displayed.

Opening the door should cause a beep and
an alphanumeric number (such as P:3 ) to be displayed.

Closing the door should cause a beep and 8:88 to be displayed.