Category Archives: Dryer Repair

Electric Dryer – Dead on Arrival

Went on another dryer service call the other day. Complaint on this one was that the dryer was completely dead, no lights, no beeps, no nuttin’. It was, as we master appliantologists say, dead on arrival.

Pop Quiz: What’s the first thing you check when you’re dealing with a dead appliance?


Answer: The power supply. In this case, make sure you have proper voltage at the wall outlet that the dryer plugs into. These pics show you the anatomy of both the three-wire and four-wire outlets. Click ’em for a larger view.
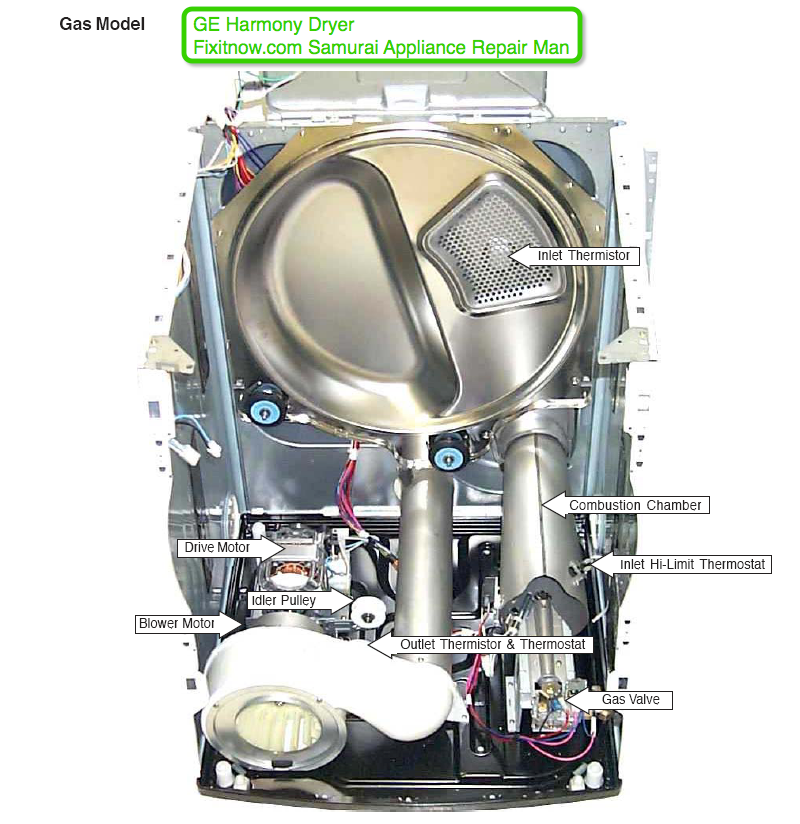
Anyway, did that, all good. So the dryer must be getting voltage, right? Ahh, grasshoppah, not necessarily. Like the yellow brick road, we must follow the pigtail into the back of the dryer, remove the little cover for the power strip and check power there. Only then can we say the dryer is getting voltage… or not. After I removed the power strip cover, my bloodshot eyeballs immediately grokked the problem. See if you can spot it in the picture below:

Burnt Connections on an Electric Dryer Power Strip

Did you find it? I knowed you could! Loose connections make heat… sometimes LOTS of heat. Be sure the nuts on those power strip studs are GOODNTIGHT!

In this case, so much of the pigtail wire was burnt up that I had to install a new one. You can, too. Piece of pie, tovarish– come git you one!

To learn more about your dryer, or to order parts, click here.

Whirlpool Duet Electric Dryer, Sensing Light Lit But No Go

It was a crisp fall morning here in New Hampster when the call came in. Whirlpool Duet electric dryer, the sensing light comes on, control panel responds to the buttons, but it just won’t start running.

So, I set down my breakfast bottle of Tuckerman’s Pale Ale, saddled up the Samurai Repair Van and peeled out.

Upon arrival, I stood in front of the dryer with the customer and verified the complaint. Sho’nuff, the sensing light came on but the motor wouldn’t run when you pressed “Start.” You’d hear a click from the control board then nuttin’, honey.

Top Panel Removed

Since the Duet is one of them over-designed, electronified dryers, you gotsta at least get some eyeballs on the schematic diagram to get an idea of the possible suspects. Conveniently, the dryer comes with a decent tech sheet located just under the top panel. To take off the top panel, you need to pull the dryer out from the wall a few feet to remove three retaining screws in back. With the top panel off, you’ll see the tech sheet in a plastic pouch like ahso.


Now, this is what sets a Fermented Grand Master of Appliantology (FGMA), like yours so very freaking truly, apart from your average parts changing monkey (PCM). Where a PCM might just ASSume that the control board is bad– and he would be woefully, hideously wrong– a Master Appliantologist would meditate upon the deeper meaning of life as revealed in the schematic.


Whirlpool Duet Electric Dryer Schematic


So I fired up a spliff, er, I mean, a stick of incense and focused my keen, Vulcan-like squinties upon the schematic whereupon I did perceive a thermal fuse in series with the motor. Being a certifiable black belt in the ancient martial art of Fixite Do, I realized that if the thermal fuse is open, well, motor no workee.


Thermal Fuse (left) and Thermistor (right)With the speed of an intoxicated electron and the precision of fuzzy logic, I removed the dryer’s kickplate and took off the blower cover so I could get my nimble fangers on that thermal fuse, located on the blower housing. I checked continuity with my meter and, shazayyam!, that bad boy was wide-azz open!


thermal fuse for a whirlpool duet dryer

I pulled a new thermal fuse off my van, slapped it in there and that dryer fired right up… after I plugged it back in and turned it on. Giddy up!


To learn more about your dryer, or to order parts, click here.

Dryer Venting Requirements

Dryer venting questions and confusions keep coming up in emails and in the Samurai Appliance Repair Forum. Lots of disinformation out there about dryer vents, too.

How Dryers Work

A dryer’s job is pretty simple: heat the clothes so that the water in the fabrics evaporates. Then get rid of all that water vapor (humidity) by moving lots of air through through the drum.

Pop Quiz: What happens if the dryer is heating OK, but it can’t move enough air through the drum?

Answer: The clothes will get warm but will not dry in a reasonable amount of time. Why is that, Capt. Ron? Because if the air inside the drum is already saturated with water vapor from the warm, wet clothes, then it can’t hold anymore water vapor. The air is what we professional appliantologists call, “saturated.”

Dryer Venting Q & A:

Q: How do you get the air to hold more water vapor?

A: By getting rid of the water vapor that’s already there!

Q: And how do we get rid of the water vapor in the air inside the drum?

A: Through the dryer vent!

Get the idea? If the vent is restricted, it won’t move enough air to purge the water vapor from inside the dryer drum. So your clothes stay wet.

When I tell people this, I invariably get the reply, “Well, I checked for lint buildup in the vent and it’s all clear.”

Ah, I see, so lint build-up is the ONLY possible way that dryer vents can become restricted? How about if the vent hose is crushed or kinked? What if the vent hood flapper on the outside of the house is stuck closed? Hmm…

Ponder these things whilst you grok on this handy guide on dryer venting requirements.

To learn more about your dryer, or to order parts, click here.


Crappy Idler Slider Pulley on Whirlpool-built Dryers Causing Noise and Broken Belts

(Click the pictures for the larger versions with enlightening annotations.)

New-Style (crappy) Idler Slider Pulley that came with the DryerNew-Style (crappy) Idler Slider Pulley that came with the Dryer

Some genius at Whirlpool figured out how to save $0.12/dryer by using the infamous half-moon slider idler. The belt slides across the teflon strip causing accelerated belt wear and much more frequent belt replacements. The extra strain on the motor has caused premature motor failures, too. Good for me because I fix ’em for a living; bad for you because you’re paying for it! Note the black fuzz below and beside the motor. That’s from the belt.


Close up of the Crappy Idler PulleyClose up of the Crappy Idler Pulley

Yep, that’s all there is to it. No roller, just a teflon strip. The belt rubbing across this teflon strip can make weird noises, too. That’s what prompted the customer to call me in the first place.


Old-Style Roller Idler Pulley InstalledOld-Style Roller Idler Pulley Installed

Here, I replaced the slider with the old-style roller idler pulley. Whirlpool has since discontinued the slider style because of all the premature belt failures out in the field. Experience is the price of wisdom. Can I hear an "Amen?"

If your Whirlpool-built dryer (which includes many Kenmore dryers) has the troublesome slider pulley, replace it today with the good ol’ roller style and save yourself some big $$ down the road. You can replace just the idler pulley alone or, for a just few more shekels, you can get the complete repair kit which includes the roller-style idler, belt, and both drum rollers. Parts links below:

Idler Pulley Only

Complete Repair Kit


Related Helps:

Dryer Disassembly

How Does that Dryer Belt Go On?

To learn more about your dryer, or to order parts, click here.

Venting a Dryer into a Garage

Mike wrote:

Hi –
Is it okay to vent my electric dryer into my unheated/uninsulated garage? Right now it vents into the crawl space, and that is not “up to code”.
Thank you!

Venting into a garage is fine as long you’re willing to put with lint coating your vehicles– they’re gonna get messy. But it’s far preferable to venting into a crawl space. Dryer exhaust is dirty and contains lots of ickiness: mites, molds, human skin, dander, pulverized synthetic fibers and their off-gases… not the kind of stuff you want in your nose, lungs or house.

Twitter comment from @TroyColby:

I have seen it cause mold on an entire wall in a garage.

This is a great point! Up here in Yankeeland, it’s not unusual to see dryers vented into garages. I’ve not seen the mold problem up here but houses in warmer climates would be very susceptible to mold infestation. Regardless of where you live, it’s probably a good idea to make sure your garage is well vented if you’re going to run that dirty, humid dryer exhaust into a closed space like a garage.

Recommended Reading:

Where to Run the Dryer Vent

The Ultimate Dryer Venting Guide

Dryer Venting Diseases: Venterialsclorosis

Slow Drying Dryer and Frankenkitty

To learn more about your dryer, or to order parts, click here.

Broken Dryer? Fuggetaboutit and Get High (& Dry)!

So your dryer shat the bed. Now the horns of an enema confront you: spend the yen to repair your energy hog clothes dryer or buy another keg of Old Milwaukee. Yeah, life is full of tough choices like that. Well, Hoss, tell you what I’d do: I’d scrap all the old parts out of that broken dryer and sell ’em on eBay. Then, with some o’ dat dinero I made on eBay, I’d git me a slick new High & Dry and never have to worry about a broken dryer again!

highndry-450x683.jpg
(click for larger view)

For more information about the revolutionary new High & Dry, send an email to Talia at highanddry@wildblue.net.

Easy Fixes for Two Common Problems with the Whirlpool “Even Heat” Dryers

You can usually tell you’re dealing with one of these puffed-up beasts (also sold under the Kenwhore label) because it’ll have the words “Even Heat” somewhere on the control panel. This dryer is a perfect example of how buying appliances with needless and overblown electronics is hazardous to your financial health.

So, my brothers and sisters, let us begin today’s sermon with a plaintive plea for sanity from another one of my sermons:

Dryers are simple, humble machines that do three things: tumble the clothes, get ‘em warm, and move a lot of air. Why would you want or even need an over-priced failure-prone “electronic control system” for a friggin’ dryer? I can almost understand it for a refrigerator or a gourmet oven, but a dryer? Putting an electronic control board in a dryer is like installing a GPS nav system on a kid’s tricycle. Enough! Stop the madness! Friends don’t let friends buy dryers loaded with over-blown electronic crap.

In today’s sermon, I’ll ‘splain easy fixes for two common problems with this needlessly electronified dryer:

  • no heat;
  • dryer starts when the start button is pressed but stops running when the start button is released.

Both problems, by the way, are a direct result of using an electronic control board and chintzy relays instead of a reliable mechanical timer and simple, rugged mechanical switches.

So, as you expect, most of the time the problem is going to be either the Even Heat control board or the motor/heater relay (there are separate relays for motor and heater but they are the exact same part).

We’ll start by opening up the control panel so we can make some simple electrical tests. Unplug the dryer and remove the two screws on either side of the console and flip the console back so it’s all opened up like ahso (click for larger view):

Inside the Control Panel of the Whirlpool Even Heat Dryer

And here’s a pictorial diagram of what you’ll see (click for larger view):

Control Panel Anatomy in a Whirlpool Even Heat Dryer

Now, start with a visual inspection. If the Even Heat board is the problem, you may see a burnt component on it, like this (click for larger view):

Whirlpool Even Heat Control Board with Burnt Resistor

But remember that electronic boards can- and commonly do– fail without any visible signs of failure. So just because an electronic board may appear okay, this does not mean that it IS okay. Otay, Buh’wheat?

Anyway, a few simple electrical measurements at the relays will usually tell the story. Here’s a closeup of the relays:

wpl-even-heat-dryer-relays.jpg

The relay coils are outlined in red. A good coil will have a resistance in the range of 2 to 3 k-ohms; a bad coil will either read infinite resistance or something in the mega-ohm range.

The Even Heat control board sends 48 vdc to the relay coil to close the switch in the relay output. When the relay switch closes, it sends power to either the motor (in the case of the motor relay) or to the heating element/gas burner assembly (in the case of the heater relay).

Armed with this knowledge, you can determine whether the Even Heat control board or the relay itself is causing the problem by doing exactly two simple tests on the appropriate relay. Let’s break it out by type of problem.

No Heat

Test 1: Measure the coil resistance on the heater relay. Remember: resistance measurements are made with power off the circuit, so unplug the dryer for this test. If the heater relay coil is open or very high resistance, replace the relay.

motor/heat relay in a whirlpool even heat dryer

Test 2: If the relay coil tests good, then we check for 48 vdc (that’s volts-DC– double check your meter setting when you measure for this) at the relay coil. This is done with the dryer running on a heated dry cycle and all the wires still attached to the relay. If you don’t get 48 vdc at the relay coil, replace the Even Heat control board.

even heat control board, whirlpool even heat dryer

But what if you do get 48 vdc at the relay coil but still no heat? Then we may have a problem elsewhere in the heater. We can confirm this by verifying that the relay is closing its contacts when the coil gets voltage with another live test. Again, dryer running in a heated dry cycle, set your meter for the 120vac range and measure the voltage across the relay contact terminals (the ones with the heavy red wires attached to ’em). If no voltage reading, that means the contacts are closed and the relay is doing its job; so the heating problem lies downstream in the heating circuit. We can help you troubleshoot this in the Samurai Appliance Repair Forum.

Motor Stops Running When the Start Button is Released

Same two tests as for the heating problem above except you do all the tests on the motor relay. That makes for a nice and easy symmetry, don’t it?

If you get 48vdc at the motor relay coil but still the motor doesn’t run, then we have a problem downstream in the motor circuit to troubleshoot. Again, we can help you with this in the Samurai Appliance Repair Forum.

Can I hear an “Amen?”

To learn more about your dryer, or to order parts, click here.