|
|
| Podcast |
| Live Help |
| Repairware |
| Hotline |
| Repair Forum |
| Beer Fund |
| Cool Stuff |
| Home |
|
|
| Buy Appliance Parts Here! |
| Search the vast repository of wisdom at Fixitnow.com: |

|
| Genuine Manufacturer's Repair Manuals |

|
Ok, you'll light this candle by opening up the dryer and having a look at those drum rollers.
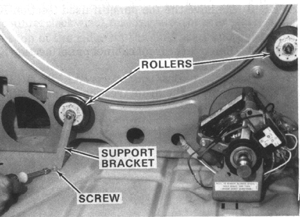
 After you take out the drum, here's what the drum rollers look like and where you'll see 'em.
Lots of times, you can tell the rollers are bad by just looking at 'em. I mean, sometimes they look gawd-awful. Sometimes, it's a little more subtle. Give 'em a spin. If they make alot of noise or they're stiff, you'll need to order this dryer repair kit and replace 'em. The kit includes all the rolling components in the dryer: rollers, belt, and idler pulley and comes with instructions. Might as well replace all those components while you're in there because once the rollers go, the belt and odler aren't far behind. It's a pretty straight forward job and if you're able to take apart your dryer to get to the rollers, you can figger out how to replace 'em. But here're a few more tips...
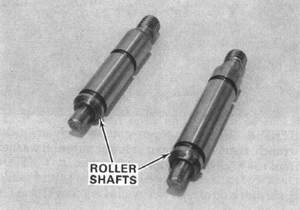
 Sometimes, the rollers get so far gone that they take a roller shaft with 'em. After you pull off the old rollers, inspect the shaft for nicks or excessive wear and replace 'em if you need to before you install the new rollers.
There's a debate among servicers as to whether or not to lubricate the rollers. I never do because I think the lube will just crust up after a while from the heat and lint in the dryer and make the drum rollers stick again. Before you know it, you're back into the dryer for the same problem. Others servicers might post here disagreeing with me. That's fine. But I'll add that my call-back rate on this particular repair is zero.
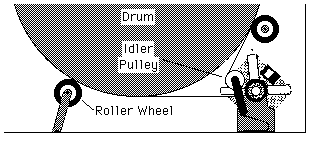
 After you get the new rollers on there and the drum put back in place, this pic shows how to route the belt. This'll probably be the trickiest part of the whole job, which ain't saying much. Just remember to feed the belt through the idler arms, underneath the idler wheel and between the pulley arms attached to the idler wheel.
Still confused? To learn more about your dryer or to order parts, click here.

|
Back to Dryer Repair Manuals |
Podcast | Live Help | Buy Parts | Repair Forum | Beer Fund | Cool Stuff | Home
 Your Appliance Guru:
Samurai Appliance Repair Man
URL: http://www.fixitnow.com
© copyright 1997-2004 Live It Up LLC
No part of this website may be reproduced or copied without the prior written permission of Live It Up LLC.