Word of the Day
And the Word of the Day is “mawkish.”

Word of the Day
And the Word of the Day is “mawkish.”
Return of the Samurai
 He’s back, he’s black, he’s madder than Hell…he’s Samurai with a mohawk!
Ok, I didn’t really get a mohawk. I’m not overtly angry, either, just the usual inward-directed anger that makes me mildly bipolar and prone to substance abuse. And I’m only a little black. But I really am back. I gotta say, that was the best hike ever in the White Mountains. Trail stories by request. Film at eleven.
I couldn’t convince my flat-lander hiking buddies to bag the Bonds this trip. So, I’m doing ’em this week, Thursday-Friday, hiking up via the Lincoln Woods trail, camping at Guyot campsite Thursday night, and then returning the same way on Friday. Weather forecasts are spectaculous.
I’ll be around today and tomorrow, on and off of live help, but then I’m gone Thursday and Friday, back online late Friday night or Saturday morning. Talk to you later, M’bassoo.
Signing Off ’till Next Week…maybe
Well, this is it, compadre. My last entry for the week and possibly my last entry ever. The Fixit Boyz will all be mustering up here at Brown Compound in about an hour from now for the Third Annual Fixit Boyz Hillstomp. We’ll go through gear, make a last minute supply run, and then adjourn to the Flying Goose Brew Pub for a pre-hike briefing and 16 oz. wrist curls. I may be back online next week or I may just die on the mountain. If you don’t hear from me again, in lieu of flowers please contribute to the United Samurai Beer Fund® so Mrs. Samurai can continue this most Noble Work. Domo.
Live Help Update
Yep, I’ll be on live help tonight for as much as I can stand it. When I can’t stand it any more, I’ll be unavailable for live help but still hanging around the forum pretending to answer questions. I’ll probably go back and forth like this for a while until I just get so dizzy that I throw up and pass out.
![]() Later, brah.
Later, brah.
Gear Review: The Kelty 50th Anniversary Pack
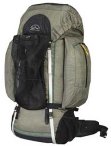 If you’re into backpacking, you probably couldn’t avoid reading something, somewhere, about the Kelty 50th Anniversary pack. Backpacker magazine kicked off the brewhaha when they picked it as an Editor’s Choice for 2002, touting it as a breakthrough in pack engineering, combining the best features of internal and external frame packs into one elegant engineering marvel. And for good reason: the pack is well-designed and boasts some nifty features like two shoulder straps, a waist belt, and a big sack to carry all your crap in.
 But wait, there’s more! Kelty spent hours scouring the Philippines for just the right political prison camp to manufacture their ergonometric engineering marvel for them. Now, this is where the collective grey matter of corporations really shines through: you develop a new product, like the 50th Anniversary Pack, designed with new features, such as the Levitators®, but then you have it all stitched together by half-blind arthritic Filipino political dissidents and charge a premium retail price for it. This helps to assure that the stitching on the pack will tear apart during the middle of a wilderness trek (see the entry below this one) and gets people screaming your name from mountain summits. It’s exactly that kind of cutting-edge marketing that makes Kelty Numero Uno. Kelty, like its cohort, Backpacker magazine, has come of age and has learned what it takes to be a successful bidness in Amerika today. In recognition of this, we here at Fixitnow.com bestow the prestigious F. Walter Ellison Award for Bribery and Coersion on Kelty Corporation.
Congratulations to all the visionaries at Kelty Corporation, and especially the Accounting, Marketing, and Quality Assurance Departments!
Live Help Update
Yesterday was a surreal succession of things going wrong while pulling my gear together for the Fixit Boyz Hillstomp this weekend. It all began when I discovered defective mission-critical stitching in my new Kelty 50th Anniversary backpack. ![]() More about that later. Oh, you can bet your sweet double-wide bottom there’ll be more. You’ll soon know all about my experience with the much-ballyhooed Kelty 50th Anniversary pack.
More about that later. Oh, you can bet your sweet double-wide bottom there’ll be more. You’ll soon know all about my experience with the much-ballyhooed Kelty 50th Anniversary pack. ![]()
 But enough about me, let’s talk more about me. I’ll be on for live help from late afternoon right up to bedtime, which will depend on how good the brews are tasting.
Q. What could be more fun than a handful of leeches?
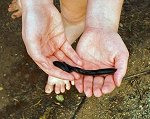
A. MORE LEECHES!

Q. What equipment do you need to hunt for leeches?
A. Just your bare hands and a specially-trained leech hunting hound.

Q. Where do you hunt for leeches?
A. The best place we’ve found is Mill Pond at Pillsbury State Park.
Uploaded the rest of the photos from our family camping trip to Moose Brook State Park last month. Good times, good times.
Get notified by email when your skivvies are dry. And now your life is happy and full.
Have you seen the Navy’s new website? Dude, this site rocks! If I was 20 years younger, I’d re-enlist all over again…ok, maybe not, but it’s still a cool flash intro.
 Look, I make no pretenses about being a neutral or unbiased voice in the home appliance world–I’ll tell you right now, Grasshopper: I ain’t. Nawsir, I am one cranky and opinionated cracker. But get me talking about GE appliances, and I turn into one pissed-off cracker. Why? Because despite horrendous quality problems and outrageous markups on replacement parts, people still buy GE appliances and so the freak show continues.
 If you recently bought a GE fridge equipped with an icemaker, it probably has the new GE IM6 icemaker. If it’s like other GE appliances, it won’t be long before something goes horribly wrong with it. Probably the day after your warranty expires. So go ahead and bookmark this entry now, Grasshopper, ’cause you’re gonna need it. Guaranteed. Ok, let’s light this candle.
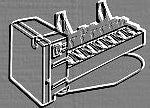
The most common problem that you, the unsuspecting GE owner, will run into with this contraption is when it inexplicably goes into fault mode. This icemaker has a green LED on the right hand side, below the power-on rocker switch, shown here. When that LED starts flashing at the rate of ½ second on, ½ second off, welcome to fault mode, compadre. The main reasons this icemaker goes into fault mode are:
More diagnostic info on the IM6, including how to initiate the harvest cycle, in the tech sheet below:
ACCESS TO THE ICEMAKER CONTROL BOARD AND INTERNAL COMPONENTS — Remove the plastic plug at top of the cover to reveal and to remove the Phillips head screw holding cover in place.
ON/OFF SWITCH — Rocker switch mounted on right side of icemaker control housing.
GREEN LED INDICATOR LIGHT — Lens mounted on right side of cover to show power is on. Also used to indicate icemaker fault conditions, like an open or shorted thermistor, or a harvest cycle that takes longer than 30 minutes. Fault mode is indicated when the LED blinks 1/2 second on, 1/2 second off indefinitely until icemaker is turned off.
ELECTRONIC CONTROL BOARD AND INTERNAL COMPONENTS — The Electronic Control Board is secured by three Phillips screws within the control housing. All wiring uses plug-on terminals. The electronic control board contains two hall effect sensors (similar to electronic reed switches) which are activated by one magnet attached to the end of the ejector arm to determine if the motor has reached the “home” position and one magnet attached to the sensing arm to determine if the “feeler” or sensing arm has reached the fully extended position. (Ice has not prevented it from moving outward to the fully extended position).
THE SENSING ARM OR “PADDLE” moves laterally or horizontally (not up and down)
THE THERMISTOR is mounted in the mold body directly behind the control housing. It has two functions: 1) to measure ice temperature during freezing, 2) to determine water level during the fill cycles. (This icemaker can have up to 3 fill cycles: 1st fill is 5.1 seconds, 2nd fill, if needed, is 2.5 seconds and 3rd fill, if needed, is 2.4 seconds) The thermistor is looking for a temperature in excess of 39.6°F (4°C) to terminate the fill cycles. Once this temperature is reached, or is exceeded, the icemaker will start the freeze cycle. If after the third fill, and the temperature has not reached 39.6°F, the control will override this requirement and the icemaker will automatically enter the freeze cycle.
THE FREEZE CYCLE is the period of time where the icemaker is waiting for the cubes to freeze solid. This is based on an algorithm programmed into the electronic control board. The electronic control board makes these calculations once per second and monitors the thermistors’ current or present resistance value as well as the rate of resistance change. This will take into account the various environmental conditions that vary the freeze times, such as control settings, door openings, room temperature, etc., but the average cycle is said to be 75 minutes to drop the 7 cubes in the icemaker mold.
THE HARVEST CYCLE begins when the freeze algorithm (programmed into the electronic control board) has been satisfied and the sensor arm is out or fully extended. If the arm is in the “in” position when harvest is to begin, a delay of 3 minutes will be added once the arm is moved to the extended position to allow for drawer type ice buckets to be removed for this amount of time without starting a harvest cycle. This 3 minute delay will begin again if the arm goes back to the “in” position anytime during the delay period. This arm is spring loaded to go to the “out” position unless it is being held in the “in” position by an obstacle such as an ice cube.
At the beginning of the Harvest Cycle, the mold heater will activate. One second later the motor will start. The heater will remain on until the mold temperature reaches 35.6°F (2°C) and a minimum of 20 seconds have elapsed. If necessary, the heater will cycle within a range of 32°F “cut in” to 35.6°F “cut out”.
To assure that the motor makes a complete revolution, the control checks to see if the motor is not “home” for at least 10 seconds and the sensor arm is “in” for at least 10 seconds. When the ejector then reaches the “home” position, this completes the harvest cycle and the motor will turn off. If the harvest cycle, which consists of one complete revolution, is not completed within 7 minutes, the control will assume that a cube is blocking the completion of the cycle and will initiate a “Harvest Fix Mode”. If the Harvest Cycle is not complete within 30 minutes, the electronic control board will assume some other problem occurred and will enter the “Fault Mode” which will cause the LED to start blinking in an 1/2 second “on” 1/2 second “off” pattern.
THE HARVEST FIX MODE occurs when the harvest cycle is not completed within 7 minutes, as mentioned earlier. This is achieved by raising the mold temperature to 68°F “cut off” temperature, with a 59°F “cut in” temperature. During this mode the motor will cycle off 10 seconds per minute of cycle time. If the motor reaches home position, a second revolution of the ejector will occur to verify that there is no more blockage. At this point, the control board will initiate another freeze cycle without a water fill to avoid a double shot of water from entering the mold. As mentioned earlier, the control will enter a Fault Mode if a harvest cycle (including a harvest fix mode) is not complete within 30 minutes.
POTENTIAL CAUSES FOR A HARVEST CYCLE TO TAKE LONGER THAN 30 MINUTES AND THUS ENTER A FAULT MODE (LED BLINKS):
Stuck ejector — caused by a cube that was not cleared or a mechanical problem.
Bad heater — caused by open circuit, control board triac or thermal cut out.
Bad motor — caused by open motor, or control board triac.
Motor home position not operating — caused by control board or loose magnet (the result will be continuous ejector operation).
Thermistor — open or shorted.THE WATER FILL CYCLE occurs when the harvest cycle is completed and the icemaker is “pre-chilled” to 35.6°F. This pre-chilling of the mold allows the thermistor to better detect the level of the water. Water entering the icemaker mold will cause the mold temperature to change, effecting the resistance of the thermistor. The thermistor has a negative temperature coefficient. This means that an increase in temperature will cause a decrease in resistance.
The first fill cycle activates the water valve for 5.1 seconds. After this fill, there is a 15 second delay to allow time for the
thermistor to “read” the water temperature and thus determine if the mold is sufficiently full. If the temperature exceeds
39.2°F (4°C) after this delay, the icemaker will end the water fill cycle and initiate the freeze cycle.
The second fill cycle is initiated if the temperature is still below 39.2°F after the 15 second delay. This second fill will be
only for 2.5 seconds, and again, another delay for 15 seconds will be made to allow time for the thermistor to determine if
the temperature has reached 39.2°F (4°C). If so, the icemaker will end the water fill cycle and initiate the freeze cycle.
The third and final fill cycle occurs after the 15 second delay if the thermistor detects that the water temperature still has
not reached 39.2°F (4°C) . The third fill cycle lasts 2.4 seconds. After this, the icemaker control board is programmed to
override this temperature requirement and will end the water fill cycle and proceed to the freeze cycle.The point of all these fill cycles is to help compensate for low water pressure and hopefully avoid the “ice cubes stuck in the ejector” problems that is so common with low water pressure.
POWER ON DIAGNOSITICS TEST MODE
When the icemaker is first connected to power and the thermistor temperature is 50°F or more, the control will initiate a “Power On” test before entering the freeze cycle. The test will consist of the following sequence:
1)Turn on the motor until it reaches home position
2)Turn on the water valve for 1/2 second
3)Turn on the heater for 1/2 second
4)Verify that the feeler arm was in the “in” and then the “out” position.
5)Verify that the motor was not in the home position and then in the home position.
6)Verify that the motor does not remain on after being turned off.
7)Proceed to the freeze cycle.SERVICE DIAGNOSTICS TEST MODE
During the first 15 seconds that power is first applied to the icemaker, the Service Diagnostics Test mode may be entered. The Service Mode is entered by pushing the feeler arm in and out three times within 15 seconds. (only three times). There will be only one fill cycle (5.1 second) in the service diagnostics mode without the waiting period for the mold to “pre-chill”. If the icemaker has already started a harvest cycle and the arm is moving, it may be impossible to start the service mode. (since the NORMAL cycle is already started).
While in the “Power On Diagnostics” test mode, the “Service Diagnostic” test mode can be initiated and will override the “Power On Diagnostics” test mode.
This icemaker has no replacement parts available and is not intented to be repaired.**
The thermistor is one busy dude in this icemaker. It’s contantly sensing the temperature of the ice mold and controls just about everything, from the mold heater to the ice harvest. It will fail either electrically open or shorted. Either way, you’re screwed…unless you know how to check it. Would you like to know? Ok, I’ll tell you. First, locate the thermistor on the icemaker and pull that sucker right out of the printed circuit board. Now, clip your ohm meter leads to the thermistor terminals and check the resistance according to this temperature-resistance chart. If your thermistor tests bad, come git you a new one!
If the thermistor is good but the icemaker still doesn’t work right, then you have to replace the whole icemaker. Sorry, Slick, but that’s GE for ya.
So, let’s say you wanted to replaced your GE icemaker with a good ol’ Whirlpool icemaker. How would you wire it into your fridge? Why, using the schematic diagram for the IM6, of course!
By the way, if you’d like to call GE to tell them what a big fan you are, their number is 1-800-626-2000. Go git ’em!

To learn more about your ice maker, or to order parts, click here.