Category Archives: Dishwasher Repair

GE Triton XL Dishwasher Wiring Diagram

GE Triton XL Dishwasher Wiring Diagram

Example model numbers:
PDW7300 PDW7700 PDW7800 PDW7880 GSD6200 GSD6600 GSD6660 GSD6700 EDW4000 EDW4060

GE Triton XL Dishwasher Wiring Diagram
(click to enlarge)

To learn more about your dishwasher, or to order parts, click here.

Samurai Appliance Repair Man
http://fixitnow.com

Parts==> http://parts.fixitnow.com
Forums==> http://appliantology.org
Facebook==> http://facebook.com/fixitnowsamurai
Twitter==> http://twitter.com/fixitnowsamurai
Newsletter==> http://newsletter.fixitnow.com
SMS==> 603-505-8460

Removing a wash tub in a Fisher Paykel DD603 Dish Drawer

Easy as bip, bap, boom!

Fisher-Paykel DD603 Drawer Removal

If you need more help fixing your own appliances, come see us in the Samurai School of Appliantology.

Samurai Appliance Repair Man
http://fixitnow.com

Parts==> http://parts.fixitnow.com
Forums==> http://appliantology.org
Facebook==> http://facebook.com/fixitnowsamurai
Twitter==> http://twitter.com/fixitnowsamurai
Newsletter==> http://newsletter.fixitnow.com
SMS==> 603-505-8460

Cheat sheet for whupping up on the “Clean light blinking 7 times” problem in Whirlpool and Kitchenaid dishwashers

Whup-AssGot that Clean light blinking seven times, pausing, then doing it again? Well, it’s time to break open a USDA Grade A can o’ whup ass on that bad boy! Use this cheat sheet to nail down the problem. The Tech Sheet that it refers to is located in a pouch behind the kickplates of your dishwasher.

Whirlpool dishwasher blinking clean light check sheet
(click to enlarge)

To learn more about your dishwasher, or to order parts, click here.

GE Profile dishwasher making a high pitched squealing noise from control board

This little repair tip is for the GE Profile line of dishwashers with model numbers that begin with PDW, such as PDW9280J00SS.

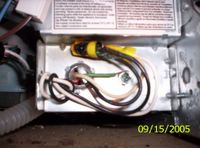
You load your GE Profile dishwasher and go to start it and… it won’t start. Even more confounding, you hear a high-pitched squeal coming from the control panel area. You cut power to the dishwasher (and the squealing stops) so you can disassemble the panel to get some earballs in there. With the panel open, you reapply power and can absotively, posilootely tell that the noise is coming from the control board. To make sure it’s the circuit board and not the touchpanel, you even disconnect the touchpanel from the circuit board so the touchpad doesn’t have any power and couldn’t make a squealing noise even if it wanted to.

So you order up a new control board from RepairClinic because they have great prices, super-fast shipping, and a 365-day no-hassle return policy on all parts, even electronic parts that have already been installed.

The new control board arrives at your door immediately after you click the Send button on the part order at the RepairClinic site. You slap that board in and… it still makes a high pitched squeal!

“Must be a bad board,” you mutter to yourself, while packing up the board to send back to RepairClinic for a replacement. The new board is on your doorstep waiting for you when you return from the Post Office. You slap it in and… it still squeals!

Finally, you go online to the mostest awesomest DIY appliance repair website on the whole Innernet *and* the Outternet– Fixitnow.com Samurai Appliance Repair Man– and you find this very post that you’re reading now. “Dayyam,” you wonder to yourself,”how’d that Samurai know what I was doing with my dishwasher? He must be one o’ them psychotics who can tell the future, an’ all.”

Well, you could say that. Or you could say, “Samurai, what in tarnation is goin’ on wif my dishwasher?”

What’s going is that the circuit board will make a squealing noise when one of the keypads on the touchpanel has an open or shorted keypad. So, when the touchpanel is disconnected, the control still senses an “open” and will squeal– same effect when a keypad on the touchpanel is shorted or stuck.

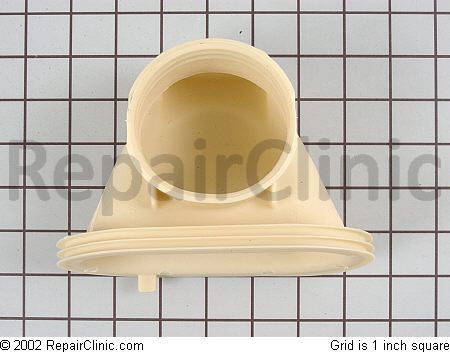
To fix your dishwasher, replace the touchpanel.

To learn more about your dishwasher, or to order parts, click here.

Wiring Diagram for Bosch Dishwasher Models SHU53XX

Wiring Diagram for Bosch Dishwasher Models
SHU5302 SHU5304 SHU5305 SHU5306 SHU5312 SHU5314 SHU5315 SHU5316

Wiring Diagram for Bosch SHU53XX Dishwashers

Samurai Appliance Repair Man
http://fixitnow.com

Parts==> http://parts.fixitnow.com
Forums==> http://appliantology.org
Facebook==> http://facebook.com/fixitnowsamurai
Twitter==> http://twitter.com/fixitnowsamurai
Newsletter==> http://newsletter.fixitnow.com
SMS==> 603-505-8460

Maytag dishwasher MDBH955AWB: He’s dead, Jim

Just like Dr. McCoy said, your Maytag dishwasher model MDBH-something is dead, no lights, no beeps, no nuttin’. Two ways to handle this’n, Hoss:

1. You could tear apart the dishwasher and slog through the incomplete information in the tech sheet and wiring diagram, making measurements and tests with your meter and maybe identify the problem or

2. Sit at the feet of the wise and battle-hardened Master and allow him to take your hand and lead you directly to the problem.

Your call.

If you chose option 1, you can stop reading now.

If you chose option 2, here are some pearls from Sublime Master Appliantologist Willie that will lead you to Appliance Nirvana™:

The most likely problem is the touchpad/console assembly hardly ever see the control board go bad on these models. I see an unreasonable number of touchpads going bad though.

Order the touchpad/console from RepairClinic and if it doesn’t fix your problem, (It will), then return the part, or order both the touchpad and controller and install only the touch pad and return the control board when you find out that you don’t need it.

Touchpad/console assembly:
http://www.repairclinic.com/PartDetail/Touchpad-and-Control-Panel/1469761

– Posted using BlogPress from my iPad

KitchenAid Dishwasher KUDI24SE — No power

Sublime Master Reg succinctly points out the two most common causes for this problem:

Check your Nuts …

click on picture

There is also a small Thermal Fuse in the Console …

repair kit comes with extention wires (for thermal safety)

click on picture


Read more: http://applianceguru.com/forum1/28055.html#ixzz130xeSTur


Need parts for your dishwasher?  Get ’em here==> http://parts.fixitnow.com

Dishwashers and hard water: getting the best possible results

Sublime Master Trying to help reveals a few secrets for getting good cleaning results in your dishwasher in hard water conditions:

Contrary to popular belief, you do not want too hot of water in hard water conditions. If you use any of the water heating options (Sani, Temp boost, etc.) try turning them off. If you are in a hard water area you can get flash drying. The water will evaporate off the glasses and plates instead of rinsing off leaving behind grit and all the hard water deposits. You want the water to be at least 125 degrees or so to activate the detergent, but that’s about it. Use a good POWDER detergent (Recommended amount I believe is 1 Tb-spoon per grain of hardness, if you are 10 or more, fill the cups) and boost your rinse aid up to Max.

I describe flash drying to people with this scenario. If you had a GORGEOUS black car, would you wash and wax it in the heat of the day in direct sun? When they say no I ask them why and they state it would leave all the those white spots all over it. This is what happens in the DW. Glasses look like they were rinsed in milk, and fine food particles are left behind. To prove you glasses have hard water (can be cleaned) and not etched (live with the white or chuck them) try filling one up with white vinegar half way and let it soak. If when you rinse it the white is gone from the area the vinegar was, it’s hard water. DW’s need 3 things, Mechanical action (Arms, you state they are spinning fine), Thermal (120-125 to activate detergent) and Chemical (Good quality POWDERED detergent matching the amount to the hardness and use rinse-aide.

Also make sure you are not skipping a fill during the cycle, or have the water siphoning out from the drain line not being looped up high enough or the lack of a siphon break if draining through the floor. If you know the filters are clean, and the arms are all clean and the water is there, and the motor turning, it might just be one of the things I listed.

Also, be sure to check out this post on phosphates and dishwashing detergent==> http://fixitnow.com/wp/2010/08/22/coping-with-phosphate-free-dishwashing-detergents/

And this one on handling hard water and mineral buildup problems==> http://fixitnow.com/wp/2010/07/06/handling-hard-water-and-mineral-buildup-in-todays-dishwashers/

Need parts or accessories for your dishwasher? Get ’em here==> http://parts.fixitnow.com

– Posted using BlogPress from my iPad

Handling the U1 error code on a Fisher-Paykel DD602 dishdrawer

The U1 error code on these early-model F-P DD602 dishdrawers means that you need to set the water pressure to be either HP (high pressure) or LP (low pressure). Here’s how to do that:

– Turn on the drawer and open it

– Press the PROGRAM CHANGING and ECO buttons at the same time, wait about five seconds and the screen will show HP or LP

– Press the START/PAUSE button and the setting will change, the sound pitch will also sound high or low

– Turn off and test

A fantastic photo essay detailing the disassembly of the motor-pump on the new Bosch Ascenta dishwashers, an Internet premiere exclusive!

Now, for the first time ever on the Internet, an illustrated and annotated guide to disassembling the motor-pump assembly on Bosch’s new budget line of dishwashers, ironically named “Ascenta.”

slantsixdan, a Scholar of Advanced Appliantological Studies at the Samurai School of Appliantology, has written this fine photo essay detailing this procedure. It’s even better than the procedure illustrated in the official Bosch service manual. Let’s tip toe through these repair tulips with Dan:

Bosch Ascenta Dishwasher SHX3AM05UC01 Motor-pump Disassembly

To learn more about your dishwasher, or to order parts, click here.

Tips for installing the sump inlet boot in a GE GSD model dishwasher

Many a noob attempting to replace or reinstall the rubber sump inlet boot on these GE dishwashers end up with water leaks at the boot-tub junction. As a result, they are often tempted by the Great Satan to use silicon sealant to make a water-tight seal, not realizing that this is but a poor attempt at a band-aid for an improperly installed sump inlet boot.

Installing these sumsabeeches can be a real flatulence-inducer. But unbunch thy panties, dear ones, for Sublime Master appl.tech offers these words of solace to guide thee on the path to appliance satori:

No silicon necessary, the most common thing I see with [leaking] complaints is that the sump isn’t correctly in the channel of the tub. When it enters the tub you have to stretch the rubber over the groove, not on the inside. When you have it correct, it will lay there flat, flush with the bottom.

Read more: http://applianceguru.com/forum1/27597.html#ixzz10fIttvuW

Get appliance parts at http://parts.fixitnow.com

GSD400T GSD500T GSD530T GSD550T GSD650T GSD680T GSD700T GSD730T GSD750T GSD780T GSD800T GSD830T GSD900T GSD930T GSD950T GSD980T GSD1200T GSD1230T GSD1350T GSD1380T GSD1400T GSD1410T GSD1420T GSD1430T GSD1910T GSD1920T GSD1930T GSC700T GSC800T GSC1200T GSM603T GSD4330Z02WW GSD4330Z02 GSD4330Z GSD433

To learn more about your dishwasher, or to order parts, click here.