If the chill-maker coils in your freezer start looking like this, then you’re headin’ for warm beer… http://post.ly/yYTT
If the chill-maker coils in yo…
Leave a reply

If the chill-maker coils in your freezer start looking like this, then you’re headin’ for warm beer… http://post.ly/yYTT
“John Guest” fittings is the name given to the seemingly magical fittings that hold a plastic tube in place without, apparently, anything. Even though the plastic tube is holding water at 60 psi (or more) pressure, the fitting holds the tube securely in place without a single drop of leakage.
How does this happen?
No one knows.
And no one cares, you just want to be able to remove the stupid tube when you need to like, say, to replace the water inlet valve on your fridge, or remove the water filter housing.
Now, for the first time ever in the history of the Universe, this ancient and mystical knowledge is revealed to you free of charge! Many a fine appliance warrior has died protecting this esoteric wisdom so please don’t profane their memory by using your new-found knowledge for nefarious purposes. This picture reveals the ancient secret of removing plastic tubing from the magical John Guest fittings:

When you re-install the tubing into the John Guest fitting, just be sure to push it in all the way. If you had to cut the tubing that’ll go into the fitting, make sure the cut is nice n’ flat, not sloped.
To learn more about your refrigerator, or to order parts, click here.
KitchenAid refrigerator of the built-in kind (KABI); if you own one, you’ll want the service manual. Come and git it: http://j.mp/c3ux0f
Ice door chute on your Whirlpool fridge dispenser flops around and doesn’t close up right? Well, don’t you fret none ‘cuz the Samurai has The Fix™!
The problem is the cheap-azz plastic door hinge is broken off as shown in the picture below:

The Fix™ is to buy the new ice door chute kit and install it. You have to break off the remaining tab and the bracket in the kit has metal tabs for the pin to go through so the problem wont reoccur. The bracket is held into place with double sided tape. The kit comes with everything you need, including destructions. Just follow the directions and take your time. All good.
To learn more about your refrigerator or to order parts, click here.
Tech Tip O’ Da Day: You’re troubleshooting a refrigerator problem and you open the freezer door to check the evap… http://post.ly/xo8R
Haiku: Ten thousand Maytags / cannot change temperature. / Read Scroll of Service. http://post.ly/xd2T
Whirlpool ET8WTKXKQ0 refrigerator tech sheet: wiring diagram, troubleshooting help, and much, much more! http://j.mp/9PI0Jt
Tech sheet location on newer Whirlpool-built fridges: remove toe grille, find cheese wrapper glued to cabinet bottom; slit & remove.
If you’re having weird, poltergeist problems with the dispenser door or display on your Maytag or Amana “ICE-2-0” refrigerator, this post is for you!
Affected Models:
Maytag Models: MFI2568AEB MFI2568AEQ MFI2568AEW MFI2568AES MFI2067AEB MFI2067AEQ MFI2067AES MFI2067AEW
Amana Models: AFI2568AEB AFI2568AEQ AFI2568AES AFI2568AEW
The Fix:
Replace the high voltage control board kit.
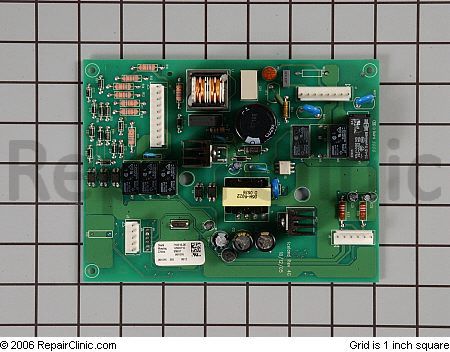
(click it to git it)
The kit includes: control board, installation and programming instructions, return label and card for the old part.
Samurai’s stash of refrigerator repair docs & manuals on Scribd, by invitation only. And you’re invited. http://ow.ly/2CMWu
LG Refrigerator LRSC26910 Error Codes http://post.ly/wxGS
Sublime Master of Appliantology john63 explains this procedure in the Samurai Appliance Repair Forums:
On the LG refrigerator model LFC20740SW—the DOOR HANDLES are removed by either grasping the HANDLE and pulling in an upward motion—about an inch.
OR
I prefer to protect the bottom of the HANDLE with a piece of cardboard or rag and lightly tap the bottom with a small hammer. Once the DOOR HANDLE moves up about an inch or so—it can removed.
Using a 1/4 ” allen/hex key—tighten the two BOLTS that the DOOR HANDLE attaches onto.
If this fails to provide a snug fit–check:
1) That the DOOR HANDLES are re-installed properly—reverse of removal–but must be fully seated on the BOLTS on the door.
2) The INSERTS on the DOOR HANDLE is somehow damaged (not likely) and should be replaced. These are the metal pieces on the opposite side of the HANDLE which slips over & onto the door BOLTS.
The french door gaskets can *tear* if they lack lubrication.
Due to the fact that french door style refrigerators do not have a *center partition* like a side-by-side refrigerator—-the french door gaskets must seal **sideways**.
All french door refrigerator door gaskets should be checked for a slippery feel at this section of the gasket. Use FOOD GRADE SILICONE or VASELINE. Just a thin coating.
To replace the DOOR GASKETS—pull off the old gasket from the door until reaching the **sideways** section.
The plastic trim needs to be pulled off at this part of the door. Try to get your fingers into the leading rdge and pull until the plastic tabs “snap” and release.
Using a flat / slot screwdriver—-the two white locking tabs will need to forced out from their mounting holes. This is the most challenging part of removing the gasket.
If you get this far—let us know. There’s more to be aware of when installing the new gasket.
Here are the part links for the door gaskets:
Relay failure melted down the terminals on this compressor. Many times, the terminals will become brittle and break off. Reconnecting the new relay becomes an artistic challenge at this point. Sometimes, there’s no choice but to replace the compressor for big bucks. This is always true if one of the compressor connection studs breaks off.

So what caused this? A cheesy electrical part, namely the relay, failed because, well, it’s a cheesy electrical part. An unsatisfying answer I know but, without getting into the engineering analysis of material failure, that’s the short answer. And don’t blame the engineers; feast your blood-shot squinties on the bean-counters and marketing geeks hovering over the engineers, hounding them about how the appliance needs to come in at $X in order to meet “corporate projections.”
Frigidaire PLHS267ZA SxS fridge – can’t control temperature on fridge side. Replace the damper assembly. http://j.mp/aTpe7G
 Let’s say you’re gonna do some tests on your refrigerator compressor to see if it’s okay. Or, you need to figure out how to wire up a generic (Supco) start relay/overload combination. So you pull the relay cover off the compressor, remove the relay/overload and this is what you see.
You need to figure out which posts correspond to the Start, Main, and Run windings ‘cuz if’n you don’t and you go and wire that relay/overload up wrong, well, you just went from a $30 easy-as-pie repair to a $300 rectal cramp.
What’s a brutha to do?
Well, urine luck, budrow, ‘cuz one of the wise and beneficent Sublime Masters of Appliantology at the Samurai Appliance Repair Forums, Bobice, has graciously prepared this little primer on how to tell them little posts apart. Let’s give a listen to Master Bob:
Using a good multimeter set on ohms, remove the compressor terminal cover with the unit off.
Touch one lead (of the meter) to one terminal and the other lead (of the meter) to one other terminal and record your reading . Lets call these terminals (A) and (B). The remaining terminal lets call (C)
So for example A-B=7 Ohms
Now lets read A-C and record. Lets say 5 Ohms
Now lets read C-B and record. Lets say 12 Ohms
Now lets add all the A’s= 12 Ohms
Now lets add all the B’s=19 Ohms
Now lets add all the C’s=17 Ohms
The highest reading will be the “Start” winding
The next highest reading will be the “Run” winding
The lowest reading will be the “Common” winding
Therefore B= “Start”
The next is C=”Run”
The remaining terminal A= “Common”
Kin Ah hears a “Amen?”