Appliances are electro-mechanical devices— that’s a fancy word that means they have electrical and mechanical parts. This also means that appliances can have either electrical or mechanical failures. Most people with one eye and half a brain in their skull can figure out the mechanical part. But very few do-it-yourselfers have even the basic skills needed to troubleshoot an electrical problem in an appliance such as reading a schematic and wiring diagram and using an inexpensive multimeter, like the one shown here to the right ($15), to make electrical measurements.
Reading wiring diagrams and schematics is something I do all the time with enrolled students in the Samurai School of Appliantology. But if you don’t know how to use a basic multimeter to make two simple electrical measurements, then you don’t have a prayer of troubleshooting even the most minor electrical problem–all you’ll be able to do is guess about which part might be bad. That’s what we call the Shotgun Parts Changing School of Appliance Repair.
Also, if you don’t know how to use a multimeter, you’re not even eligible to enroll in the Samurai School for live appliance repair help. I used to spend hours on the phone, explaining to grasshoppers how to use the $20 multimeter they just bought from Radio Shack to measure continuity or voltage. “Ok, put the black probe in the ‘-‘ slot and the…” Those days are over.
Ok, grab ‘hold of those two large lumps at the base of your spine and let’s light this candle.
Resistance and Continuity Measurements

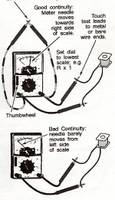
Using a Multimeter to Measure Continuity or Resistance
The picture above shows how to measure resistance (click it for a larger view). Resistance is measured in units called “ohms.” You’ll commonly want to know the resistance of things like bake elements and solenoid coils. For example, a good bake element typically has a resistance of about 30 ohms. If your oven’s not baking and you measure the resistance of the bake element and the meter doesn’t move, then you know you’got a bad element.
A special type of resistance measurement that we commonly make in the field is a continuity measurement. When we’re testing continuity, we don’t care what the actual resistance is, we just want to know if the thing being tested (switch, wire, fuse, etc.) will allow electricity to flow through it. Continuity is a “yay” or “nay” measurement, a component either has continuity or it doesn’t–it’s kinda like pregnancy in that sense.
Two things to remember when making resistance measurements: 1) the circuit should be de-energized (for those of you in Palm Beach, this means to unplug the appliance first!) and 2) remove at least one wire attached to the component you’re testing to disconnect it from the rest of the circuit so you’re not getting a false reading by measuring through the rest of the circuit.
You wouldn’t believe the number of grasshoppers I talk to who just off and changed the bake element when the oven didn’t work only to find that that wasn’t the problem! A simple ohm measurement would’ve saved them a lot of money and headache. But, some people can’t be bothered with a bunch of “useless theory.”
Voltage Measurements

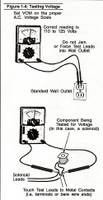
Using a Multimeter to Measure Voltage
The picture above shows how to measure voltage. A voltage measurement at the outlet should be the first thing you do whenever you have an appliance that is completely inoperative, or if you have an electric dryer that’s not heating, or an electric range that doesn’t get hot enough. You’ll need to know the basic anatomy of these various electrical outlets to know what to measure for. Check out the links below for illuminating illustrations of these outlets:
- Standard Household Outlet
- Three-Prong Electric Dryer Outlet
- Four-Prong Electric Dryer Outlet
- Three-Prong Electric Range Outlet
- Four-Prong Electric Range Outlet
Obviously, to measure voltage, there must be power present. This means you can have a hair-raising experience if you touch the wrong thing with your bare hands. As long as you’re holding the probes by the insulated handles and are careful about where you place the metal points of the probes, you’ll be fine. I’ve been working with electricity for over 30 years and I still get shocked every now and then. It only hurts a little, kinda like a snake bite, and it fades quickly. So don’t freak out.
Besides the outlets, you’ll frequently need to measure voltage at various points inside the appliance. Usually, you’re measuring this voltage with respect to ground. That just means that you can clamp one probe to an unpainted metal place on the appliance chassis and then touch the other probe to the points of interest. Your other hand should either be tucked in your pocket or behind your back. This way, you won’t get shocked because you won’t be giving the current a path to flow through your body. Easy, da?
Current Measurements

Using a Clamp-on Amp Meter to Measure Current
Here’s a clamp-on ampmeter (or amp meter) being used to measure current flow through a wire. This is a common test for determining whether or not a gas oven ignitor is good or bad–the only way to really know is by measuring its current draw and comparing to rated draw. And, yes, Homer, the ignitor can glow orange and still be bad.
You’ll also want to measure current draw in cases where you have an electric motor that runs a few minutes then shuts off to see if the problem is with the motor drawing excessive current.
Recommended reading:
- The Secrets of Household Electricity… REVEALED!
- Using Test Equipment
- FAQs for Appliance Repair
- The Samurai Appliance Repair Forum


Yikes! answers all the questions I’ve been asking, and previously got only mumbo jumbo. Right on.