
The Cliff Notes Version
Here’s a simple way of determining whether spin or agitate problem is with your washer’s transmission (also called a gearcase) or some other part like a clutch or a drive coupler.
First off, if the washer agitates okay but does not spin, even though you hear the motor running, you may have a bad lid switch or the lid switch plunger on the washer lid is broken off. Usually, if the lid switch is bad, it won’t make a “click” sound when you press in the lid switch slot with a key or screwdriver. Here’s the most common replacement lid switch for most direct drive models but you should use your model number make sure you’re getting the exact one for your model. Regardless of the particular variation of lid switch in your model, they’re replaced the same way on all direct drive washers and the technique is shown in this video:
If the lid switch is okay, your next step is to remove the cabinet and jumper the lid switch harness (tan to gray). Put the unit in spin and watch the shiny metal clutch disc that is on top of the transmission where the shaft comes out. If the machine starts and runs in spin, check to see if the disc is spinning. If it is, then the problem is not in the gearcase— look for trouble in the clutch (see the “Clutch” section below), basket drive or the tub drive block (see the “Drive Block” section below).
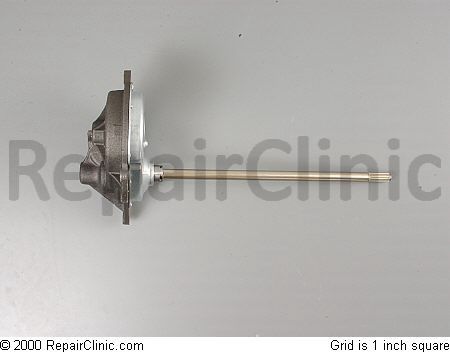
If, on the other hand, the disc is NOT spinning, check for a problem with the motor drive coupler or one of its retainers. This washer doesn’t have a belt. Instead, the motor is directly coupled to the gearcase by a drive coupler; that’s why it’s called a direct drive washer. BTW, replacing the motor coupler is probably the single most common repair on this washer.
To check the drive coupler, you need to actually remove the motor to do this properly– you can’t always tell it’s bad by just eyeballing it from underneath.
Here’s how to replace the motor coupler:
And you can buy the replacement motor coupling here.
If all that looks good, then you may need a new gearcase. If the machine tries to agitate and spin at the same time, this is always a bad gearcase.
(click it to git it)
Here’s how to replace the gearcase:
Weak or No Agitation
The agitator output shaft is the only thing bolted through the center of the machine. The agitator shaft is nested inside of the brake/spin/drive-tube shaft. The spin-tube is nested inside of the outer tub. As the motor spins the gear case the basket drive turns the clutch drum, which turns the clutch ring. The clutch ring applies force to a small cam-lever on the bottom of the spin-tube that releases the spring tension that holds the brake pads against the brake drum. That release allows the torque to then be transferred fully to the top of the spin tube, where the basket attaches.

(click to enlarge)
Weak agitation is rarely a sign of gear case failure— it’s usually the agitator dog and clutch kit.

The agitator is made of much weaker plastics and is designed to take the majority of the punishment. When the agitator dogs fail, you replace them and usually a strong wash cycle is restored. It’s possible for the gears to be worn in addition to the agitator dogs if the items being washed are larger than a bath towel, e.g. bed sheets, bed spreads, pillows, rugs etc. These type of top load machines are just not good at handling these items.
One common sign that the agitator needs to be rebuilt is if the bottom part of a dual-action agitator moves properly but the top part just wallows around lazily in the tub.

The agitator dog kit is easy to replace. The only tools you need are a flathead screwdriver and a 7/16th socket. Here’s the agitator repair kit and a how-to video to get you going:
Clutch Problems
The clutch will usually wear prematurely due to improper loading habits or the agitator clutch dogs being worn. The agitator clutch makes the top part of the agitator circulate the load and actually helps to balance the load. Running the machine with an unbalanced load causes the tub to oscillate erratically during spin and creates an imbalanced load on the clutch.
A quick eyeball test for the clutch is to lean it back and inspect the area around the gearcase and clutch for oil. If you find a lot of oil, you’ll need to replace the gearcase.
The Hand Test for the Clutch
If no hammering sound has ever been heard out of this machine, one of the unofficial tests we professional appliantologists will do in the field is called the Hand Test.
WARNING: This test is not sanctioned by Whirlpool Corporation; it involves bypassing safety equipment and then putting your hand on and near rotating machinery which could result in injury, dismemberment, disfigurement, disembowelment, mangling, hideous screaming, and a bloody death. Proceed at your own risk! Have a nice day.
– put the timer on a spin cycle and open the lid
– grab the inner basket with maybe 30% to 40% of your hand strength with your left hand
– turn on the machine and bypass the lid switch by depressing the lid switch with a key until the machine begins to spin
– if the clutch is engaging properly, the basket should immediately begin to spin and slip through your hand
– if it takes very little force to stop the tub from spinning, the clutch needs to be replaced.
The Clutch Eyeball Test
The Eyeball Test is less risky than the Hand Test but requires lots more time and mechanical fiddling. It’s not as comprehensive as the Hand Test because it only checks for one particular defect with the clutch. But it’s included here for your edification.
Use a pair of pliers to compress the spring of the clutch ring and remove it from the drum. Inspect the rivet holes that hold the pads to the ring. If these holes are packed with debris, then change the clutch. When a clutch is slipping, as well as any other frictional surface, it will develop a glazed look to it which will reflect light and look glossy, just like a lawnmower belt or washer drive belt that has been slipping. This can cause for a burnt rubber or plastic smell.
You don’t need to remove the outer tub to inspect the clutch drum and ring; all you need to do is remove just the gear case. This saves lots of time and headache and keeps the water seals intact and undisturbed.
Replacing the Clutch
Here’s the clutch kit:
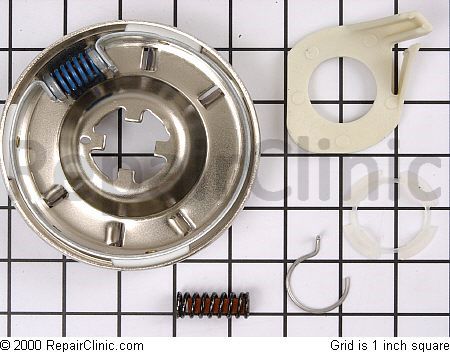
(click it to git it)
The blue spring is for large capacity washers; black for compacts.
Tools needed: flathead screwdriver, Phillips head screwdriver, pliers, putty knife, 7/16th socket, and a hex socket.
How-to video:
Drive Block

The basket is only coupled to the spin-tube through a cast-aluminum drive block. There are two tabs on the top of the spin-tube that interlock with 2 slots molded in the inner circumference of the drive block. When the drive block nut is tightened, it forces the basket down, which compresses the wedge shaped sides of the drive block into the face of the spin-tube, much like a compression fitting for a copper water line.
A worn drive block will usually have a pounding sound, like hammering metal, during spin when it first starts. If there is enough interlocking tab left on the drive block, you’ll see it finally engage at top speed with an empty basket.

Things for which you would need to remove the drive block include:
– inspecting the surface of the spin tube
– inspecting brake pad life and surface contamination
– inspecting brake drum surface and contamination
– inspecting or replacing the drive block
– inspecting or replacing the “self cleaning” filter on the bottom of the basket
– cleaning and inspecting of the inside surface of the plastic outer tub
– removing foreign objects from between the tubs
– possibly removal and installation of a counterbalance weight ring
Here’s how to remove/replace the drive block:
Tools Needed: flathead screwdriver, Phillips head screwdriver, pliers, putty knife, 7/16th socket, a hammer, and a spanner wrench.
And you can buy the replacement drive block here.
