|
|
|
|
| The Samurai Appliance Repair Forums | Appliance Repair FAQ | Live Appliance Repair Help |
Appliance Repair, Tips & Help |
Need help finding something? I can help. If I'm online, send me an IM and I can help you find what you're looking for
Recent Appliance Repair Morsels
|
| Search the vast repository of wisdom at Fixitnow.com: |

FAQs | Forum | Parts | Service | Store | Newsletter | Sitemap | Beer | Home
Add to My Yahoo |
XML/RSS Feed |
Sunday, August 29, 2004
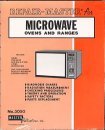
There's loads more microwave oven repair information in this highly recommended reference: Repair-Master Microwave Oven Repair Manual To learn more about your microwave or to order parts, click here.
Samurai Appliance Repair Man cast these pearls at 22:22 ET. [permalink]

Saturday, August 28, 2004
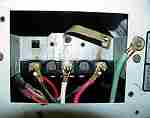
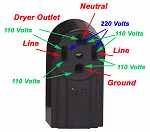
Besides the number of wires in each cord, there are two important things to notice. First, in the four-wire configuration, notice that the dryer's grounding strap is folded back on itself. The whole point of the four-wire cord is to separate the ground from the neutral. The green wire (the "new" extra wire in the four-wire cord) is attached to the dryer cabinet. In the three-wire configuration, the grounding strap is left intact and the neutral and ground are tied together.
One more thing. All these pearls of dryer cord wisdom apply only to electric dryers--gas dryers use a standard 120v wall outlet. Recommended reading: Electrical Requirements for Appliances. For more information on your dryer or to order parts, click here.
Samurai Appliance Repair Man cast these pearls at 00:17 ET. [permalink]
Friday, August 27, 2004
Another common cause for siphoning is not having an air break between the drain hose and the drain stand pipe. Usually, this isn't a problem since the drain hose diameter is usually much smaller than the diameter of the drain stand pipe. But sometimes folks will inadvertently remove the air break by duct taping the drain hose to the stand pipe. They might do this because the drain hose keeps popping out of the stand pipe when the washer pumps out the tub. Other times, the drain hose might fit into the stand pipe with a tight interference fit. The other day, I talked to a guy on the Toll-free Appliance Repair Hotline who was having this problem with his washer. Since he didn't know what caused it, he had taken is whole washer apart, thinking there was something wrong with the pump! I thought I could hear him kicking himself after I explained this siphoning business to him! To learn more about your washer or to order parts, click here.
Samurai Appliance Repair Man cast these pearls at 09:33 ET. [permalink]
Thursday, August 26, 2004
Samurai Appliance Repair Man cast these pearls at 16:15 ET. [permalink]
Wednesday, August 25, 2004
Recommended Reading: Dryer Disassembly Revealed! Dryer Repair Revelations--REVEALED!
Samurai Appliance Repair Man cast these pearls at 23:10 ET. [permalink]
Saturday, August 21, 2004'Twixt running appliance service calls and hiking, I haven't had much time to post Hillstomping Updates. Well, Budrow, urine luck 'cuz here ya go...
Take a moment from your insipid appliance repair ruminations and feast your bleary squinties on the pictures from these hikes. You might decide that it's finally time to dump that piece of junk you're working on; hey, life's too short--take a hike.
Samurai Appliance Repair Man cast these pearls at 08:31 ET. [permalink]
Thursday, August 19, 2004
Didn't see yours? No worries, mate. Check out the complete encyclopedia of dryer belt configurations. I have more detailed photos illustrating the dryer belt configurations here for Need a belt for your dryer? We got 'em for every brand and model you can imagine right here.
Samurai Appliance Repair Man cast these pearls at 19:06 ET. [permalink]
Wednesday, August 18, 2004
Dishwasher Repair Revelations--REVEALED!
Samurai Appliance Repair Man cast these pearls at 18:41 ET. [permalink]
Tuesday, August 17, 2004
Samurai Appliance Repair Man cast these pearls at 18:45 ET. [permalink]
Monday, August 16, 2004
Myth #1: You can clean your dishes better by hand. Truth: Dishwasher wash dishes and utensils at 140ºF, which kills many bacteria. Try doing that by hand. Myth #2: For best performance, you should rinse your dishes clean before loading them in the dishwasher. Truth: Removing all food soils from the dishes and utensils prior to loading increases the alkaline concentration of the dishwashing detergent and increases the possibility of etching your glassware. Etching is a permanent pitting or eroding of the glassware surface. Initially, etching appears as shades of blue, purple, brown, or pink when the glassware is held at an angle to the light. In more advanced stages, the glassware appears cloudy or frosted. To avoid etching, you should only scrape the food chunks off the your dishes and load them into the dishwasher with the remaining food residue still on them. Myth #3: If your metal utensils are showing signs of pitting after washing in the dishwasher, it means you have "corrosive water." Truth: When two different metals (such as silver and stainless steel) contact each other in the hot, wet dishwasher environment, electrolysis can occur and cause pitting. This is not caused by "corrosive water." To prevent the problem, load silver and stainless steel in the silverware basket so they do not touch each other. Myth #4: If your dishwasher isn't washing the dishes very well, it means the pump is bad. Truth: The most common causes for poor cleaning in a dishwasher are:
While a defective pump would certainly prevent proper cleaning in the dishwasher, it is a far less common causative factor than the aforementioned list. Even if the pump really is defective, they can usually be rebuilt for much less cost than buying and installing a whole new dishwasher. To learn more about your dishwasher, or to order parts, click here.
Samurai Appliance Repair Man cast these pearls at 11:40 ET. [permalink]
Saturday, August 14, 2004
Q. How do icemakers work? A. All icemakers are based on a fundamental thermodynamic property of water where, below 32ºF (or, for those of you trapped in a communist country, that's 0ºC), water becomes a solid that we Ameedicans call ice and those infernal godless Swedes call früzen glaza. You want the boring answer? Ok. First, the icemaker signals the water fill valve to open and allow water to flow into the icemaker tray. Note that the water is not "pumped" in--the only pump in your refrigerator is the compressor and you don't wanna be drinkin' what it's pumpin', you dig? The water fill valve simply opens and lets water flow in under household water supply pressure. The amount of water that comes into the icemaker is controlled by the icemaker itself. Once the tray is full, the water sits there until the thermodynamic state change from a liquid to a solid occurs (that means "until it freezes" but it was more fun to say it thata way). When the water tray thermostat senses the ice tray has reached a certain temperature, it starts the harvest cycle--that's when it dumps the ice into your bucket. This keeps on going until so much ice mounds up that it raises the metal arm on the side of the icemaker. Then the icemaker stops until you use up some of the ice. Here's a bonus Fun Fact to Know and Tell: icemakers won't make ice if the freezer temperature is above 17ºF (that's Q. Why do my ice cubes smell or taste bad? A. Impurities in the water, dirty fridge, old ice...these are just a few of the reasons your ice can smell or taste foul. Try cleaning out your freezer once in a while. You'd be amazed at the oozing crud you'll find lurking in there underneath all that frozen stuff that's been in there for years. Sanitize the inside of the freezer with an antibacterial cleanser. Throw out all those old fad diet food packs that taste like the bottom of my shoe and all those semi-melted pop-sickles and cans of orange juice concentrate. As a bonus, you'll probably find you won't get sick as often. Use a filter to clean up the water--garbage in, garbage out. Here's a newsflash: all water has some impurities in it, even water that tastes fine when you drink it. But when you freeze this same water into ice cubes, these impurities are magnified and can become noticeable, sometimes disgustingly so. So, even if the water in your house tastes good when you drink it, this same water can make stinky ice. Come git you a water filter. Q. How long can I ignore changing the water filter for my icemaker? A. This really depends on the strength of your body's immune system. You see, as the filter removes the impurities from your water, it not only becomes saturated with those very impurities, but it is transformed into a veritable metropolis for bacteria. These little creatures multiply and grow to such an enormous extent that they actually begin to clog up the filter with their dead corpses. New little bacteria babies begin living and feasting on the rotting corpses of their fallen parents and cousins, clogging the filter, causing low water pressure, and the resulting hollow ice cubes. At this point in the filter's life, millions of dead and living bacteria, the mixture variously called scum or puss, normally not visible but in extreme cases may cause the ice cubes to appear cloudy, begin sloughing off and traveling with the water to your icemaker. As you use the ice, you ingest these little creatures where they attempt to make their new home deep inside your intestines. The results could range from simply bad tasting ice, to a feeling of a sour stomach, to mild nausea, to violently vomiting up the entire contents of your stomach along with much bile and other slimy secretions. For optimal ice quality and minimum health effects, change your icemaker water filter at least every six months. Q. Why won't my icemaker make ice? A. I dunno--mine works fine so I'm all set, thanks. But you might try reading through the diagnostic guide in the icemaker diagnostic section. I know, I know, I'm always telling you to read stuff. Sorry about that. I'm still waiting for Microsoft to come out with those new electrodes that you shove deep into your skull and then plug into your computer so you can download stuff from the internet directly into that fermented brown mush 'twixt your ears. Hope you don't get one o' them nasty viruses. Ahh-CHOO! Q. Can I add an icemaker to my refrigerator/freezer? A. Ya sure, ya betcha! Picking out the right kit for your fridge can be a little confusing so let this venerable Appliance Tip of the Day be your guiding light through the maze of choices. As a special bonus to my loyal grasshoppers, brand-spankin' new icemakers are on sale now through August 22, 2004--come git you one! And, hey, if you need help installing your new icemaker and even a new water supply line for it, we got installation help for you ratcheer, Hoss. For more pearls of wisdom on icemakers, click here.
Samurai Appliance Repair Man cast these pearls at 07:28 ET. [permalink]
Thursday, August 12, 2004I use the Callwave (more aptly named, Callgrave) internet answering machine service to run the Toll-free Appliance Repair Hotline. Here's a heads-up on a glitch I've been having with the Callgrave service. When you call the Toll-free Appliance Repair Hotline phone number, it only rings my phone three times, even though you'll hear it ring in your phone more than that. But if I don't answer the phone within the first three rings, Callgrave stops ringing my phone and I lose the ability to answer your call at my cell phone. This means there's a lower likelihood of my answering your call in-person and and you'll have to leave a message for me to call you back. I've contacted Callgrave about this problem but, as you might expect, I got a canned reply that didn't even address my problem, as though the Customer Disservice Rep at Callgrave just scanned my email and pigeon-holed it into the wrong problem category. So, until I finally get someone at Callgrave with an attention span long enough to read more than a single sentence, we'll have to put up with this diminished level of service. But, be persistent and, as we sing in that time-honored spiritual, "We shall overcome!"
Samurai Appliance Repair Man cast these pearls at 10:57 ET. [permalink]
Saturday, August 07, 2004Jamie wrote: I just wanted to let you know that your site is awesome. I have a maytag neptune and your site pointed me in the right direction to fixing the problem. I had the same no spin problem. I also had a burnt out R43. I believe that the R43 gets burnt out if there's another problem with the machine. After finding this, I then checked the motor control board and found that the fuse had completely melted. I tried replacing the fuse but that didn't work. Anyhow after contacting repairclinic.com they told me to replace the motor control board AND to get the motor replaced because a new motor and a AC filter was needed to stop the problem from happening again. Just thought you would like to know! All the best. Jamie This is a great update to my War Story on this very problem. As chronicled there, I also saw a burnt R43 on the machine control board in a Maytag Neptune stack laundry unit with a no-spin complaint. Maytag lists the common-fail resistors on the machine control board and their associated washer components in Technical Bulletin TDL-0052-B. R11 is associated with the door latch switch and is almost always found to be burnt when diagnosing the infamous and pervasive no-spin complaints on this washer that dares not speak its name; R43 is not even listed in the bulletin. Apparently, this problem with the burnt R43 on the machine control board has eluded even those titans of engineering at Maytag--actually not too surprising considering that this machine is a monument to contemporary appliance engineering incompetence. So, this means we're all on a journey of discovery together--thanks for adding your glimmer of light to the dim flicker of understanding that we all have about this machine. Hey, maybe if some Maytag engineers read this they'll explain the burnt R43 problem in a future service bulletin...if they figure it out.
Samurai Appliance Repair Man cast these pearls at 00:05 ET. [permalink]
Friday, August 06, 2004Ron wrote: 1997 GE washer keeps filling with cold water, even with machine unpluged. Recently cleaned plugged inlet screens. Why?????
Samurai Appliance Repair Man cast these pearls at 22:13 ET. [permalink]
Thang about it is that the solution is just so gawd-awful simple to fix that I'm reluctant to give away the secret to this great cash cow. Yeah, I know, I shouldn't reveal this treasured trade secret that all appliance repair techs swear an oath to defend. What? You say you want me to tell you anydamnway? Well...ok then. Most of the time, your water flow complaints will be about either the cold or the hot water being restricted to near nothing. Sometimes, both the hot and cold water flow are restricted and the water just trickles in no matter where you got the temp control set at. Either way, 90% of the time, the problem is because of sediment built up on the inlet screen of the washer inlet valve. Almost always, the cold water flow is most affected by sediment because your water heater acts as a settling basin and removes most of the sediment. (This also means that sediment is accumulating inside your water heater and its tank is rotting out even as you read this.)
Now, here's where you can benefit from my lifetime experience as a certifiable appliance guru. There's something I call the cute plumber's trick where the unsuspecting appliance owner calls in one o' them real hairy, stinky plumbers to fix their washer. Well, Buttcrack Bubba correctly takes a look at the inlet valve and figgers he's being reeeel cute by just removing the inlet screen altogether. Most of the time, Buttcrack Bubba does this 'cause he ain't even got a washer valve on his truck so it's the difference between making something off the job 'cause he "fixed" it, or making next to nothing 'cause he didn't have the part and he'd have to come back to do the repair. Buttcrack Bubba's in, what we in the trade call, "the horns of an enema." Yessir, so he goes ahead and removes that screen. The customer don't know any better; heck, all he knows is that water's flowing to his washer again. It's a freakin' miracle!
Other times, problems with no water can be the pressure switch or a burned-out solenoid in the water valve. If there ain't much sediment on the inlet screen of the water valve, you gotsta measure the continuity of the solenoid coil at the terminals. If your meter says there's no ohms in the solenoid coil, that sucker is slap-open and it's gotta be replaced. That's the name o' that tune, Hoss. If solenoid continuity is OK, then you may need to measure the voltage at the solenoid coil. This is a live test, meaning the circuit will have 120v on it, so you can get your big ol' gluteus flabbeous shocked off if'n you ain't careful, Slick. If you ain't getting 120v to the valve during the fill portion of the cycle, then you need to check the pressure switch, or fill switch. This diagram shows how the pressure switch (fill switch) talks to the water inlet valve. Well alright then. That's about all the rocket science involved with this little gig. All that's left for you to do is order a new water fill valve. While you're at it, how 'bout upgrading those cheesy black rubber fill hoses to burst-proof stainless steel-braided fill hoses. Hey, Slick, it's the cheapest flood insurance you'll ever buy. Since we're talkin' about washer floods, come read more about how to prevent 'em ratcheer. And, of course, your loving donations to the United Samurai Beer Fund would be received most joyously. To learn more about your washer or to order parts, click here.
Samurai Appliance Repair Man cast these pearls at 17:31 ET. [permalink]
Thursday, August 05, 2004This message on the Toll-free Appliance Repair Hotline was chosen out of the millions of messages received today as the Message of the Day because it so eloquently and succinctly conveys the sublime essence of appliance repair. Listen to this moving appliance repair poem and let it inspire you in your own quest for Total Appliance Awareness.
Samurai Appliance Repair Man cast these pearls at 23:19 ET. [permalink]
Sunday, August 01, 2004Some people like to read novels; others read the news. The Great Unwashed Illiterati prefer to just "read" the pictures in Hustler and other such pillars of contemporary culture. The Samurai has more philosophical tastes in his reading preferences. I like to read about that great elixir of life, Beer. Especially Cheap Beer. Many folks don't realize that America has a rich and colorful history of Cheap Beer, mostly centered around Milwaukee, the Mecca of Cheap Beer. And now it's conveniently documented in The Cheap Beer Diaries. (Best viewed with a fohty of Old Milwaukee.)
Samurai Appliance Repair Man cast these pearls at 22:49 ET. [permalink]
This indeed is a sorrowful story to tell, grasshoppers. Y'all go grab yerselves a brewski and settle in for one gawd-awful sorry tale. It was a stormy afternoon when the call came in. The wind was kickin' up somethin' fierce and the trees were a-bowin' and a-bendin'. The sky was black with angry clouds just itchin' to unleash their besotted fury on the fair New Hampshire landscape beneath. We barely heard the phone ring over the howling of the wind outside; I shoulda never put down my Old Milkwaukee to answer that phone. But, I am the Samurai--if I hear it ring and I'm sober enough, I always answer the phone. This customer was calling with an emergency of the highest order: a dead dishwasher. C'mon people, it's 2004--no one washes dishes by hand anymore! She frantically explained that the dishes were piling up in the sink even as we spoke and begged me to please hurry over and fix her dishwasher. So I let out a big ol' beer belch (but I let it rumble quietly through my nose, so's not to offend her delicate sensibilities--I'm mannerly thata way) and assured her that I'd be over there as soon as I finished my 40-ounce Old Milwaukee. I realized as soon as I mentioned the fohty that I'd made what them Frogs call a faux pas, which is French for...I dunno, something like puttin' your foot in your mouth. But I cleverly recovered by assuring her that it was only my third one since lunch. See, to be good at this bidness, you gotsta know how the fix the appliance and the customer. So I tapped a kidney and staggered, er, I mean, walked with complete balance and control to my service van and drove to the customer's house, with perfect lane control and observing the speed limit the entire way (just in case any of New Hampshire's Finest are reading this, heh heh.) When I arrived, I verified the customer's complaint: dead dishwasher. Nice one, too. One of them Kitchenaids. Always wanted me one o' them. Wonder how much...anyway, I had to stay focused on the problem at hand. Well, my laser-like, albeit slightly fermented, mind zeroed in on checking the power supply first thang. So I pulled the kickplates and opened the power junction box to measure the voltage, fully expecting the find no voltage. But my meter showed a full 120v at the power wires. Hey, I done see'd this before: prob'ly a bad door switch or a blowed thermal fuse on the control board. They's alots of 'em go bad thata way. So, I removed the control panel to check them thangs out but they were both good. In fact, I was getting 120v clear up to the control board. So, I put my awesome powers of deduction to work and figgered that if I was getting good voltage past the thermal cutoff, clear up to the control and the board wasn't doin' it's dance, then it's a bad electronic control board, slam-dunk, case-closed. Well, I didn't have one of them electronical boards on my van so I had to order one. I advised my customer to buy paper plates so as to avoid piling up dirty dishes and attracting ants and vermin and such 'cause it was gonna be a week before the part came in. So a week goes by and, sho 'nuff, Donny, my UPS man, brung me a brand new board. I love how he brangs me parts. And he always brangs treats for my dawg, Bubba, too. Bubba likes that. Yeah. Anyway, to make a short story long, I diddy-bopped on over to my customer's house and popped in that new control board. Then I prepared to receive gushing accolades of praise as I closed the door and pushed the start button...'cept nothing happened. No lights, nuttin'. Well, I stood up blushing and scratched myself (but stoically resisted the temptation to sniff my fingers). I stammered and hammered something about a bad touch panel 'cause that's the only other thang it could be. Then I got outta there as quick as I could. When I got back to the office, I called my supplier and had 'em overnight a touch panel to me. Next day, I went back out and installed that touch panel, relieved that this job was coming to an end...but nooooo! Still nothing! Now my face had turned a rare shade of deep crimson and I began sweating profusely; not entirely out of embarassment, but more from straining to hold back some powerful flatulence that I tend to get when I'm tense and nervous. But the power of the spicy buffalo wings I had for lunch proved to be too much to withstand and a tiny but pungent squeaker broke free. As the essence de fécal filled the kitchen and her eyes teared up with olfactory recognition, the situation became, well, unbearable. I was, how shall I say, in the horns of an enema. Then, like a poacher's lamp at midnight, inspiration cut through the sweat and stench and did shine its light on the swirling muck 'twixt my ears: "What if," I could hear an angelic voice saying, "the neutral wire in the circuit breaker box is not connected?" Of course! Without a neutral connected, you'd still read 120v on the hot wire but there's no return path for the current to flow so nothing would run. It takes electrical current to make things happen--voltage just creates the potential for current to flow. No path, no flow. So I went down to the breaker box and took off the cover panel. Sho nuff, bigger n' life, the neutral wire on the dishwasher circuit was disconnected from the breaker. Turns out she'd had some electrical work done and the electricians musta been gettin' close to Miller time 'cause they got sloppy with their work. I re-connected the neutral wire to the breaker and that Kitchenaid is still running to this day. Now, this same problem with an open neutral can happen in all kinds of other ways besides sloppy electricians: broken wires, corroded connections, mice, to name but a few. This problem has befuddled many a fine appliance repair man; this one took real kidneys to catch. Moral of the story: checking voltage is good, but checking current is supreme.
Samurai Appliance Repair Man cast these pearls at 21:18 ET. [permalink]
|
 Welcome, Welcome,Grasshopper. I am your gracious host, Samurai Appliance Repair Man.

Hey! There are over 3,000 pages of free appliance repair help at this website! Use the site search box below to quickly find ezzzzacly what you need to Fix It Now! 
Mrs. Samurai's Store
"Keeping the Samurai's clock wound for almost 20 years!"  |
||||||||||||||||||||||||||||||||||||||||||||||||||||||||
Appliance FAQs | Repair Forum | Live Help | Buy Parts | Podcast | Beer Fund | Home
|
Your Appliance Guru:
Samurai Appliance Repair Man 
"If I can't help you fix your appliance and make you 100% satisfied, I will come to your home and slice open my belly, spilling my steaming entrails onto your floor." |
URL: http://www.fixitnow.com
|


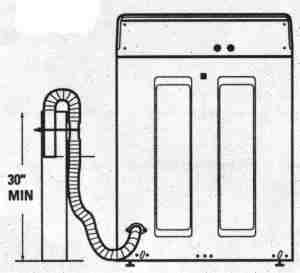 One cause for siphoning is simply that the drain hose discharge is below the fill level of the washer tub. This picture shows the minimum drain height needed to avoid siphoning.


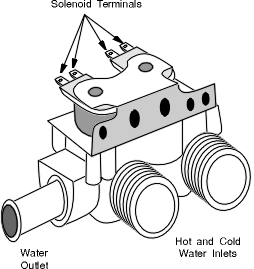 Here's a typical two-solenoid inlet valve. This is the most common, although some Whirlpools use a three solenoid arrangement and front loaders get even more funky, but the diagnosis and correction are the same. Most of the time, what happens is that sediment builds up on the inlet screen of the solenoid valve and restricts the water flow into the valve.
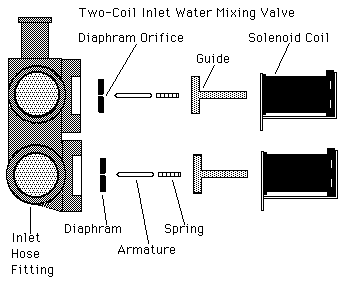 What happens next, though, is a sad tale to tell. Y'see, after a while, the innards of the valve get so gunked up with sediment that the valve can no longer stop the flow of water when it's supposed to (like, when the washer is unplugged). You can see here that they's a whole buncha delicate leetle bitty parts in there, da, comrade? Little, itty-bitty pieces of dirt and pipe scale can stick that plunger guide wide-ace open. So, water just keeps on flowing into the washer. Meanwhile, you're outside playing frisbee with the dog, knockin' back a fohty of Old Milwaukee and the gottdayam washer overfills making one helluva mess in your house. All cause o' that "cute plumber's trick." Now, how smart was that to call in a plumber to do an appliance tech's job?