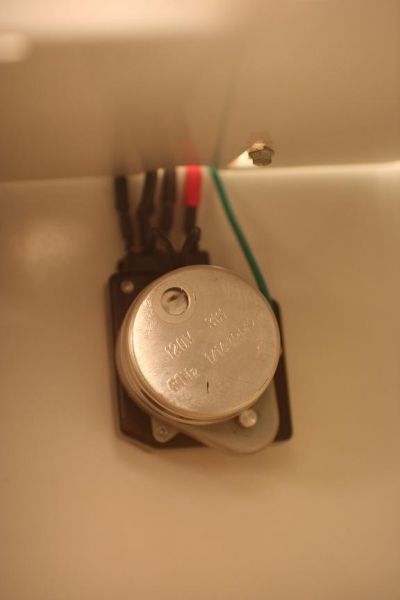
Defrost system failures are a common problem in the Maytag (and Jenn-Air) refrigerators with the Automatic Defrost Control (ADC) boards. Most of the time, the cause of the problem is that the ADC board has failed. Master Appliantologist AZBen has developed and field-tested an ingenious field modification that vastly improves the reliability of the defrost system by replacing the ADC board with the good ol’ mechanical defrost timer. Simple, rugged, and much less expensive than a replacement ADC board. Here’s how he did it:
I’ve been fighting this failed defrost for several months. Fortunately in AZ we don’t get enough humidity for it to frost up very fast… over 3 months between incidents. So being somewhat like the old adage “the cobbler’s children have no shoes”, I did not rush to figure this out, just defrost and go… until I got really aggravated about it.
Then I read all the forums I could about the MSD2756DEW and how it is prone to frosting problems. I saw that the adaptive defrost control circuit board was anywhere from 40 to 55 dollars, and difficult to test, so I had a discussion with the counter help at Johnstone Supply where I buy AC parts. With the wiring diagram, found beside the defrost control board, I was able to match up the B10-988 mechanical timer and 4 of the 5 wires on the original circuit board. The white with black stripe wire is not needed because it is the sensor wire. Using the mechanical timer we will rely on the sensor to open the defrost circuit, but we do not need that information back at the new fixed interval (non-adaptive) timer.
The wires used are Orange (compressor), Yellow (defrost), White (common or neutral), and Red (L1 or hot). At the defrost control the red wire is used only to power the board or the timer motor… power is already applied to the orange and yellow wires and is to be directed through the timer or circuit board back to the white (neutral). So think in terms of grounding the circuit you want to complete. The B10-988 timer has a color code which you can translate as follows: Terminal 1 labeled R is connected to Maytag red wire, Terminal 2 labeled BL is connected to Maytag yellow wire, Terminal 3 labeled OR is connected to Maytag white wire, and Terminal 4 labeled BK is connected to Maytag orange wire.
Once I had the new timer working, I could hear the defrost cycle start with a click and the cabinet lights dimmed, but just for a few seconds. You can make the defrost cycle start by turning the small plastic wheel protruding through the timer back, but you need to do this with a meter attached to see when the contacts close between 2 and 3 (yellow to white wire). A quick check with my fingers and I found that the defrost heating element was still cold. Do this cautiously because when it works it will be red scorching hot and will not be something you want to touch. I moved very slowly toward it to see if the element was hot at the lowest point in the loop.
So I had a second problem, or I have a spare circuit board. Either way, I’m tired of guessing when the defrost cycle is working, so the spinning of the timer flywheel — visible through the clear window — is reassuring and I have mounted it so I can see it without removing the plastic cover in the top of the refrigerator. Now I attempted to slip the pins out of the defrost coil plug, but I did not have the right size tube to hit the release. This would have allowed me to redirect the blue power lead directly to the heating element on the white with black stripe wire, without going through the thermocouple switch. So with the plug pulled, I cut out the thermocouple switch then soldered and shrink tubed the solid white wires together. After plugging back into the 3-pin connector, then forcing the timer to switch back to defrost (the 25 minute cycle ended well before I finished the splice), I immediately got dimmed cabinet lights and a glowing defrost element.
I tested the thermocouple switch that I removed, by putting it into a deep freeze at 0F. It had high resistance, above 100 ohms, too high to power up a heating element that shows only about 20 ohms cold.
Now I have a situation where the defrost cycle will stay on for a full 25 minutes each 6 hours, not the way I want to run. However, observation of the next 18 hours and 3 defrost cycles shows that the element is not overheating the cabinet or scorching the paint on the front cover. This gives me time to locate the replacement switch and re-install it without having to buy the full Maytag assembly… or the PartSelect PS890605 (38.08 with shipping), the only way it is sold is with the heating element and 3-pin plug. The thermocouple switch is marked with a small symbol and CT-7SB 43F 77159-16 3270. I believe 43F or above is the temperature to open the contacts inside.
BTW, don’t be surprised if you have problems with the little tabs breaking off when you slide the top cover out of the refrigerator to access the adaptive defrost control circuit board. Both tabs broke off even though I was very careful. I believe they had sort of fused into the similar plastic of the cover. When I replaced the cover I pushed it up over the remaining part, so that the slot was filled, then ran a screw into each side in the crack. This pulled the cover up snug and keeps it from sliding forward where it could drop off of the front support tabs. The photo shows my defrost timer and the screw to hold the cover where the tab broke off.
Finally I took my owners manual, wiring diagram (from near the adaptive defrost control), receipt for new timer, and wiring modification notes — and placed all these into a large zip lock bag which sits below the bottom drawer in the refrigerator side. A small piece of blue painters tape keeps it from slipping around and no one notices it since it barely protrudes from under the drawer.
AZBen
Update about the photo… the green ground wire is spliced into a green ground wire in the wiring harness above. There was not a ground wire going to the original defrost control board.

To learn more about your refrigerator, or to order parts, click here.

