Now, Grasshoppah, prepare for dishwasher illumination. The Samurai is gonna reveal to you what they never tell you about fixing cleaning problems in your Whirlpool-Kenmore-KitchenAid dishwasher. So, strap yourself in and get ready to download wisdom directly from my brain to yours.
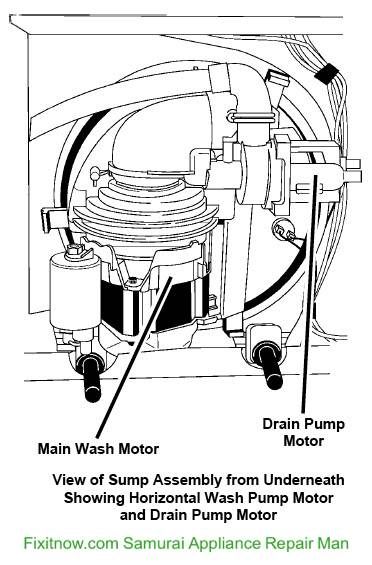 For newer-model Whirlpool and KitchenAid dishwashers (also sold under the Kenmore label with model numbers beginning with 665)– the so-called “Voyager” platform models– download this scroll for some good tips on improving cleaning performance. You can tell if you have the Voyager style by removing the front access panel (at the bottom) of the dishwasher and looking at the motor and pump layout (click the thumbnail image for a larger view).
For older model Whirlpool or KitchenAid dishwashers with the big honkin’ center-mounted motor without a separate pump, here are some tips to improve cleaning performance. Many of the tips below also apply to any dishwasher, with the obvious exception of the suggested replacement parts.
First, try these two things:
1. Use normal amounts of detergent and keep the rinse agent dispenser
supplied with rinse agent.
2. Use Hi-Temp Wash Cycle and Energy Saver Dry to allow for
proper wash action, and slower dry to allow water to sheet off the dishes.
If no joy, then we gradumutate to the more advanced stuff:
Water Hardness: Check the water with a hardness test strip. A hardness of ten grains or more may cause filming. Run a cleaning solution, such as white vinegar, through the system (refer to the “Use and Care Manual”). Other recommended cleansers for hard water situations are Glisten, or Glass Magic.
Water Temperature: Water temperature at the sink closest to the dishwasher should be between 120°F and 160°F.
Water Level: After a complete Fill cycle, check the water level in the dishwasher. The water should cover the fine mesh pump screen and part of the edge of the pump top. Check for the proper drain hose height (20 “) and verify that the dishwasher is not siphoning.
Spray Arms: Make sure that the upper and lower arms are turning freely. Check each arm for blockage and splits.
Drain: Check the dishwasher to make sure that it is draining completely. The water level in the tank after a proper drain cycle should be below the coarse strainer of the pump.
Rinse Agent Dispenser: Make sure that there is rinse agent in the dispenser, and verify that it is actually dispensing. The recommended setting is Level 2.
Detergent Lid Gasket: Check the detergent lid gasket. If the gasket is not present, install a gasket.
Check Valve: Check the pump check valve for proper operation. Listen for “gurgling” at the drain line while the dishwasher is in the Wash mode. It will indicate that the check valve flapper is leaking, allowing drained water to reenter the dishwasher. Try cleaning the gookus out of the check valve. If you still get the gurgling noise, then replace the check valve.
Pump Motor: On units built prior to code date FF47, the pump drain cover plate was the original “2-ball” design. The drain cover was replaced with a single check ball design after code date FF47. If the pump motor has not been replaced, and the unit was built prior to FF47, install the updated the pump motor assembly.
If all things listed above check okay, then replace the electronic control.
To learn more about your dishwasher, or to order parts, click here.