 I was talking to a fellow the other day who told me he had a set of refrigeration gauges that his dear old Pappy left him and he wanted to use them to check the “freon” pressure in his beer cooler. Hey, don’t laugh– folks tell me all kinda stuff that you couldn’t make up even if you wanted to.
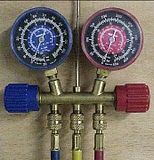
First off, you need to know that in order to use the gauges to check the system pressures, you have to have valves to hook the gauge hoses up to. Since residential refrigerators don’t come with valves already installed, that means you have to install ’em. Installing the valves means you’re introducing another potential leak source in the system. So, the rule is that you never install valves in a residential refrigerator unless you know you’ll be doing sealed system work– like repairing a leaky evaporator or replacing the compressor– or if you’ve already eliminated everything else as the cause of the problem you’re having.
Having said that, here’s the scoop on system pressures in residential refrigerators running R-134a refrigerant:
Low Side: About 2 psig, although I’ve seen these systems pull a slight vacuum, 0 to -3 psig, when down to temperature, meaning the freezer is at 0℉. If you see more than 10 psig on the low side, the system is more than likely overcharged with refrigerant, usually from a servicer who added too much; refrigerators are rarely overcharged with refrigerant from the factory.
High Side: in the range of 125 to 150 psig.
Compressor current draw is a different deal because it’s a non-invasive test and can give crucial insight into the health of the sealed system. Combined with the system pressures, you can usually make a nutz-on accurate assessment of what’s going on in the system.
You measure current draw using a clamp-on ammeter, like the excellent one shown here. Current draw will vary with compressor run time and the amount of charge. A current draw of 1.5 amps may mean you’re overcharged with refrigerant but there are other things that can increase the current draw, too, such as a dirty condenser, burned out condenser fan, etc.
In a normally functioning system, the current draw when the compressor first starts will be higher than when it’s been running a while. For the first few minutes after the compressor starts, you’ll typically see a current draw of something over 1 amp. Then, as system pressures reach steady state, you’ll see the compressor current draw drop to something less than 1 amp.
If you’ve confirmed that you have a sealed system problem like a refrigerant leak or a bad compressor, The Complete DIY Refrigerator Repair Reference has information on doing sealed system work.
To learn more about your refrigerator, or to order parts,
click here.


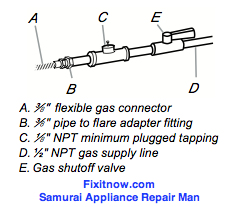 • 1/2 ̋ IPS pipe is recommended.