Author Archives: Samurai Appliance Repair Man

GE Side by Side Refrigerator Freezing the Beer

It happened again: you reach for a can of Old Milwaukee only to feel that tell-tale bulge at the top of the can. The beer froze… again. D’OH!

Refrigerator air inlet cover/damper kit with fan motorThe problem is usually the damper door assembly— these have been a real cash cow, er, I mean, headache for servicers since dayo uno.

What usually happens is that the damper door cracks and gets stuck in the wide open position. Look in there and see. If this is what’s happened to yours, then you’ll need to replace the entire damper assembly.

Maytag Neptune MAH3000AWW Won’t Run

You’ve done your due-diligence checks and have verified that R11 on machine control board is not smoked. Now you need to do the motor phase voltage test described in your tech sheet inside the control console. Sublime Master of Appliantology Trying to help gives the CliffNotes version:

You will want to take the front off of the unit but leave the door on. Remove the two screws from the hinges, and the plates opposite of the hinge location on the other side of the opening (for door reversal). The front will then remove. After that, close the door, put the timer in a 6 hour delay, and pull the JP4 (Yellow, Red, Blue and a double White Jumper ) connector off the motor control board which is located behind the front panel on the front right machine floor and let it hang in the air. When you press the start button in this position, JP4 off, in delay, washer door closed you are in a motor test. The motor should start spinning in one direction at 50 RPM’s. If it does, let it run for a minute or two to see if it shuts off or if it will run. If it does not, you will need to do a voltage test on the board at the connector that has a white wire and a black wire (a green ground I believe as well). If you have 120VAC from white to black, and the motor is not turning, you will need the part listed below:

Motor/control conversion kit, Neptune washer

Read the heart-warming story about how one Grasshoppah whupped-up on his Maytag Neptune washing machine. I laughed; I cried; it became a part of me.

To learn more about your washing machine, or to order parts, click here.

The Samurai has a Liberty Lunch with Ron Paul

The Samurai has a Liberty Lunch with Ron Paul.

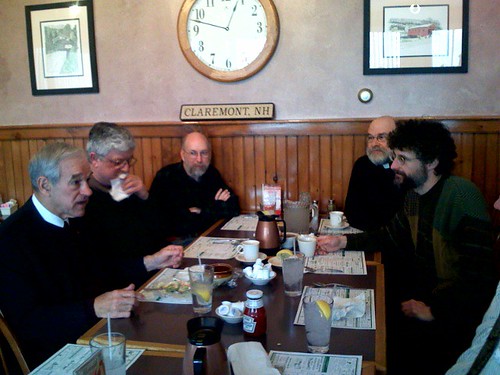
From L to R: Congressman Ron Paul!, Mike Faiella, A Guy, Fr. Andrew Tregubov (my priest), Samurai Appliance Repair Man. Not shown: Mrs. Samurai— she’s taking the picture (click to enlarge).

Monday, December 3, 2007
BJ Bricker’s Restaurant, Claremont, NH

I just found out last Friday that I was going to this lunch. What a rare and unique opportunity to talk with an actual presidential candidate! And not just any candidate either; I was having lunch with the man who could very well become the next commander-in-chief.

As we were eating and making small talk, I waited for just the right moment to ask my question. Then, as the waitress was pouring more coffee for everyone, I got my chance.

“So, Dr. Paul,” I began in my best Perry Mason imitation, “I run an appliance repair website, Fixitnow.com, perhaps you’ve heard of it…?”

“No, never heard of it,” he answered.

“Oh well,” I replied, “your loss. Anyway, I get email from thousands of people everyday complaining about their broken appliances. What’s the gubmint gonna do about this?” I asked, indignantly.

“Do about what?” he asked back.

“‘About what?’ About all these broken appliances, that’s what!” I struggled to keep my voice down– I was *really* getting hot now. Was he dissin’ me?

Dr. Paul shot a puzzled glance to his campaign manager. I could tell by the expression on his face that he was thinking to himself, “Wow! This guy’s really good! How do I answer this?” Yep, I had him right where I wanted him.

But instead he said, “I don’t think the government has any business doing anything about yours or anyone else’s broken appliance appliances. Things break. If you get the government involved in it, they’ll just break more often, stay broken longer, and be more expensive to fix.”

“Yes, things break,” I replied with narrowing eyes, “and that’s exactly why we need gubmint to take over this vital issue because no one’s better at breaking things than the federal gubmint.” I paused for dramatic effect. Dr. Paul was looking at the other people seated at the table. “We need to create a new Department of Appliantology and elevate it to a cabinet-level position. Are you willing to create the new DOA for the Ameedican sheople, Dr. Paul?” I was smelling blood as I moved in for the kill.

“Department of Appliantology?” he was sounding a little irked now. “Are you on medication? I don’t even know what ‘appliantology’ is but I promise you this: your ‘Department of Appliantology’ truly is DOA. In fact, I’m going to hack back *all* the alphabet soup bureaucracy in Washington. If I’m elected, the IRS, DEA, BATF, CIA and many others are all going on the chopping block. The size and scope of the federal government will be slashed to a fraction of its present state.”

*SLAM* It was like someone cracking a two-by-four over my head at full swing. I literally jerked backwards and fell over in my chair onto the floor.

In an instant Dr. Paul, a gubmint-licensed physician, was kneeling beside me as I lay flat out on the floor. He checked my pulse and then turned to Mrs. Samurai.

“I’m sorry, Mrs. Samurai, I should have seen it right away; it appears to be a case of cranial rectitis,” he said somberly. “I’ve been seeing it all over the country while campaigning.”

Cranial rectitis?” Mrs. Samurai asked, her lips quivering slightly. “What is it, Doctor? Is there a cure? Can I get it from the toilet seat?”

Cranial rectitis is where the victim’s head gets, well, let’s just say it’s not in the right place. The disease causes the victim to believe that he needs government in his life. The cure is to simply hear the message of liberty.”

Then he proceeded to explain that freedom is the birthright of every human being on the planet and that the only legitimate purpose of government is to secure and protect that natural freedom. He explained that the federal government today has become a predator and is herding us like cattle into a increasingly restrictive police state. They do this through the proven tactic of problem-reaction-solution: create or exaggerate a problem – whip up emotional reaction to the problem among the sheople – implement a government solution which always involves infringing on more personal freedoms.

As he spoke, I felt my head begin pulling out of my bottom. Slowly at first, then with increasing strength until it suddenly popped out like a cork shooting off a champagne bottle. I gulped in the air like a prisoner who just tunneled his way out of jail. I was cured; I was free man and I knew it!

Dr. Paul cured my cranial rectitis!

Popping sounds are going off all across the country. Catch the cure! Read more about the miracle cures of Dr. Ron Paul:

Key Issues
Cliff Notes Version

Vote Ron Paul!

Working with Electronic Circuit Boards in Appliance Repair

Most appliances today use electronic circuit boards. For example, many appliances use an “electronic control system” consisting of a dime-store calculator LCD display, a plastic touch pad, and a cheesy circuit board, all made in a Chinese sweat shop. Although these boards are manufactured for pennies, replacement circuit boards sell for big bucks, sometimes hundreds of dollars, and are the single most profitable replacement part that any appliance manufacturer sells.

Electronic circuit boards in wet appliances violate the 5th Law of the Prophecy: Electronics and wet appliances do not mix. Nevertheless, it’s hard to find a washing machine, dishwasher, refrigerator, or dryer today that doesn’t use circuit boards for the user interface. And they’re here to stay so like it or not, we better get used to ’em. Hence the raison d’être for this article.

Here are some all-too-common examples of how you’ll use your new-found circuit board skills in appliance repair:

If you’re going to attempt to repair a circuit board, you need to first understand that, in the course of trying to repair the board, you may accidentally inflict collateral damage to the board. The risk of collateral damage is inversely proportional to your soldering skill and how carefully you handle the board. In other words, as your skills in handling and soldering circuit boards increase, the risk of accidentally damaging the board decreases. YOU, and you alone, are responsible for whatever happens, good or bad, to the circuit board while it’s in your hot little hands. If you’re not prepared to take the blame– as well as the accolades– for whatever happens with the broken circuit board you’re thinking about fixing, then don’t even start! I recommend that you practice– a lot!– on an old circuit board before going live on the real thing.

You need to practice two basic techniques: soldering and desoldering. I’m not going to get into the nuances of making a good solder joint– there are lots of references for this all over the Internet, like this one. So rather than bore you with long, tedious descriptions of how to solder and desolder, what you really need are pictures demonstrating the techniques. And, hey, looky-here at what I just happened to have…

And, for your convenience, here’s a shopping list of the basic tools you’ll need:

Handling Electronic Circuit Boards

Many electronic boards are static sensitive. This means that the static electricity naturally present on your body can fry the delicate little IC chips on the circuit board. Always wear an antistatic wrist strap and ground yourself before working with electronic control boards. Always handle boards by the edge and don’t touch discrete components on the board.

Awwite, Tron, go dab some molten lead on a circuit board.

GE Profile Refrigerator Leaking from the Water Dispenser

The water dispenser on your GE Profile refrigerator has a case of the drips. So, you do what everyone does and place a cup under the dispenser spout to catch the water. Yet, despite its effectiveness, the spousal unit will no longer tolerate this mode of operation. Thus your quest for appliance enlightenment begins… and ends right here because you just found it!

Dual water inlet valve kitAll you need to do is replace the water inlet valve in the back of the refrigerator; can’t miss it– it’s the blue thing with wires and tubes sticking out of it inside the service compartment in the back of your refrigerator. I have more refrigerator anatomy help, if you need it.

Bosch Front Loading Washer Nexxt 500 Series Stops Mid-Cycle and Gives Error Code E04

BigChiefNocaHoma, an Apprentice Appliantologist at the Samurai Appliance Repair Forums, owns a Bosch front washer, model number WFMC3301UC. Recently, his Bosch washer developed a problem where it would stop mid-cycle with an E04 error code in the display and he posted this problem in the Laundry Appliance Repair Forum. Sublime Master appl.tech.29501 talked him through it by leading him to check the pump for gookus (that’s a technical term that refers to anything what ain’t s’posed to be there; please, I *am* and professional, don’t use this word at home). Anyway, the stunningly simple solution and an illustrative page from the service manual are all posted in this topic at the repair forum.

The Samurai Appliance Repair Forums: you got appliance problems, we got The Fix.

Icemaker Fill Tube Freezing

This annoying problem can have a variety of causes. Check these four things first:

  1. Make sure the water supply is greater than 20 psi. If too low, the water valve won’t seat properly and it’ll “weep.” Common causes of low pressure are gunked-up saddle tap valves, kinked water supply line, and using a reverse osmosis filter to supply water to the icemaker.
  2. Check between the valve diaphram and valve seat for sediment. If found, do not attempt to repair, buy a new valve.
  3. Check to see if the black, flexible portion of the fill tube is wrinkled, twisted, or kinked which can cause ice dams that block the fill tube.
  4. Find out if the water has been shut off while the icemaker has kept on cycling. This, too, can cause the fill tube to freeze up.

If all the above checks out and you’re still getting fill tube freeze-ups, there’s still one thing left to try.

It turns out that the manufacturer’s have been scratching their heads about this, too, and have concluded that the new fill tube air slit design helps prevent this problem. Buy your replacement fill tubes for your fridge through the links below:

Well al-l-lrighty then.

Still confoosed, Grasshoppah? Browse all the FAQs on ice maker repair. To learn more about your icemaker, or to order parts, click here.

Oven/Range Troubleshooting and Repair Manual

Oven/Range Troubleshooting and Repair Manual

Problem Possible Solution
[Electric Only]
The bake and/or broil element never gets hot.
  • It’s not getting any power at the outlet…DUH!
  • Well, maybe it’s burned out. Attaway, Hoss, just go ahead and replace it with the assumption that nothing else could cause a no-bake condition. How ’bout checking the continuity of the element? Whoa, there’s a brain flash, ya hey? Should read in the range of 20 to 40 ohms. More help on how to troubleshoot it on this page.
  • ‘Course, it could also be a burnt or loose wire to the bake element. I’ve seen it alot.
  • Could be a bad function selector switch, too.
  • Kids and visitors are great for screwing with the mechanical clock "start" or "stop" knobs and pushing them in so the oven doesn’t work.
  • The oven sensor could be open. You’ll need to ohm it out with… wait for it… your ohm meter.
  • Your electronic range control (ERC) board could be fried. Usually, there are self tests you can do for this and the wiring diagram has the key sequence.
  • The thermal cutout switch might be open. I can help you find it if you’ll start a new topic in the Kitchen Appliance Repair Forum.
[Gas or Electric]
The oven won’t self-clean anymore.
  • Your self clean latch is bent or misaligned. Inspect for proper alignment to make sure that latch is contacting the latch switch.
  • The self clean latch switch is fried. Check continuity.
  • Function selector switch is fried.
[Gas or Electric]
The clock doesn’t work anymore.
  • If you have a mechanical clock, the clock motor winding could be open, in which case you’ll need to replace the entire clock.
  • You might be lucky and only have a burnt wire or bad connection supplying power to clock. Check voltage at the clock motor.
  • Fried ERC (on ovens with LED digital display). Nolo Contendre, compadre. Come git you a new one.
[Electric Only]
Oven works but it just doesn’t get hot enough.
  • Oven sensor is FUBAR. You’ll need to ohm it out using a good digital ohmmeter.
  • Thermostat is fried.
  • Check that oven door gasket for rips and tears. That’ll do it, too, Hoss.
  • Bad voltage at oven electrical receptacle. 240v should be measured at the oven receptacle from L1 to L2. 120v should be measured from L1 to neutral and from L2 to neutral– details on this page. Check circuit breaker to make sure it’s not tripped.
[Electric Only]
"I turn the oven on and it goes straight to balls-to-the-wall high heat. Wassup?"
  • Yo, mon, how ’bout checking that thermostat? Contacts should be open at room temp.
  • Maybe your oven relay is fried. These little gems were mainly used in ovens made by Frikidaire (no, I spelled it that way on purpose). This includes Kenmore ovens made by Frikidaire.
[Electric Only]
Oven temp is as erratic as a bat outta…well, you know.
[Gas or Electric]
"My oven door is stuck closed. I’m gonna die! HELP!"
  • You might have a fried ERC. This would mainly affect ovens that have automatic door latching in self clean (no lever), such as Jenn Air’s and some other Maytag brands. Check for error code in display. If an error code is given, check against manufacturer’s code explanations in owner’s manual or tech data sheet inside oven control panel.
  • The self clean latch is bent or someone tried to do the gorilla routine on it. You’ll need to disassemble the oven to get at it. Have fun, Homer– glad I ain’t doing it!
[Gas or Electric]
Getting an error code on the oven clock.

Appliance manufacturers (praise be their holy names), in their infinite wisdom and mercy have determined that it is in our best interest that they carefully guard the meanings of their precious fault codes. And to make our joy complete, they even vary the codes from model to model! So, even though there are no standard fault codes, even within the same brand, Allah has revealed all appliance fault codes to me in a dream. Yea verily, God bless Allah!

[Gas Only]
The bake and/or broil burner do not fire up.
  • The bake ignitor is shot. Listen, Bubba, you can’t tell it’s bad by just looking at it–you gotsta measure the amperage. Just because it glows orange, doesn’t mean it’s good. On round ignitors, look for a current draw of 2.6 to 2.8 amps. On flat ignitors, look for 3.2 to 3.6 amps. Low current draw will not allow the gas valve to open.
  • The valve is fried. If ignitor checks out OK, remove power from oven, pull the two wires off the valve and ohm test. Should read two to five ohms. If open, replace valve.
  • The pilot is out…DUH! Try reigniting the pilot. If it goes out again, check 1) gas supply (out of gas, crimped line, etc.), 2) pilot orifice clogged or dirty.
  • Pilot flame not wrapping around thermocouple. Reposition the thermocouple bulb so the upper third of the pilot flame wraps around the thermocouple bulb. Did I lose y’on that one, Bubba? If so, you better take it to the repair forum ’cause you ain’t gettin’ any smarter staring at the screen.
  • If pilot is spark ignited and you’re not getting spark to the pilot, replace the spark electrode, spark module, and the ignition wire. These parts are inexpensive enough that it’s not worth the trouble to just replace one, replace the entire ignition system as long as you’re in there.
[Gas Only]
"The oven just doesn’t get hot enough and it ruined my angel food cake. I’m just gonna die!"

Still confoosed, Grasshoppah? Browse all the FAQs for ovens and ranges. To learn more about your range/stove/oven, or to order parts, click here.

Stove Troubleshooting and Repair Manual

Stove Troubleshooting and Repair Manual

Problem Possible Solution
[Electric Only]
"One of the elements on my electric stove doesn’t come on and I’ve got company coming and I’m just gonna die!"
  • Ok, so maybe the element is burned out. "Oh, I know the element is burned out because it’s not getting hot." Yes, Virginia, and a bad element is the only possible explanation for there being no heat, isn’t it? How ‘bout we at least do a simple continuity check on the element? A good element will read between 20 to 30 ohms. If the element shows the proper resistance, what else could be wrong? Well, could be a bad receptacle or a bad infinite switch.
  • Ok, so it could be a bad element receptacle after all. On plug-in type elements, pull out the element and inspect the receptacle and element plug ends. If you see lots of charring or pitting, replace the receptacle and the element.
  • The infinite switch could be fried (and frequently is, *gasp*!). Test for 240 volts AC at the two terminals going to the element when the switch is turned on. Yes, Grasshoppah, you’ll need to use your meter and these are hot tests, meaning that voltage and amperage are present and could fry yo’ ace.
[Electric Only]
The element only goes to high no matter where it’s set.
[Gas Only]
The burner won’t fire up.
  • Spark module is fried. Make sure the ignitor is getting 120v. Ensure valve switch is also sending 120v signal to begin ignition. If you don’t hear clicking sounds anywhere in the range, the spark module is toast.
  • One of the valve switches is fried. Test continuity.
  • If ticking sound is intermittent or muffled or seems to alternate between burners, then the spark module is defective.
  • A worn (leaky) ignition wire. The insulation on the ignition wire going to the electrode(s) can wear thin in spots causing the high voltage sparks to shunt to ground. You’ll usually hear muffled ticking noises in odd places in the range. Inspect spark wire for wear spots in outer sheath.
  • Stove electrical supply receptacle is reverse wired (hot side is neutral and neutral side is hot). Rewire receptacle observing correct polarity.
[Gas Only]
The flame just does its own thing and can’t be adjusted.

Still confoosed, Grasshoppah? Browse all the stove repair FAQs. To learn more about your range/stove/oven, or to order parts, click here.

The Complete DIY Refrigerator Repair Reference

Now, at long last, it’s the complete do-it-yourself refrigerator repair reference that you’ve been clamoring for. This post links you to resources for any type of problem you’re having with your refrigerator, from simple control problems to advanced sealed system work. Awwite, grab ‘hold of those two large lumps at the base of your spine and let’s romp. Giddyup…

If you’re in an emergency because your refrigerator isn’t running and all your beer is getting warm, start with the warm refrigerator fire drill. In particular, if you’re hearing an occasional hum-CLICK and the refrigerator is warming up, start with this page.

Now we move on to more general diagnostics in the Portable Refrigerator Repair Manual.

OK, so you’ve worked through the diagnostics and you’re suspecting that your refrigerator has a Freon leak. How can you be sure? Like ahso.

If you’ve confirmed a Freon leak and you think you have the huevos to do the sealed system work yourself, you absolutely need this refrigeration service training DVD from Electrolux. (The compressor, its associated tubing, the evaporator, the condenser, and the Freon charge in the tubing are collectively referred to as the “sealed system.”) It takes you through all the procedures you’ll need to master in order to do your own sealed system work. If you have an older refrigerator, you may need to convert from R-12 to R134a.

“But, Samurai, shouldn’t we get an EPA license to buy the Freon so that we can be obedient to the gubmint and do everything they tell us to do?”

Ahh, Grasshoppah, your bootlicking question reminds me of a story… what was it?… ah yes, The Story of O.

For written sealed system service procedures and a list of tools you’ll need, download this reference.

And this topic in the Kitchen Appliance Repair Forum has a good discussion about recharging tips.

Naturals, by gawd, every last one of you, naturals! Now go and make an old salt proud!

To learn more about your refrigerator, or to order parts, click here.

Electrical Outlets for Electric Ovens, Ranges, and Stoves

Bought a new range or planning to? Planning an addition to your house? Building a new house? These are just a few of the ways you could run into converting from a 3- to 4-wire range outlet. Whatever your situation, this illustrated anatomy of electrical outlets for ranges, ovens, and stove should help you see what’s going on.

Three-Prong Range OutletHere’s the older style, but very commonly seen 3-wire range outlet. All the terminals are identified here. Click the pic for the larger view.


Four-Prong Range OutletThis the the 4-wire outlet required by the newer editions of the National Electrical Code (NEC). Click the pic for the larger view.


More help, including parts for all brands and models, ratcheer. If you’re still confoosed, come start a new topic in the Kitchen Appliance Repair Forum.

To learn more about your range/stove/oven, or to order parts, click here.