Category Archives: Appliance Repair Posts

All appliance repair categories.

How to manually unlock a stuck door on a Whirlpool Duet washer

This procedure is for the Whirlpool Duet (not the Duet “Sport”) and Kenmore HEt front load washers. Example Whirlpool model numbers: GHW9100L GHW9200L GHW9150

Manually Unlocking the Door Lock System

1. Unplug washer or disconnect power.

2. Remove the lower kick panel.

3. Reach up along the inside of the front and locate the bottom of the door switch/lock unit.

4. Located on the bottom of the door switch/lock unit is a tear-drop shaped tab.

5. Gently pull the tab down about a ¼” or until a click is heard.

6. The door may be opened.

To learn more about your washing machine, or to order parts, click here.

A fantastic photo essay detailing the disassembly of the motor-pump on the new Bosch Ascenta dishwashers, an Internet premiere exclusive!

Now, for the first time ever on the Internet, an illustrated and annotated guide to disassembling the motor-pump assembly on Bosch’s new budget line of dishwashers, ironically named “Ascenta.”

slantsixdan, a Scholar of Advanced Appliantological Studies at the Samurai School of Appliantology, has written this fine photo essay detailing this procedure. It’s even better than the procedure illustrated in the official Bosch service manual. Let’s tip toe through these repair tulips with Dan:

Bosch Ascenta Dishwasher SHX3AM05UC01 Motor-pump Disassembly

To learn more about your dishwasher, or to order parts, click here.

Troubleshooting tip when working on a Kenmore HE2T / Whirlpool Duet “Sport” washer, RE: door panels, F28

International Academy of Sublime Masters of Appliantology Fellow, Willie, recently offered these troubleshooting tips in the Samurai School of Appliantology. Y’all gather ’round, chillin’, and let’s listen in:

This appears to be a HE2T Kenmore – a Whirlpool Duet ‘SPORT’.

It’s very important to have all the panels in place or if not in place and testing remove ground switch and wrap with electrical tape to keep switch closed while testing.

If any of the grounding wires that go thru the front or rear panel ground switch are broken or the switches are bad, (OR PANELS OFF), you will get a F28 error.

____________________
William Burk (Willie)
Willie’s Budget Appliance Repair
Eureka, CA 95501

Sent from my iPad

Appliance repair service manuals on request via Twitter… FREE!

This is a shameless and experimental Twitter promotional campaign. Here’s how it works:

● Go to Twitter.com. If you have an account, log in; otherwise, create a free new account.

Follow me on Twitter; my Twitter username is @fixitnowsamurai. This is important because if you don’t follow me, I can’t get the manual to you as explained below. Here’s my Twitter page: http://twitter.com/fixitnowsamurai

● Send a tweet to @fixitnowsamurai requesting the service manual you need. Just send one tweet– don’t worry, I’ll get it. Be sure to include your complete model number; no model number, incomplete model number, bad model number = no manual. Model number help here: http://fixitnow.com/wp/2003/05/22/appliance-tip-of-the-day-the-ten-commandments-for-reading-appliance-model-numbers/ NOTE:Sending multiple, repetitive tweets is unnecessary, obnoxious, and will delay getting a manual.

● If I have the manual (and I usually do), I’ll send you the download link via direct message on Twitter.

That’s it!

We’ll see how this works out. If it turns into a big headache for you or me, that’ll be the end of this brave new ‘spearmint. But I’m hoping this will turn out to be one of those synergistic, symbiotic kinda deals. If this works out, I have other plans in mind that I think you’ll like. 😉

Tips for installing the sump inlet boot in a GE GSD model dishwasher

Many a noob attempting to replace or reinstall the rubber sump inlet boot on these GE dishwashers end up with water leaks at the boot-tub junction. As a result, they are often tempted by the Great Satan to use silicon sealant to make a water-tight seal, not realizing that this is but a poor attempt at a band-aid for an improperly installed sump inlet boot.

Installing these sumsabeeches can be a real flatulence-inducer. But unbunch thy panties, dear ones, for Sublime Master appl.tech offers these words of solace to guide thee on the path to appliance satori:

No silicon necessary, the most common thing I see with [leaking] complaints is that the sump isn’t correctly in the channel of the tub. When it enters the tub you have to stretch the rubber over the groove, not on the inside. When you have it correct, it will lay there flat, flush with the bottom.

Read more: http://applianceguru.com/forum1/27597.html#ixzz10fIttvuW

Get appliance parts at http://parts.fixitnow.com

GSD400T GSD500T GSD530T GSD550T GSD650T GSD680T GSD700T GSD730T GSD750T GSD780T GSD800T GSD830T GSD900T GSD930T GSD950T GSD980T GSD1200T GSD1230T GSD1350T GSD1380T GSD1400T GSD1410T GSD1420T GSD1430T GSD1910T GSD1920T GSD1930T GSC700T GSC800T GSC1200T GSM603T GSD4330Z02WW GSD4330Z02 GSD4330Z GSD433

To learn more about your dishwasher, or to order parts, click here.

Maytag Dryer MDG8400AWW will only tumble in the “Extended Tumble” cycle and does nothing on any of the other ones

Model number variations: MDG8400

This is a classic bad timer condition; if the dryer runs in one cycle it should run in the rest. Replace the timer and problem solved!

Part link for the timer==> http://www.repairclinic.com/SSPartDetail.aspx?s=t-MDG8400AWW-%3d%3dc13i1002865&PartID=1002865

To learn more about your washing machine, or to order parts, click here.

Tips for replacing the door gasket on an LG WM2277HW washer

First, seat the rubber boot into the groove of the door, it will stay there. Then put the wire clamp on three quarters of the way from the 10 o’clock position to the 6 o’clock position. Make sure the wire is properly in the groove. Then hold the 10 o’clock position of the wire with your right hand and the 6 o’clock position with your right knee and pull the spring apart with a hooked dental pick or similar type tool with your left hand and slip it into the rest of the door boot groove. It’s so easy a caveman could do it but that’s just my opinion.

Read more: http://applianceguru.com/forum2/19958.html#ixzz10b56EEyC

Get appliance parts at http://parts.fixitnow.com

How to disassemble a Maytag Atlantis washer to install a new transmission

Janet wrote:

how to take apart a maytag atlantis washerto install transmission

… … …

Oh, sorry, I was waiting for you to go ahead and tell me but I guess you were axin’ a question. 😉

Funny you should ask/state that ‘cuz I just posted a link to the repair manual for this on Twitter: http://bit.ly/d83eZI

I’m always cranking out goodies like this, just follow me on Twitter to git ’em: http://twitter.com/fixitnowsamurai

It’s free!

To learn more about your washing machine, or to order parts, click here.

Auto Load Detection in Newer Model Whirlpool (and some Kenmore) Top Loaders; We’re Not in Kansas Anymore, Toto!

Newer model Whirlpool-built (includes Maytag brand and some Kenmores) top loading washers are using a newfangled technology called “auto load detection.” Whirlpool washers with model numbers like WTW57ESVW0 and Maytag washers with model numbers like MVWC6ESWW0 use this new system.

Auto load detection senses the load of clothes in the tub and automagically provides the correct amount of water to get ’em washed. It works with a flow meter and an automatic temperature control (ATC) switch, both also new, to accomplish this miracle of modern engineering.

This is all done as a band-aid attempt to reduce the obscene amounts of water used by these dinosaur top-loading washers. Of course, if you, as the green-minded and environmentally conscientious consumer, were truly concerned about conserving water, you wouldn’t be using one of these machines in the first place; you’d use a front loader or one of the high-efficiency top-loaders. But I digress…

As far as band-aid hacks go, this one has been pretty reliable. When something does go horribly wrong, one of the most common problems you’ll see is that the washer will start agitating as soon as it starts filling with water when you start the machine. It may also start filling during the spin cycle with the end result of your clothes coming out sopping wet. How’s that for water conservation?

If you see this problem, the cause is almost always a bad water level (load sensor) switch. It lives in the control console and looks like this:

You should be aware that Whirlpool uses at least two variations of the auto load detection switch so be sure to look up the correct switch for your washer using your model number. Just get your model number and plop it into this nifty search box and you’ll be sure to get the right switch (or any other part you need):


In case you want to know more about the new auto load detection system, here’s the tech bulletin from Whirlpool:

Auto Load Detection in Whirlpool-built Top-loading Washers

To learn more about your washing machine, or to order parts, click here.

The sound of bad drum bearings in a front loading washer; if your washer sounds like this, you’re goin’ shopping.

Awwite, grasshoppers, y’all go grab you a brewski and weird ol’ Uncle Samurai’s gonna tell ya a sorrowful tale of a heartbreak service call on a Kenmore (Frigidaire) front load washer.

Went out on a service call the other day on one of these machines. Complaint was that the washer was full of water, wouldn’t pump out and wouldn’t spin.

Well, this is a pretty common problem with any front loader– no pumpy-outy, no spinny– and you usually end up finding some piece of gookus, like a nail or a piece of plastic, caught in the pump impeller. I’ve previously posted a nice, commented set of photos detailing this repair that you can peruse here:

Frigidaire Front-Load Washer Drain Pump Clean-Out

So I whipped out my katana and prepared to deal harshly with this washer’s major malfunction. The katana in this case was my wet vac that I needed to use to suck the water out of the drum cuz if’n you don’t do that first, you’ll have one helluva mess when you pull off the pump suction hose.

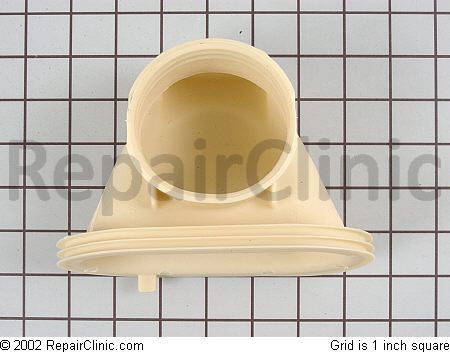
With as much water sucked out of the drum as I could get, I then removed the suction and discharge hoses from the pump and unscrewed it so I could pull it out and feast my bloodshot Samurai peepers™ inside that thang (see the aforementioned photo album link for details on this). With the pump removed, I turned that sucker around and, lo, I did behold the offending item:

Broken piece of the outer tub caught in the pump impeller
(click to enlarge)

That’s a pretty hefty and unusual piece of plastic broken off from somewhars and caught in the pump impeller and it looked uncannily like the same material as the drum, same color, same heft. Somewhere, deep in the murky, fermented recesses of my solid steel Samurai cerebrum, something was nagging at me saying, “Yo, Samurai, sumpin’ ain’t raht.” But I shook it off and proceeded to put it all back together.

After I got it all put back together, I fired that puppy up and prepared to bask in the glory and accolades of having spared another household from a trip to the Laundromat. The machine filled with water and pumped out just fine. But when it ramped up to high speed spin, my bowels got all loose and quivery-like when I heard this noise:

In this next video, you can hear it winding down from high speed spin as the inner basket comes to stop and the chattering noise subsides:

Then came the sinking, sickening horror of realizing that all my foregoing sweat and labor on this washer was for naught. This is the sound of classic drum bearing failure in these washers. If your washer sounds like this, you’re going shopping. The new bearings come factory-pressed into the drum assembly and the cost of the parts alone is over $400. And it’s a complete teardown; a three-hour job that’s best done with two men; not worth the money and I advised the customer accordingly.

In discussing it with the customer, she told me that the washer was making that same loud noise right before it quit running. Then it all came to me in a vision.

I realized that the odd piece of plastic caught in the pump impeller was a broken off piece from the drum. I looked but didn’t find a hole broken through the drum so it must have been an inside piece of the drum that got broken off from the inner basket banging around inside there during high-speed spin.

The moral of the story? Well, there are two:

1) when you see a heavy-duty piece of plastic that looks suspiciously like the drum caught in the pump, stop and ask the customer if the washer was making an unusually loud racket before it stopped running, and

2) some days, I’d rather be licking urinals at the Texaco than running appliance service calls.

To learn more about your washing machine, or to order parts, click here.

Whirlpool Duet washer– push the power button, beeps 3 times but won’t run: the short and shorter solutions

Example model number: WFW9200SQ02

Short answer: Common problem and the solution is to replace the Motor Control Board (MCU):

http://www.repairclinic.com/SSPartDetail.aspx?s=t-WFW9200SQ02-%3d%3dc13i1257029&PartID=1257029

Longer answer but still mercifully short:

I’ve posted about a very similar problem to this one except with the display showing the F70 error code. Same diagnostic procedure and solution described in that post would apply. Come hither:

http://fixitnow.com/wp/2010/08/16/whirlpool-duet-sport-washer-testing-and-replacing-the-motor-control-unit-mcu/

To learn more about your washing machine, or to order parts, click here.