Category Archives: Refrigerator Repair

How to fix a scorched muthaboard in a #GE #refrigerator

Your GE fridge is on the fritz and not keeping the brewskis cold anymore. So you go behind the fridge, remove the metal cover on the muthaboard compartment and SHAZAYYAM, looky yonder…

GE refrigerator scorched muthaboard
(click for larger view)

How does a brutha fix this sucka? Ain’t but one way, Hoss: replace that mutha. Come git you a new muthaboard ratcheer.

Easy to install, just sing along with the destructions that come bundled with the new board. Good to go, sailor.

You may be wondering, “But dearly besotted Samurai, won’t the new board just blow again unless the cause of the failure is identified and correctified?”

Interesting modification of the word, “corrected,” grasshoppah.

The answer is that these electrolytic capacitors will just blow out like that without anything else necessarily being bad. But here’s a little secret: If you buy the new board through my part link, install it and it blows again in less than a year, return it for a full refund! It’s the best deal you’re gonna get all day and it makes for a risk-free repair.

Now go forth and conquer!

To learn more about your refrigerator, or to order parts, click here.

Putting a #Samsung #refrigerator into forced #defrost mode

If you’re troubleshooting a defrosting problem with your Samsung refrigerator, one of the first things you’ll want to do is manually put it into defrost mode so you can use your meter and see if the control board is sending 120vac to the defrost heater. Here’s the procedure that’ll work for most current Samsung refrigerator models:

Samsung Refrigerator Forced Defrost RS2534WW RS2534VQ RS2556WW RS2556BB RS2556SH RS2578WW RS2578BB RS2578SH

To buy parts for your Samsung refrigerator, click here.

Disassembling the dispenser on an LG LRSC SxS refrigerator

LG LRSC SxS Refrigerator Dispenser Disassembly

To learn more about your refrigerator, or to order parts, click here.

Tips for installing the anti-drip kit in an older Whirlpool or Kitchenaid refrigerator

The dispensers on some of these older Whirlpool-built refrigerators are famous for the annoying and potentially floor-damaging drip-drip-drip problem where water will continue to drip for some time after dispensing water. Changing the water inlet valve or checking house water pressure are probably wild goose chases on this one.

Turns out there’s a design flaw in these units that use a coil of tubing for the water “tank” inside the refrigerator. When water is dispensed, it’s immediately replaced by warmer water from outside the refrigerator. As the water cools, it expands. In the coiled-tube tank, there’s no place for it to expand except to force its way out the nozzle, much to the dismay of many owners of these refrigerators.

Fortunately, there is a fix and it’s not too bad of a spanking. You need to install this tubing kit, sometimes called “the slurp kit.”
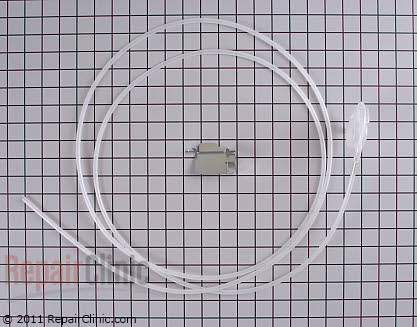
anti-drip tubing kit

The kit comes with instructions but they don’t apply to models made between 2000 and 2001. But not to worry, Grasshoppah, because the Samurai shall be your beacon of appliantological wisdom in this dark time of your appliance morass.

First, you’ll unsnap the dispenser frame off. Underneath the bottom edge of the frame, you will see two slots. Just take a flathead screwdriver and pop that plastic frame off, then you can get good access to it.

Whirlpool Refrigerator Dispenser Disassembly
(click for larger view)

Depending your manual finesse level, you may need to remove the control bracket, called out in the diagram. The dispenser nozzle is also labelled in the diagram.

Next, drop down on your knees and pull the toe grill off. Undo the union connector behind the grill. Remove the nozzle retaining screw and pull the tubing up from the front dispenser.

When installing this new one, push the new tubing down through the channel hole that the old one was in all the way down. Then just get something small to fish up in the bottom of your door channel, like a stubby screwdriver or pocket screwdriver and pull the tubing down. Another pair of hands can save some adult language that might otherwise be forthcoming to push down on the tubing while you fish it through the bottom.

Don’t worry, I’ve changed lots of these and never even came close to breaking the line half way through the door when pull it out from the front dispenser.

To learn more about your refrigerator, or to order parts, click here.

“What’s that wire thing dangling from under the icemaker in my LG refrigerator?”

That would be the temperature sensing thing called a thermistor. The icemaker uses it to make decisions about when to make ice.

LG LRSC26923TT Refrigerator - Dislocated Icemaker Sensor
(click for larger view)

This particular example is from an LG refrigerator model LRSC26923TT but all the LG models are similar. Samsung’s icemaker’s use the same thermistor arrangement, too.

Usually the thermistor can be clipped right back in place as shown below:

LG LRSC26923TT Refrigerator - Icemaker Sensor
(click for larger view)

If yours is broken for some reason, you’ll need to replace the icemaker, which you can get right here for the LG model LRSC26923TT ==> http://www.repairclinic.com/PartDetail/Ice-Maker-Assembly/1266867?modelNumber=LRSC26923TT

For other models and brands, you can look up the icemaker using your model number on the icemaker page, right here ==> http://www.repairclinic.com/Ice-Maker-Parts

Easy way to test the sensors / thermistors in LG refrigerators

These sensors are also called thermistors. They’re used in lots of the recent brands to sense temperature. The old way was with a mechanical thermometer with a capillary tube. Ahh, those were the days.

The idea behind these newfangled sensors is that their resistance increases as temperature decreases. On LG refrigerators, the sensor should have a resistance 16 K-ohms ±5% at 32℉. To test the sensor:

– Measure the temperature of the sensor or the space the sensor is in. I use an infrared temperature sensing gun for this.

– Measure the sensor resistance. Make sure your meter is zero’d out and calibrated. You’re looking for readings in the k-ohms range. Note the resistance.

– Place the sensor in a glass of ice water. Let it sit for a minute or two to stabilize.

– Measure the resistance again.

You’re looking for two things:

1. That the sensor resistance did change, either up or down depending on whether you’re starting from a temperature higher or lower than 32℉. If you’re starting from a temperature higher than 32℉, then you should see the sensor resistance increase; if the starting temperature was lower than 32℉, then you should see the sensor resistance decrease.

2. The sensor resistance should be 16 ohms ±5% at 32℉.

This same procedure can be used to test any sensor in any refrigerator (many ovens use the same kind of temperature sensing technology) as long as you know the specification of the sensor at a given temperature that you can reliably produce. That’s why 32℉ is a nice test temperature to use because it’s easy and reliable to produce with ice water.

To learn more about your refrigerator, or to order parts, click here.

How to troubleshoot warm refrigerator problems by reading the evaporator frost pattern

If the beer is getting warm in your refrigerator or the ice cream is melting in your freezer, the first thing you’re gonna want to do is get some eyeballs on the evaporator coil. The evaporator is the aluminum coil hidden behind a panel in the freezer compartment that makes all the cold air in your fridge. Side x Side, Top ‘n Bottom, French Door– doesn’t matter what kind of refrigerator you have, it will have an evaporator coil.

That evaporator coil is supposed to run at a temperature somewhere around -10℉. Well, it don’t take a nucular fizzicist like yours so very freakin’ truly to realize that, at that temperature, the coil will choke up with frost and ice in no time. When that happens, air can’t flow across the coils and get chilled so no cold air circulates throughout the entire box. Now we’re talkin’ warm beer.

Another thing that’ll make warm beer is if the evaporator coil doesn’t get cold enough. This usually means either the refrigerant has leaked or there’s a problem with the compressor or condenser fan motor— the one back in that cubby near the compressor.

For specific diagnostic help as to why the refrigerator is warming up, check out the warm refrigerator flow chart. The point of this post is to show you how to interpret the frost pattern on the evaporator coil when you do that essential eyeball check. Here now, for the first time ever in the history of the Universe, are three self-explanatory photos that reveal this arcane wisdom to the Great Unwashed Refrigerati:

Early Stage Refrigerator Evaporator Leak

Normal Evaporator Frost Pattern

Excessive Frosting on the Evaporator

To learn more about your refrigerator, or to order parts, click here.

GE Profile refrigerator beer compartment lights flicker or are dim

Affected models: PFSS6, PFSF6 (Samsung-built units)

So, you’re playing canasta with Frankie and da boyz and, being the good host, you notice it’s about time for another round of brewskis. You leave the canasta table and shuffle over to your spiffy GE fridge. When you open the beer compartment door (women usually call it the “fresh food” door; yeah, as if!) the flashing lights inside give you a flashback to your magic mushrooms days in college when you would stand in front of the fridge for hours with the door open, contemplating the meaning of life as revealed in that mayonnaise jar with green fuzz growing in it. No wonder you flunked out of college, you realize in an epiphany moment.

But this time, you’re wondering what’s wrong with your refrigerator lights. So you surf over to Fixitnow.com Samurai Appliance Repair Man and find out that you need to replace the LED board located in the muthaboard compartment in the back of your refrigerator.

GE Profile refrigerator fresh food lights flicker or are dim

In addition to finding out what the problem is and where the LED board is located, you squeal with delight when you learn that you can buy the part right here with a 365-day, no-hassle return policy!

Still confoosed, Grasshoppah? Come see us in the Samurai School of Appliantology and we’ll confoose you some mo’!

To learn more about your refrigerator, or to order parts, click here.

The Sound of Shopping for a New Refrigerator

If the compressor in your refrigerator sounds like this, then you just won a no-expenses paid trip to your appliance dealer to shop for a brand new refrigerator!

The cause of the noise is probably one of the mounting springs inside the hermetic compressor. But, as the name implies, these compressors are hermetically sealed at the factory and are non-serviceable.

Oh, sure, you could pay to have the compressor replaced by a Master Appliantologist who specializes in this repair but that’ll run you $300 minimum. That’s why for most home refrigerators, a bad compressor or a leaking sealed system is a terminal event unless you have one o’ them high-dollah refrigerators, like a Sub-Zero, where you paid so much for it that you’re married to it.

“Hey, what about the warranty?”

Yeah, what warranty? A long, long time ago, in a land far, far away, home refrigerators came with a five-year sealed system and compressor warranty. But that’s back when the present day country of Ameedeeka was known as “America,” a nation that had a sense of purpose, identity, pride in workmanship, and actually made stuff– you know, “land of the free and home of the brave” kind of a deal. Nowadays, Ameedeeka is a burnt out, decadent nation that bullies and threatens other nations around the globe, including its own citizens, it gropes its citizens’ genitals at airports, murders 51 million unborn babies and calls it a “right” and it doesn’t make anything that anyone wants to buy; it’s become the “land of the freeloaders and home of the depraved.”

It used to be that you could expect to have at least a five-year parts only extended warranty on sealed system repairs. In today’s refrigerators, most often made in Mexico or China, very seldom if ever do you get any more than the standard full one-year parts and labor warranty.

A few of the high end brands such as Sub-Zero still have the extended 10-12 year warranty on the sealed system. But the prices for these units are out of reach for most people.

Kenmore / Frigidaire Side by Side refrigerator dumps water into the icemaker and door dispenser at the same time

This is an oldie problem with a tech bulletin first issued in 2001 but it still comes up every now and then these days. You put your glass under the in-door water dispenser and press the button for water. Your glass starts filling with water but so does the icemaker, making a big frozen mess inside the freezer.

The problem is a shorted diode in the icemaker wiring harness. The new diode comes conveniently factory-installed and bundled in a shiny new wiring harness. Come git you one==> http://www.repairclinic.com/PartDetail/Triac-Diode-or-Resistor/1015421

Samurai Appliance Repair Man

The Samurai Family of Appliance Repair Websites

Parts==> http://parts.fixitnow.com
Forums==> http://applianceguru.com
Facebook==> http://facebook.fixitnow.com
Twitter==> http://twitter.fixitnow.com
Newsletter==> http://newsletter.fixitnow.com
SMS==> 603-505-8460

GE Monogram built-in refrigerator ZISS480DRDSS condenser fan wiring

If you find yourself the victim of a botched condenser fan motor “repair” job, like this grasshopper was, you may need to know the wiring scheme for the fan motor. After the parts changing monkey finally gave up on brutalizing his refrigerator, here’s the conundrum our grasshopper was left with:

A local repair shop attempted to replace my condenser fan and in the process he removed the wires from the control board harness connector that mates with the fan harness connector. He couldn’t figure out how to put it back and eventually gave up. How hard can this be? I have the wiring diagram that was attached inside the refrigerator but it doesn’t show enough detail to re-install the connector.

There are 4 wires on the fan: Red, White, Yellow, and Blue. There are only 3 wires in the harness that connects to the control board: Red, White, and Pink. Schematic says Red is 12VDC, White is Fan Common, and Pink is Condenser Fan. Schematic doesn’t show the 4 wires between the fan motor and its harness connector. Only shows the Red, White, and Pink wires between control board and fan. The big question is what color wire from the control board mates with what color from the fan motor.

And the answer is…

Red to Red
White to White
Pink to YELLOW

The blue wire is RPM feedback to the main control which is not used.

In case you’re interested, here’s how the whole sordid story of appliance butchery ended up:

Issue: My refrigerator was making a ticking noise that my wife could not tolerate. (She’s the sensitive type)

I called a local repair company and the diagnosis was the condenser fan motor. The motor was running but supposedly the shaft was making noise. The repair tech had a lot of trouble removing the fan motor due to limited access on top of the fridge. He was complaining the whole time. When he left the fan wasn’t running but he attributed it to the system needing to warm up. He even called another tech who confirmed it. So I let him leave. The fan never came on.

The guy came back twice when I wasn’t home and my wife has no idea what he was doing but he eventually gave up and said call GE or another repair company. Here’s what I found.

1. The fan motor harness connector must pass through a very small hole that you cannot see. Apparently he just ripped the fan connector through because the old fan motor just has bare wires.

2. The mating connector on the harness back to the control board was in a bag when I took over the problem. I don’t know why it was removed but maybe it had something to do with him ripping the fan motor out. This is why I was inquiring here what the wire colors were for.

3. I attempted to put the wires back in the harness connector when I noticed one pin was broken. I don’t know if this was the cause of the problem or whether it just happened when he was trying to get it to work.

4. I didn’t know where to get this type of pin so I just went to Radio Shack and bought a different 4 pin connector and changed out the motor and mating harness. The fan started running immediately. Should it ever fail again the new one won’t mate with the new connector but it’s easy enough to change it out. I used the same type of connector you’d find on a computer hard drive.

As is stated in an earlier post, the condenser motor wiring for a GE Monogram built-in refrigerator is:
RED to RED
WHITE to WHITE
PINK to YELLOW
BLUE is not used (it is used on the evaporator fan which has a very similar motor to the condenser fan)

Samurai Appliance Repair Man

The Samurai Family of Appliance Repair Websites

Parts==> http://parts.fixitnow.com
Forums==> http://applianceguru.com
Facebook==> http://facebook.fixitnow.com
Twitter==> http://twitter.fixitnow.com
Newsletter==> http://newsletter.fixitnow.com