Category Archives: Refrigerator Repair

Frigidaire SxS refrigerator, installed new adaptive defrost control board and now won’t start

As if it’s not confusing enough just figuring out what’s wrong with an appliance in the first place, sometimes the manufacturers like to spice things up for us by playing musical parts.

In this case, Friggidaire (not a typo) uses two different but similar-looking ADC (adaptive defrost control) boards in their newer model SxS refrigerators. Both boards look the same, come in the same white case, and mount the same inside the refrigerator. It got so confoosing for even Master Appliantologists that Friggidaire put out a service flash on it. You can read it and more discussion on this ratcheer:

http://applianceguru.com/forum1/27553.html

Need parts for your refrigerator? Get ’em here==> http://parts.fixitnow.com

– Posted using BlogPress from my iPad

How to manually start the harvest cycle on an LG icemaker

Sometimes, you need to manually start the harvest cycle in an ice maker when you’re troubleshooting a problem. Examples would be a mystery leak in the ice bucket or no ice. In the LG ice makers, manually starting the harvest cycle is as simple as pressing a button.

To start the harvest cycle, press and hold the fill key for 3 seconds. The icemaker will run thru:
harvest –> fill –> ice making.

Samurai Appliance Repair Man
http://fixitnow.com

Parts==> http://parts.fixitnow.com
Forums==> http://applianceguru.com
Facebook==> http://facebook.fixitnow.com
Twitter==> http://twitter.fixitnow.com
Newsletter==> http://newsletter.fixitnow.com

Manually starting a defrost cycle in newer model Frigidaire/Electrolux refrigerators with ADC

Jargon: ADC = Adaptive Defrost Control. If you don’t know what that means, this post will give you a quick background on it==> http://fixitnow.com/wp/2010/06/27/adapting-to-adaptive-defrost/

This procedure applies to the newer model Frigidaire/Electrolux refrigerators with ADC. Example model number: PHSC39EESS

To activate manual defrost, press and hold the Freezer temperature UP (WARMER) key
while pressing the Fresh Food temperature DOWN (COLDER) key 5 times within 6 seconds.

A “d” in the freezer temperature window and “F” in the refrigerator temperature window
will display when the heater is activated.

“d” and “F” will be displayed until the defrost cycle is complete. (approx. 8 minutes)

To deactivate manual defrost, press and hold Freezer temperature UP (WARMER) key
while pressing the Fresh Food temperature DOWN (COLDER) key 5 times within 6 seconds.

Buy parts for your refrigerator here==> http://parts.fixitnow.com

How to manually start the defrost cycle in a Frigidaire freezer with electronic adaptive defrost control

Example model number: FFU2065FW0

To manually defrost the freezer set the control to ” 2”
and press the up and down arrows simultaneously for three seconds.

“d” will appear in the display and a 30 minute defrost will occur.

The control will then restart its 12 hour compressor run time for the next automatic defrost cycle.

To learn more about your freezer, or to order parts, click here.

How to get a GE Arctica refrigerator into self diagnostic mode

To enter Self Diagnostic mode, both temperature control panel displays must be illuminated.

A display can be illuminated by pressing an adjacent temperature adjustment button.

When both displays are illuminated, set the freezer and refrigerator temperature settings to 5.

Simultaneously press and hold all 4 temperature adjustment buttons for approximately 3 seconds.

A flashing 0 in the refrigerator and freezer displays will indicate that the refrigerator is in Self Diagnostic mode.

To perform a self diagnostic test, locate the test in Table 2, Diagnostic Tests.

For temperature control panels with single-digit displays, the COLDER temperature adjustment button will increment the numbers up and the WARMER temperature adjustment button will increment the numbers down.

Use the freezer temperature adjustment buttons to enter the test code number in the freezer display.

Use the refrigerator temperature adjustment buttons to enter the test code number in the refrigerator display.

When a test code has been entered, the displays will flash to confirm the test.

Press the HOLD button for 3 seconds to begin the test.

When testing has been completed, do one of the following things:
• Enter code 1 5 to completely reset the system.
• Enter code 1 6 to exit diagnostic mode. The temperature control panel is reset automatically.
• Unplug the refrigerator for at least 10 seconds. Test mode will terminate when the refrigerator is
plugged back in.

Test mode will terminate automatically after 15 minutes of inactivity

To learn more about your refrigerator, or to order parts, click here.

Repairing a water tube embedded inside the freezer door foam insulation of a GE refrigerator

One of the most costly and aggravating repairs that you may run into in your GE Arctica or Profile refrigerator is a leaking water line inside the freezer door. This waterline is a plastic tube that is foamed in place inside the door. The tube may split or crack or in some other way become damaged and start leaking, leaving a puddle of water underneath the door. At this point, you have two choices:

1. Replace the entire door at a cost exceeding $200, or

2. Implement the repair procedure illustrated in this fine pictorial essay prepared by Sublime Master appl.tech.29501 for a cost of about $20.

Let’s watch with amazement as the Sublime Master reveals this arcane and esoteric technique to us for the first time ever on the Internet.

GE Refrigerator Door Water Tube Repair

To learn more about your refrigerator, or to order parts, click here.

Troubleshooting GE Arctica refrigerator evaporator fan problems

One of the first smooth moves you’ll want to do when troubleshooting evaporator fan motor problems in a GE Arctica refrigerator is to put it into diagnostic mode. Here’s how:

Self Diagnostics

To enter Self Diagnostic mode, both temperature control panel displays must be illuminated.

A display can be illuminated by pressing an adjacent temperature adjustment button.

When both displays are illuminated, set the freezer and refrigerator temperature settings to 5.

Simultaneously press and hold all 4 temperature adjustment buttons for approximately 3 seconds.

A flashing 0 in the refrigerator and freezer displays will indicate that the refrigerator is in Self Diagnostic mode.

For temperature control panels with single-digit displays, the COLDER temperature adjustment button will
increment the numbers up and the WARMER temperature adjustment button will increment the numbers down.

Use the freezer temperature adjustment buttons to enter the test code number in the freezer display.

Use the refrigerator temperature adjustment buttons to enter the test code number in the refrigerator display.

When a test code has been entered, the displays will flash to confirm the test.

Press the HOLD button for 3 seconds to begin the test.

When testing has been completed, do one of the following things:
• Enter code 1 5 to completely reset the system.
• Enter code 1 6 to exit diagnostic mode. The temperature control panel is reset automatically.
• Unplug the refrigerator for at least 10 seconds. Test mode will terminate when the refrigerator is
plugged back in.

Test mode will terminate automatically after 15 minutes of inactivity

Troubleshooting GE Arctica Refrigerator Evaporator Fan Problems
(click to enlarge)

To learn more about your refrigerator, or to order parts, click here.

How to replace the muthaboard in a GE refrigerator

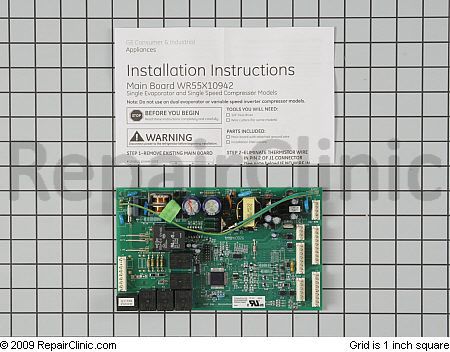
Seems like every day or so, I either get an email or someone asks the question in the repair forum, “How do I replace the motherboard in my GE refrigerator?”

Well, these folks either don’t have the new muthaboard yet or they threw out the instruction sheet that comes packaged inside the box with every new board, as you can see…

Go ahead and click it, you’ll see for yourself. And, in case you need one, you can buy the board right there, too. 🙂

Anyway, if you already have the board and you lost your destruction sheet, you can borrow mine; just be sure to return it!

WR55X10552 Motherboard Replacement

To learn more about your refrigerator, or to order parts, click here.

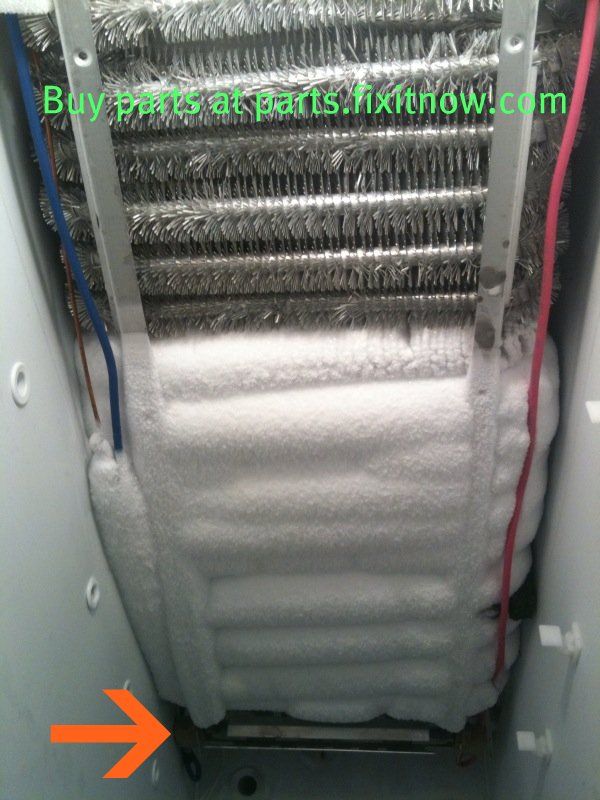
GE refrigerator freezer section back wall keeps frosting over every few days to a couple of weeks and everything in the fridge starts warming up…

…but fret thou not, my leetle grasshoppah, because this is almost always a simple problem of the defrost heater burning out. Usually a simple inspection is all that’s needed to tell it’s bad.

Remove the back panel from the inside of the freezer and get some peepers on the evaporator coil. If it looks something like this…

Photobucket

… then that’s what I’m talking about. The defrost heater is at the very bottom of the evaporator coil, with the orange arrow pointing to it. It’s supposed to be a clear glass tube with a shiny metal spiral running through it. If it’s blackened or smokey or green, it’s fried. You need to replace it with the upgraded heating element. The new element is a dualy and looks like this:

Easy to install, it’s a plug n’ chug kind of a deal. And, in case you need it, the new element comes with complete destructions. You can get the new defrost heating element ratcheer:

http://www.repairclinic.com/SSPartDetail.aspx?s=t-GSS20IEMBWW-%3d%3dc42i1399613&PartID=1399613

To learn more about your refrigerator, or to order parts, click here.

Electrolux french door, bottom-freezer refrigerator; ice maker evaporator in the fresh food compartment ices up every month or so and makes a knocking noise

Heads up on the Electrolux french door bottom freezer refrigerators, example model number EI28BS56IS0, with the ice in the refrigerator compartment and has it’s own evaporator. The problem we’re starting to see in the field is that the unit will run fine for about 30 to 45 days. Then the ice accumulation on the ice maker evaporator starts and this makes a knocking noise in the fridge. See the pic below:

Ice accumulation on the evaporator in the ice maker compartment of an Electrolux french door bottom-mount refrigerator

To get rid of the noise, the refrigerator will need to be shut down for a couple days to melt the ice. Then the unit will run fine for another 30 – 45 days and the whole knocking noise, ice formation starts again. And these units are less than a year old! What’s a disgruntled Electrolux customer to do?

As it turns out, Electrolux has a re-work kit for this that they’ll send out free of charge under warranty. This is not a fun job and if you can get a warranty servicer to do this for you, you’ll be much happier.

To learn more about your refrigerator, or to order parts, click here.

Replacing the freezer door rail slides in an Amana-built, bottom-mount refrigerator: A photo odyssey

So here’s the photo odyssey you’ve been waiting for: replacing the freezer door rail slides in an Amana-built, bottom-mount refrigerator.

Some things that may necessitate you doing this job would include the rails making the door hard to open or keeping it from closing reliably.

So let’s begin, shall we?

Freezer door

In this first photo, notice that I’ve got the door off the rails with the support arms still attached to the door. When you do this job, you do not need to remove those support arms from the door; simply pull the door out all the way and lift it up off the slide rails. You can then set the door aside so you have clear access to work on the slide rails,

Old Slides

Here, I’m showing you the old rail so you can see how it’s installed. Notice in particular that there’s a little plastic catch in the back; click the thumbnail and you’ll see a larger view where the catch will be annotated with a note. You need to depress the catch in order to release the slide rail and it slides right out.

Slide Holster - Remove four 1/4 inch hex head screws to remove.

In this next photo, I’m showing a slide rail holster and its retaining screws that you can remove in case you do need to remove or replace the holsters. Generally, you don’t need to replace the holsters unless they’re cracked or damaged. They’re just cheap plastic and they will break on occasion but this is rare. Most of the time, you’ll just be replacing the slide rails.

Comparison of the old-style slides (top) and new, upgraded slides(bottom)

Okay, moving on. In this next photo, I’m just showing you a comparison between the old sliding rails and the upgraded slide rails. These slide rails have been upgraded to a include a catch mechanism that will catch the door in the last couple inches of closure and help pull it all the way closed. There were lots of complaints of the freezer door not closing reliably so they added a spring-assist closing mechanism to the upgraded slide rails to help fix that.

Closeup of upgraded slide snap-back mechanism housing

Here I’m just showing a close-up of the closure mechanism that’s been added to the new rail assembly.

Removing the new, upgraded slides

And finally, I’m revealing the trick for how to remove the slide rails on the upgraded rail assembly. The door-assist closure assembly covers the access hole to depress and release the slide rail from the holster. So they drilled this little access hole that you can stick a small screwdriver through to depress the plastic catch and release the slide rail. Ain’t that sweet?

And, to make your joy complete, here’s the part link for the slide rails.  They’re ambidextrous so the same part works on the right and left side.  But you should always change ’em as a pair.

http://www.repairclinic.com/SSPartDetail.aspx?s=t-1007413-%3d%3di1007413&PartID=1007413

The plastic holsters, OTOH, come in left and right-hand flavors. So if you need a replacement holster, be sure you order the correct one. Here’s the right-side holster:

http://www.repairclinic.com/PartDetail/Shelf-Component/1022821

and there’s the left side:

http://www.repairclinic.com/PartDetail/Shelf-Component/1022820

To learn more about your refrigerator, or to order parts, click here.