|
|
|
|
|
Appliance Parts
850,000 Parts (Including Sears-Kenmore)- 70,000 Photos! Return any part for any reason. Appliance repair parts and accessories shipped overnight. |
Appliance Breakdown Diagrams
Cool, interactive diagrams that show you how your appliances are put together. A great troubleshooting aid! |
Appliance Accessories
Specialty tools and test equipment for appliance repair, service manuals, water filters, cleaners, light bulbs, and tons of other accessories for all your appliances. |
FAQs | Forum | Parts | Service | Store | Newsletter | Sitemap | Beer | Home
Add to My Yahoo |
XML/RSS Feed |
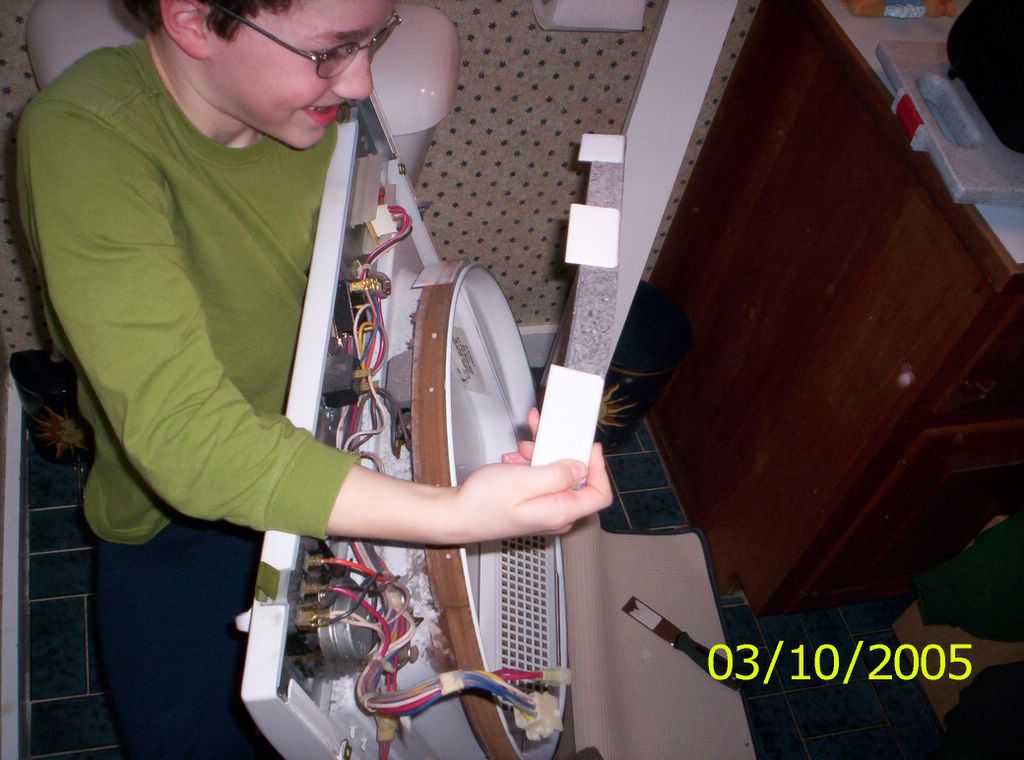
Thursday, March 17, 2005If you have a Friggidaire dryer (also sold under the Kenwhore brand) that chews holes in your clothes, you probably need to replace the drum front upper felt glide kit. The picture below shows you what I'm talking about (click the picture for a larger view):
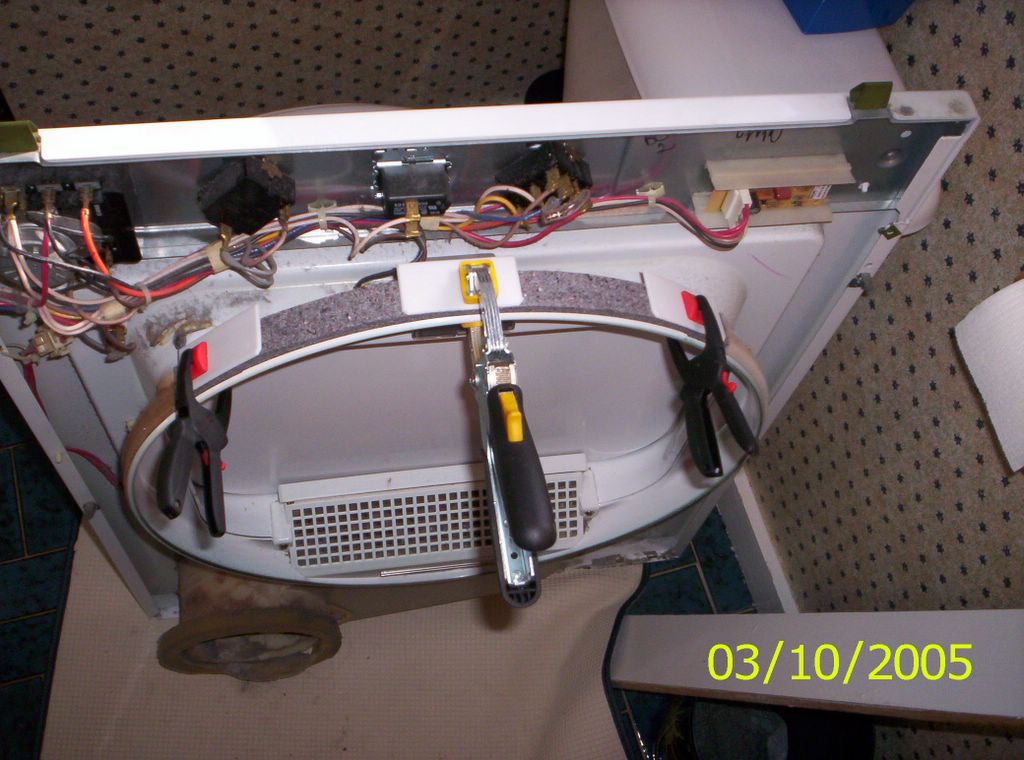
To light this candle, start by removing the front panel-- see my enlightening tome on Dryer Disassembly for instructions on this. Next, use a stiff, sharp-edged putty knife to scrape off the old glide kit. Maybe sand it down a bit just to make a nice surface. Wipe off all the grotus and residue with a clean towel. The kit comes with high-temp adhesive. Open the tube and slather that stuff on. Now, I'll share an old-timer's trick with you. Squeeze whatever glue you have left into a paper lunchbag then put it up to your nose and mouth and hyperventilate violently for several minutes until your vision starts to tunnel inward. Then hold your breath and wait for the special appliance trick to be revealed. Ok, after you've awakened from your chemical slumber, slap on the new felt kit. Note the orientation: the overlap of the teflon pads should go toward the door panel. Clamp it for a minutes using the proprietary technique illustrated below:
Note that this is a patented technique so, if you use it to install your glide kit, you must remit your royalty payment to the United Samurai Beer Fund.
Samurai Appliance Repair Man cast these pearls at 22:33 ET. [permalink]
19 Comments:
Although I pretty much diagnosed the problem on my own, and had already ordered the parts, I was glad to find this site to reinforce my diagnosis. The explanation and pictures were very helpful in the replacement process, and my dryer no longer sounds like fingernails on a chalkboard x1000.
By Hey, thanks for the comment! Glad to help, that's why we're here.
By Great site. I used the patented technique and it was good. Now that I have successfully run a few loads though, I have submitted $10.00 to the beer fund. I'm hopeful the intent of the beer fund is as stated, and will not be used for food or other less useful items. Disassembly instructions for stacked units would be helpful.
By
Glad you found the patented technique tasty and, oh, so expeditious.
By I just did it and it was easy. Scraping off the old one was no problem (I used a paint scraper then some sandpaper. Just tried it out on some wet clothes and it seems good as new! Thanks for saving me the $700 I would have spent on a new dryer! (also it made me look good in front of my wife to be so handy)
By Cool-- that's what it's all about, budrow!
By
Question, oh Great and Wonderous SARM. My Kenmore dryer also leaves small (2") burn streaks. Is it possible the BACK glide kit, or drum seal is at fault -- and how difficult is it to replace the rear glide kit/seal? The front one looks pretty good, but the back one is suspect.
By There's no glide kit in back but there is a felt seal. This can wear out creating gaps that are just the right size to pinch clothing. Easy to check, easy to fix, too. This page will help with that.
By
Well now that the dead can sleep peacefully down the street at the local cemetary with the squeaking gone from a felt guide and bearing replaced, the heating element appears not to be working. It comes on for about 2 minutes then goes off for the rest of the cycle. When the unit was opened I vac'ed all the fuzzy balls up, could I have shorted out an electronic component, all the wires appear still conected? This unit is about 6 years old and just put in $65 in parts, at what point should just shoot it and call it a day?
By I'll bet my last warm Old Milwaukee that you inadvertently crushed the vent hose when you pushed the dry back into place. This is only thing that cause the heater to short-cycle like that. Recommended reading: The Ultimate Dryer Venting Guide.
By I'm pretty sure that I need to replace the Glide Bearing/Seal Assembly part on my Whirlpool dryer, Model #LER7646EQ2. It's been ripping holes and leaving streaks on our clothes for months! My questions to you - do I need to also replace the 2 piece Split Bearing Support? I'm pretty sure I "ripped" a broken plastic piece out of there in my futile attempt to fix the stupid thing. I just don't want to order unneeded parts. Thanks for your help!
By I'd check those drum roller before replacing the teflon bearing. Loose drum rollers will create gaps in the drum as it tumbles, catching clothes. Also check that rear drum felt seal.
By
I removed the lower seal without noting the direction of the taper.
By
Figured it out... away from the drum.
By
I have replaced the upper glides and felt about a year ago. Now the center glide and the right glide are almost worn through and clothes are getting scorch or burn marks on them.
By
Well, I got my Felt/Glides Assembly but everyone should know that you'll probably need the lower felt also which is separate. Step 4 of my instructions states the paint on the drum lip must be smooth with the paint intact. Mine is polished from the worn out felt but has no paint. What do you think? Score, prime, finish coaat or forget it?
By Just thought I'd give everyone a warning: If you use the "old-timer's trick", you may wake up to discover your puppy was chewing on your newly purchased glide kit. It's better to wait until *after* you've completed the project to break out the paper bag & celebrate :)
By
Excellent instructions, although I fell forward onto the paperbag and it became attached to my face.
By
As usual, the honorable and wise samurai appliance repair man provided the pearls of proper fixin. Our Kenmore dryer is reassembled with just the right parts, and no longer munches on my wife's delicate clothes. She bows in respect for this grasshopper - back to you O sword swiping regent of repair! My deposit to the Beer (and website) fund forthwith!
By 
|
 Welcome, Welcome,Grasshopper. I am your gracious host, Samurai Appliance Repair Man.

Hey! There are over 3,000 pages of free appliance repair help at this website! Use the site search box below to quickly find ezzzzacly what you need to Fix It Now! 
Mrs. Samurai's Store
"Keeping the Samurai's clock wound for almost 20 years!"  |
| The Samurai Appliance Repair Forums | Appliance Repair FAQ | Live Appliance Repair Help |
Appliance Repair, Tips & Help |
Still not finding what you need? I can help. If I'm online, send me an IM and I can help you find what you need.
Recent Appliance Repair Morsels
|
FAQs | Forum | Parts | Service | Store | Newsletter | Sitemap | Beer | Home
| Search the vast repository of wisdom at Fixitnow.com: |

|
Your Appliance Guru:
Samurai Appliance Repair Man 
"If I can't help you fix your appliance and make you 100% satisfied, I will come to your home and slice open my belly, spilling my steaming entrails onto your floor." |
URL: http://www.fixitnow.com
|