
The LR error on your non-spinning Maytag Neptune is usually, though not always, accompanied either by a burn spot or a blown fuse on the Motor Control Board.
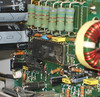 Burn Spot on a Maytag Neptune Washer Motor Control Board (click to enlarge) |
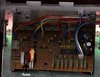 Blown Fuse on a Maytag Neptune Washer Motor Control Board (click to enlarge) |
Either way, it means just one thang: a new motor and motor control board kit are in your future.

Maytag Neptune Motor and Motor Control Board Upgrade Kit (click it to git it)
Maytag upgraded the motor and motor control board because this problem was so prevalent. Big rash of these a few years back.
Anyway, easy job, probably a una-mugger on the world-famous SUDS-o-meter. It’s all plug n’ chug; just follow the directions that come with the new kit and you’ll be fine. Here be some words of encouragement from Liquified, a talented Senior Apprentice Appliantologist in the repair forum who recently installed this kit in his Maytag Neptune MAH5500BWW washer:
Ok, so I ordered the part from repairclinic and overnighted it. Sure enough, it showed up the next day.
Here’s some info about the install for anyone who is interested down the road:
Installing replacement motor, motor control harness, and motor control circut board.
Pretty easy install. On a scale of 1 to 10 (ten being hardest) I’d call it a 3.5. If you can use a screwdriver, a wrench, and have played with legos before, you can probably do this job. It took me about 3 hours to do, but this was with inferior tools, and two smoke breaks included.
Minimum tool requirements: Adjustable-head cresent wrench (8″ or smaller handle), phillips head screwdriver, utility knife.
Recommended tool equirements: Small ratchet with socket set, ratcheting screwdriver with phillips head and small socket attachments, brew.
The instructions are pretty clear. Once you pull the front panel off, there are two braces at ~45 degree angles on the lower corners of the washer. The instructions don’t ask you to, but I would remove the brace on the left to make life easier. This gives your arm more room to work and makes it easier to pull the motor out the front.
They ask you to remove the wiring harness from the motor first and then pull the harness out with the control board. My wrench was too big to get to the bolt to remove the harness from the motor. All I did was cut the harness – since they supply a new one – then pull out the control board, then pull out the motor. As far as getting the pulley off, slip it on and off at the large wheel, this is much easier than taking it off at the small motor drive shaft. The only other thing of note is to make sure you look at the diagram for the conectors a few times before you snap it together. There are a few ways you could hook it up wrong so pay attention. There should be no loose ends when you finish. Also, I couldn’t get the flange back on on the rear acess panel when closing it up, but it doesnt seem to serve muc purpose besides asthetics, so I tossed it.
The $200 for the parts and shipping was well worth it. I saved about $150-250 to do it myself, the wife was impressed, and I felt like a real man afterwards. The only wierd thing is since the repair, the machine squeaks briefly when changing directions during the wash cycle. It sounds like the belt but I’m not really sure. Anyway, hope this info helps someone, Good Luck. <3
To learn more about your washing machine, or to order parts, click here.
