Monthly Archives: October 2005

The Story of “O!” (that being our painful exclamation as we get screwed again and again by Big Gubmint and Big Corporations)

Awwite all you cool grasshoppers, go grab you a beer and the Samurai’ll tell you a story.


Dupont:  Better Living Through ChemistryOnce upon a time, in a place that was called the "land of the free," there was a big ol’ company called Dupont. Now, Dupont made a thang that we old timers held near and dear to our hearts and that was R-12, a refrigerant used in just about every type of refrigerator ever made, including beer coolers. But Dupont had a problem: their patent on R-12 was about to expire and everyone else and their momma was gonna start making it, too. Well, it don’t take a rocket scientist, like yours truly, to figger out that once this happened, the price of R-12 was gonna take a nose dive.

Now, Dupont, being a company with lots of money to throw around, paid off a bunch of fancy-pants scientists and engineers at these high-dollar universities to show that R-12 was reeeel bad and needed to be banned. So these fancy-pants university types cooked up some numbers showing how all them nasty little molecules in R-12 was eatin’ up the orzos in the atmosphere…er somethin’ like that.

One of the fourth branches of the gubmint.Anyway, Dupont goes and presents all these high falootin’ studies to one of the fourth branches of the gubmint, the EPA. The EPA said, "Hmmm, we can’t be eatin’ up all them little orzos like that there. Gubmint has to do something about that!" So they came out with a big ol’ riot act of new regamalations where they said everyone what works on beer coolers has to have a new-fangled recovery unit to catch all them bad molecules.

Well, I didn’t know no better and besides, I didn’t wanna hurt them little orzos ‘cuz, heck, they ain’t never done nothin’ to me. So I lined up with all the other suckers, er, I mean, tradesmen and plunked down a bunch of money for a fancy new recovery unit.

Funny thang happened though. When the EPA got into the bidness of regamalating refrigerants, their prices all went sky high. So the cost to replace the compressor on your average beer fridge went from $150 to, oh, say $400, once you figger in the higher refrigerant cost and a refrigerant recovery charge. Well, at that price, people were just hauling their old fridges off to the landfill and buying new ones. Lots of good fridges piling up in landfills today. But, hey, the gubmint knows what’s best ‘cuz they here to help!

Meanwhile, Dupont is back in bidness, happily raking in the big bucks selling it’s new line of R-12 replacement refrigerants. Ain’t gubmint great? I think everybody awwta own one!

And so the gubmint and the big shot corporations who benefit from their regamalations all lived happily ever after.

The End


I can tell you that my recovery unit makes a reeel spiffy footstool in my workshop ‘cuz that’s all I ever use it for. Never even used it once. Wanna buy one cheap?

Frigidaire (or 417 Kenmore) Front Load Washer Leaking from the Bottom; washer leak; washer repair

Sue wrote:

We saw what you said about a Leak from a Frigidaire (Kenmore 417.xxxxx) Front Loading Washer. It appears the door is holding water. There is a slow trickle of water leaking out. Would this more likely be the door seal boot?

THANK YOU!!!!

_______________________________

Message sent from IP: 70.240.69.82

click here for a cool interactive breakdown diagam of your washer to help you fix it now!In vexing times like these, I turn my furrowed brow to Samurai’s 12 Laws of Appliance Repair. In accordance with the 7th Law, “All leaks are visual.” To aid your visualizations, click the washer breakdown diagram shown here for an interactive tour of the very bowels of your washer. Go ahead, I’ll wait …

Back so soon? Ok, with that crash course in washer anatomy, let’s light this candle with the simple stuff, first.

We’ll start behind the washer… oh, cut it out! … where the two water fill hoses connect. They’ll connect from the shutoff valves at the wall to the water inlet valve on the back of the washer. Lay some heavy-powered eyeball action, aided by the brilliant illumination from the halogen search beam you’re using, on both ends of those fill hoses looking for any sign of water. And, by the way, if your fill hoses look like this, well, you and ol’ Brother Noah ’bout to have something in common… ‘cept he had forewarning; but now you do, too!

Awwite, ever-thang looks good with the fill hoses, so now we pop that front kick plate, like ahso. We’re looking for evidence of leaking from either the tub boot or from the tub gasket. Here’s a thought question: since the tub boot is right up front, and if it were leaking, where would we see signs of leaking? Ooo, you’re good! If your tub boot is leaking, this excerpt from the service manual should hepya replace it.

Ok, here’s a tougher one: given that the tub gasket goes all the way around the tub, where would you expect its characteristic leak pattern to be? That’s a little less obvious, but this post explains what to look for and a minimally-invasive procedure that may fix it.

Finally, I have also seen, on rare occasions, where a bra wire pierced the pump suction boot and created a leak.

Smile! It’s a Friggidaire! (yes, I meant to spell it that way)

How to Replace the Water Inlet Valve on Most Washers; Maytag, Whirlpool, Kitchen Aid, Roper, Kenmore, Estate, GE, Hotpoint, Frigidaire

A handy compilation of water inlet valve replacement procedures from our friends at RepairClinic. Tear ’em up, Hoss!

Maytag, Top Loader
• Remove the screw holding the inlet valve mounting plate to the washer.
• Remove the two screws holding the valve to the mounting plate.
• Lift the plate up slightly and pull it out of the washer.
• Label the wires and remove them.
• Disconnect the water feed tube from the valve.
• Install the new valve.
• Flush out the water fill hoses.
• Reassemble in reverse.
• Turn on the water supply valves.
• Check for and correct any leaks.
• Restore power and test operation.

Whirlpool, Kitchen Aid, Kenmore, Roper, Estate, after 1985
• The valve will be mounted to the back of the washer with two screws. However, you must remove the valve from inside the washing machine, and this requires you remove the entire washer cabinet, which consists of the top, front and sides.
• Remove the two screws in the lower corners of the control panel.
• Lift the control panel up high enough so it stays up and back.
• Disconnect the wire harness connector.
• Using a flathead screwdriver, snap out the two gold-colored spring clips at the top of the cabinet on the left and right sides.
• The cabinet will now lift up at the back. Pull the cabinet up 10-12 inches and then slide it forward 2 inches.
• Remove the cabinet completely and set it aside.
• The valve will be on the right side of the washer at the back. It’s the device to which the water fill hoses are attached.
• Label the wires from the valve and remove them.
• Remove the water feed tube(s) from the valve.
• Remove the screws holding the valve to the back panel.
• Install the new valve in the reverse order.
• Reinstall the cabinet. (Note: As you follow this procedure, do not force the cabinet in any way. When done properly, the cabinet will go back together very smoothly.) First, tilt the cabinet toward you 10-12 inches while you “walk� the cabinet back onto the lower frame of the washer. (This will be easier if you have the washer lid open so you can see inside the cabinet at the same time.) The front edge of the cabinet slides underneath the base frame, and the sides of the cabinet rest on top of the base frame.
• When the cabinet is resting on the frame squarely, check to be sure the back of the washer is aligned with the cabinet. There are two plastic strips attached to the back of the washer that must line up with the sides of the cabinet as you set the cabinet down.
• Reinstall the two spring clips at the top.
• Reattach the wire harness connector.
• Rotate the control panel back down and reinstall the two screws.
• Flush out the water fill hoses.
• Reattach the water lines.
• Turn on the water.
• Check for and correct any leaks.
• Restore power and test.

GE, Hotpoint, (valve on middle right side of washer)
• The water inlet valve is attached to a metal plate, which is attached to the washer.
Remove the screws holding the metal plate to the washer.
• Remove the screws holding the inlet valve to the metal plate.
• Label the wires to the valve and remove them.
• Remove the water feed tube from the valve.
• Install the new valve.
• Flush out the water fill hoses.
• Reassemble in reverse.
• Turn on the water supply valves.
• Check for and correct any leaks.
• Restore power and test operation.

GE, Hotpoint, (valve inside upper control panel)
• Open the main control panel by removing two screws.
• Remove the two screws holding the valve down.
• Label the wires to the valve and remove them.
• Disconnect the water feed tube.
• Install the new valve.
• Flush out the water fill hoses.
• Reassemble in reverse.
• Turn on the water supply valves.
• Check for and correct any leaks.
• Restore power and test operation.

Frigidaire, Top Loader – Valve Inside Upper Control Panel
• Open the main control panel by removing two screws.
• Remove the two screws holding the valve down.
• Label the wires to the valve and remove them.
• Disconnect the water feed tube.
• Note: The new water inlet valve mounting screw holes may not be threaded. That is because the screws that hold the valve in place are self-threading. It may be easier for you to twist the old screws into the valve while the valve is out, rather than wait until it is in place. Then, remove the screws from the valve for installation.
• Reinstall the new valve in the reverse order.
• Flush out the water fill hoses.
• Reinstall the fill hoses in the proper order.
• Turn on the water supply valves.
• Check for and correct any leaks.
• Restore power and test operation.

Frigidaire, Top Loader, Valve in Main Body of Washer (not in control panel)
• Use a putty knife to press in the two spring clips at the front of the washer top near the sides. (You may need a flashlight to see the clips.) While you’re pressing in on the clip, lift up on the top, and will lift up like the hood of a car. Be sure to support the lid properly so it doesn’t fall backward or forward.
• The valve will be to your left behind the washing machine tub.
• Remove the two screws, which are on the back of the washer, holding the valve.
• From the inside of the washer, carefully pull the valve up toward the top with the wires and feed tube still attached.
• Label the wires to the valve and remove them.
• Remove the water feed tube from the valve.
• Note: The new water inlet valve mounting screw holes may not be threaded. That is because the screws that hold the valve in place are self-threading. It may be easier for you to twist the old screws into the valve while the valve is out, rather than wait until it is in place. Then, remove the screws from the valve for installation.
• Reinstall the new valve in the reverse order.
• Flush out the water fill hoses.
• Reinstall the fill hoses in the proper order.
• Turn on the water supply valves.
• Check for and correct any leaks.
• Restore power and test operation.

Others:
If you didn’t see your brand and model above, and you’re sure you need to replace your water inlet valve, come see us in the Samurai Appliance Repair Forums. Fix ya up. Whatever.

How to Replace the Tub Boot on a Frigidaire-built, front-loading Washing Machine; Frigidaire washer repair; tub boot

1) If the machine has a dryer stacked on top of it or is positioned in such a way that it would be too much bother to move, just leave it where it is. However, if it is possible, it would be easier to do this job if the machine could be leaned. If leaning it back is not possible, then a 6 or 8 inch block of wood will be handy to use to wedge between the front panel and the tub to hold the tub back out of the way.

2) The boot is attached to a lip around the perimeter of the opening in the front panel and is glued on in spots about three inches apart, all the way around. Use a razor blade as shown in illustration #1 to carefully slice the glued spots on the boot away from the front panel.

3) Once the boot is loose from the front panel, push it into the opening of the tub and out of the way as shown in illustration #2. At this point, if the machine is not leaning back, take your block of wood and while pushing back on the tub through the opening, wedge the block between the front panel and the tub about ten inches to the bottom – right of the opening. This will give you more space to work with the boot.

4) Notice that the boot is still attached to the duct that is located just inside the front panel at the upper left corner from the opening. This is where the water, soap, bleach and fabric softener enter the tub. To remove (and later on, reattach) the clamp holding this in place on the end of the duct you will have to make yourself a tool from a three inch piece of 3/8 inch soft copper tubing. In illustration #3 you will see that the end of the tube is flattened somewhat so that it can be slipped over the twisted ends of the clamp as shown in illustration #4. Twist the tube counterclockwise to slip the clamp and set both the tool and the wire clamp aside. Pull the boot free from the duct.

5) Using both hands, grab onto the boot at the top of the opening to the tub and pull downward and toward you with slow steady pressure. As the boot is pulled free from the outer lip of the tub (at the top), the coiled spring that holds the boot from the groove behind the lip around the opening to the front shell will become visible. You can either continue pulling on the boot until it comes off or you can hook the spring (with a piece of coat hanger fashioned into a hook) and pull it off and then pull the boot off separately.

6) Once the boot is off, examine the lip that extends around the entire perimeter of the front opening of the front shell of the tub (the front shell and the rear shell are so named because when bolted together, form the outer tub that surrounds the inner tub). The boot has a lip that will have to be folded into the groove behind the lip on the front shell. To start this, examine the new boot and locate the groove in front of the lip that corresponds to the similar lip and tab on the tub shell. It will make this job a lot easier if you can get some liquid dishwashing soap from the consumer, and sparingly lubricate this groove on the boot to make it easier to slip onto the lip of the shell (see illustration #5). No soap is preferable to too much soap. Have a cloth handy to wipe the soap from your fingers.

7) Once the groove in the boot is lubed with soap, locate the arrow as shown in illustration #6 that is located on the top of the boot (located to the right of the extrusion that slips over the duct). This arrow must point up when the boot is installed.

8) With the boot in one hand and the other hand spreading the lip and groove (on the boot near the arrow), force the lip into the groove behind the lip at the top of the opening on the tub shell (see illustration #7).

9) With one hand holding the boot so it does not slip off, use the other hand to continue spreading the lip and groove of the boot further to the right. In this way, you continue this action 360 degrees around until the boot is mounted onto the front shell ( illustration #8). Your fingers will take a beating while you do this and may become quite tired. Do not give up. Just pop a cold one (without letting go of the boot) and keep at it. Rest one hand at a time if needed. Whatever you do, do not remove both hands until the boot is on (unless you want it to fall off and then you get to start all over with it).

10) Now is the time to put the spring back on. Included in the BOOT KIT is a set of three spacers (an example of which is shown in illustration #9). These spacers are to be used to hold the spring in place in the groove on the outside perimeter of the boot. As it will take both hands to stretch this spring into place, these spacers will prevent the spring from popping out when you let go of it to use both hands to stretch it further around the boot. Begin by pushing the spring down into the groove just forward from where the boot contacts the front shell at about the 12 o’clock position. While holding it in place with one hand, use the other to tightly wedge the spacer above it, between the spring (in its groove) and the weight ring above it as shown in illustration #10.

11) Working your way to the right, push the spring down into the groove. When you have placed the spring about 90 degrees around the opening from the first spacer, the spring will begin to get tight. Push in another spacer at that point (making sure to keep checking the first spacer, if it pops out – the spring will pop out).

12) Continue working your way around (while checking both spacers, you don’t want them to slip out) until you reach 180 degrees from the first spacer. Install the third spacer.

13) The spring will be extremely tight now as shown in illustration # 11. Once you have gone more than half way around, the spring will be easier to roll into the rest of the groove (so long as all three spacers are holding tight). When you have the spring in place, make sure to remove the three spacers before proceeding to step # 14.

14) Replace the boot extrusion back onto the duct and pull it up over the ridge on the duct near the top of the opening. Reinstall the clamp in such a way that the clamp sits between the ridges on the extrusion and above the ridge on the duct. Snap the clamp closed with the copper tubing tool that you used previously.

15) Before attaching the new boot to the front panel, clean the surface of the front panel with alcohol or household cleaner. Also clean the flat surface of the new boot that will be contacting the front panel. This step is needed to remove the mold release material used in the manufacturing process and will allow the adhesive to stick.

16) Remount the boot onto the front panel as shown in illustration #13, making sure that the boot is not wrinkled. If large wrinkles exist, they may pool water in the boot and dribble onto the floor when the door is opened. If this is the case, pull it loose from the front panel and remount it slightly more clockwise or counter clockwise as needed.

17) Using the adhesive supplied in the kit, sparingly apply dots of glue under the edge of the boot as shown in illustration #14. Spot glue at the 12 o’clock, 1, 2, 3, 4, 5, 6, 7, 8 and 9 o’clock positions around the opening. Caution: you will need to wait a couple of hours before using the washer to allow the adhesive enough time to dry.

To learn more about your washing machine, or to order parts, click here.

Yes! Some of You DO Grok this Site!

Mark wrote:

As Tommy Lee Jones would say, “Excellant work young man”
The site is great, the info is right on target. Been there, done that. Reminds me of a friend of mine that we never let use power tools or touch anything electrical. I am constantly telling him the same things so profoundly posted on your site. Keep it UP!

_______________________________
Message sent from IP: 24.11.143.222

Thank you, mah bruthah! I’ve always tried to make this site informative as well as entertaining and it’s always cool when I hear from kindred spirits, like yourself, who “get it.” Mucho domos and keep thinking your own thinks!

Is Your Washer a Flood Waiting to Happen?

Flood Waiting to HappenWent on a service call the other day for a refrigerator. And, in one of those, “While you’re here…” things, I ended up checking out the washer and dryer. Something I always, always check when working on a washer are the fill hoses. The cheap, stamped-brass fittings on the black rubber fill hoses were badly rusted and, in that weakened condition, were more prone to snap or split, causing a huge flood in this million-dollar lake house.

Stainless-Steel Braided Fill Hoses for a WasherSo I pulled those hoses off… actually, the fittings were so badly rusted that they no longer rotated so I had to cut ’em off with the big serrated-edge knife in my Leatherman Wave that I keep on my belt when I’m running service calls. Then I installed a beautiful, brand-new pair of stainless-steel braided fill hoses with stainless steel fittings. The only additional charge was for the retail price of the new hoses. Cheapest flood insurance you can buy!

Recommended Reading: Three Easy Steps to Total Washing Machine Flood Prevention

Mailbag: Washing Machine with a Case of the Drips

Doctor K wrote:

Your holiness,

washing machine question. (KitchenAid model#622874) I suspect the water inlet valve is faulty since water is dripping when the machine is “off”.

Where is the valve located? How do I access to replace?

With all do admiration,

Michael

_______________________________

Message sent from IP: 67.117.147.242

back of a whirlpool or kenmore direct drive washer
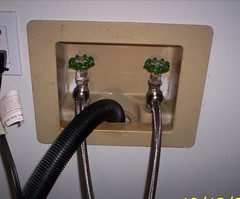
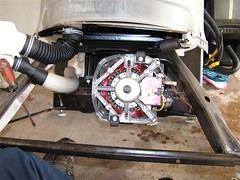
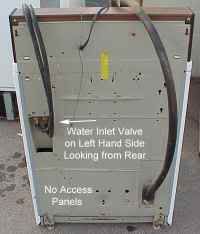
Yep, sounds like your water inlet valve can’t quite pinch it off anymore. The valve is mounted to the washer’s rear bulkhead (that’s Navy talk for “wall” or “panel” — don’t let it throw you), as seen here to the right.

Hey, don’t run off and start taking off the back panel like a kid opening a Christmas present– take a breath and read this short missive on how to disassemble your washer. You’ll be glad you did.

As you probably suspected, the valve can no longer be trusted to control 40 to 60 psi of water pressure every day, all day long; you have to replace the valve. And, if you purchase the new valve here within the next five minutes, I’ll confer a special blessing upon you.

Nolo contendere, e pluribus unum, my child.

Frigidaire Dryer Squealed then Stopped Running; dryer noise; dryer drum bearing; dryer repair

Drum Bearing, Old and NewWent on a service call the other day on a Frigidaire dryer with the complaint of being very noisy and then stopped tumbling altogether. I opened up the dryer and saw that the back of the drum had actually dropped down several inches. Hmm, this was weird.


Looking between the back of the drum and the heater can with my flashlight, I saw that the drum bearing had broken clean off!

Incidentally, for instructions and pictures on disassembling this dryer as well as other dryer brands, see this illuminating tome on dryer disassembly.

Anyway, when the bearing on this dryer needs to be replaced, it makes one helluva racket. The noise will go on, getting progressively louder and more skull-piercing, for several weeks before some type of catastrophic failure occurs. I don’t know how they could put up with the noise all that time. When the dryer finally stopped working altogether, then it was time to call for service. Enter the Samurai.

Bearing Sockets, Old and NewTo get an idea of how long the dryer must’ve been screeching and howling, check out how the round drum bearing ball got lathed into a cylinder by the worn bearing ball socket.


dryer drum bearing kit for frigidaire dryer-- click here to purchaseAnyway, I installed a brand-spanking new drum bearing kit and harmony was restored to both the dryer and the household.

To learn more about your dryer, or to order parts, click here.

Gas Oven Goes Boom When It Starts; gas oven ignition problems, gas oven repair

rvancott wrote:

I have a kenmore stove. Inconsistantly after the stove is turned on after several minutes I heard a boom from the stove. The kitchen smells like gas, but the stove is on. I would assume from your trouble shooting guide that the ignitor was the case. Do you have any insights/surgestions….Master

_______________________________

Message sent from IP: 68.43.121.147

This is caused by delayed ignition of the gas. You didn’t include a model number so I can’t be sure of who the real manufacturer is (RE: Who made my Kenmore?) But this was a known problem with the ignition ports on the bake burner tube in some Whirlpool-built gas ranges, including some of the ones made for Kenmore.

The ignition ports are special holes in the burner that line up with the hot-surface ignitor (the “glow plug”). When the valve opens, gas gushes through the ignition ports and hits the ignitor where it ignites. The ignition flashes back into the burner tube and ignites the gas in the remaing burner tube holes.

The problem was a manufacturing defect with the gas ignition ports on the bake burner where the ignition ports where offset just enough that it delayed the efficient ignition of the gas; instead, the gas had to flow for a few moments before it finally found the ignitor. The result was a BOOM when all that extra gas outside the burner tube ignited.

The fix was to install the new, corrected burner tube, which you can acquire here.

How to Open a Whirlpool or Kenmore Direct-Drive Washer; how to take apart washer; washing machine disassembly; washer repair

Doc wrote:

How do I open a Kenmore Washer
Model# 110.28932790

_______________________________

Message sent from IP: 71.12.209.185

This is a Whirlpool-built direct drive washer. It opens up a little differently from what you might expect. Many people, thinking the top panel pops up, begin ruthlessly prying on the seam between the top and front panel and only end up with a disfigured washer. I’ve seen more adventurous types actually remove the entire back panel, getting them no closer to what they were trying for. Let the Samurai enlighten you.

The entire cabinet removal procedure is illustrated in this diagram. Even though the procedure is very straight forward, a couple of fine points are worth mentioning:

  • Some Kenmore-branded versions of this washer use plastic endcaps to cover the console screws. Just remove the console end caps and the console retaining screws are right there. This technique is illustrated in this photo.
  • Once you’ve removed the console screws, flip the entire control console up and back to reveal the cabinet retaining braces, shown here.
  • After you pull the cabinet back and away from the washer, here’s an illustrated anatomy of your naked washing machine. The lid switch is screwed to the inside of the cabinet top panel and is easily accessible with the cabinet removed.
  • Replacing the cabinet is usually very straight forward but sometimes little snags can arise. Some helpful hints for replacing the cabinet are explained here.

To learn more about your washing machine, or to order parts, click here.

How to Make Electrical Measurements; how to use a volt-ohm meter; how to measure electricity

recinos wrote:

I have a GE Dryer, DDG6580GDLAD which quit working. I bought a multimeter (Craftman 3482141) to help me find the parts that are not working. However, reading the instructions for the multimeter is completely foreign to me. What I need is a crash course on how to use it. I read some of your information on it use and now have a vague idea. What I need is an Instructions for Dummies.

Thank you!

_______________________________

Message sent from IP: 66.214.149.184

Come in, grasshopper, and find shelter from the storm. I’ve written an easy-to-understand primer on making basic electrical measurements for your ineffable inflatus.

Amana Gas Oven Won’t Fire Up; Oven Ignitor Wires; Oven Repair

Oven Ignitor WiresWent on a service call for an Amana gas oven that wouldn’t fire up. When I arrived, I turned on the oven to verify the complaint– the ignitor (the thing pictured here) glowed but didn’t fire up. I measured the current draw on the ignitor (see this page for more details on that) and read 2.8 amps– too low to open the gas valve. When I turned off the range and removed the ignitor, I saw that its wires had been pinched so badly that it appeared the wires were intermittently making contact with the cabinet and arcing. While this wasn’t the direct cause for the oven not firing up in this case, it could have eventually become a cause for other problems, such as nuisance breaker tripping.

Anyway, installed a new ignitor and they lived happily ever after.


To learn more about your range/stove/oven, or to order parts, click here.

Maytag Neptune Washer with Top Panel Raised, Accessing the Door Latch Assembly


Popping the Hood
Originally uploaded by Zenzoidman.

To raise the top panel on this dishwasher, you have to first remove the door and then the front panel to expose the top panel latch bolts, located on each side, just below the top panel. With the top panel raised, you have access to the lid switch, water fill valve and injection assembly, dispenser assembly, and the top part of the tub boot. This can all be done with a #2 Phillip’s screwdriver, but I like to use a 5/16″ nut driver on the top panel latch bolts. Just another one of my bad habits. ; )