
This washer is an oldie but goodie, manufactured by Maytag back in the days when Maytag earned a reputation for quality and dependability (unlike the junk being cranked out today with a Maytag label on it).
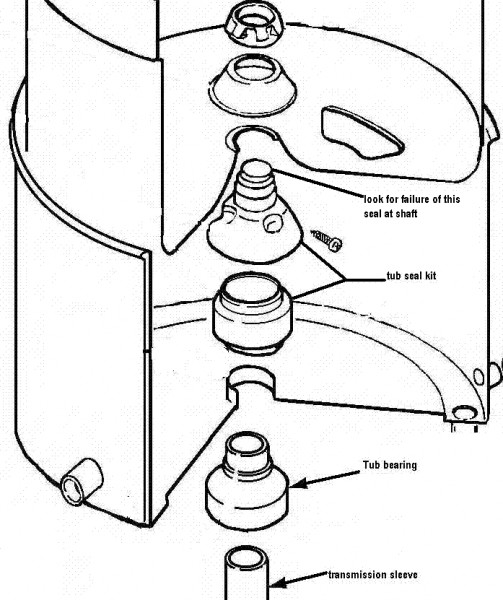 A sure sign that you need to do this repair on your trusty old Maytag is if you see water leaking from the center of the tub onto the transmission. To check this, you’ll need to remove the front panel. Other indications may be a tub that’s reluctant to spin (or burns belts) or makes a ghostly howling noise during spin. The diagram shown here to the right will explain what’s happening (click the pic for a larger view).
You may be thinking, “Oh, but it’s so old, I’ll just buy a new washer and get another 20 years out of it.” Oh, feckless grasshopper, you would be in for a rude awakening.
OK, proceeding on the assumption that you are one of the thinking grasshoppers and not one of the brainless masses being manipulated by the purdy pictures of shiny new appliances dangled in front of your nose by the savvy marketing teams of the manufacturers, let’s get into the nuts and bolts, so to speak, of doing this repair.
I. Essential Tools
– Spanner wrench (to remove the inner basket).
– Sockets: 1/4″, 5/16″, 3/8″, and 1/2″
– Straight-slot screwdriver
– Allen wrench or torx set (depending on the set screw used on the replacement part).
– Beer. Lots of beer. About four, 16 oz. mugs, to be exact.
II. Required Parts
– Mounting Stem and Seal Kit
– Tub Bearing Repair Kit
III. The Procedure
1. Unplug washer and Remove two Philips head screws holding front panel in ( newer models have clips on the bottom and no screws )
2. Remove front panel, lift panel from sides, has two “tabs” on top
3. Remove two 3/8ths hex head screws holding top down
4. Lift up top, it’s somewhat hinged, careful lid doesn’t smash against wall or pipes
5. Disconnect water tube on left side to top cover
6. loosen the two screws on the steel band… straight or 5/16th ( newer washers have a plastic tank cover, pry out the tabs and lift up to remove the plastic tank cover )
7. gently but forcefully remove the top cover
8. careful not to bend the band or cut the gasket
9. *remove the agitator by grasping firmly and pulling up towards your chin, carefully!
*( many have 1/4 hex head screw on agitator, down the side near the base, older ones have a rubber ring on transmission shaft )10.using a hammer and your spanner wrench remove or cut off the spanner nut, it is a left hand thread so it must come off clockwise, careful not to chip the tub
11. remove the inner tub,, it’s heavy with the concrete counter balance
12. take the Allen wrench screw (or torx) out of the mount stem ( see one of the 4 dimples for the set screw )
13. using your hammer and spanner wrench take the mount stem off, mount stem is a left hand thread so it must come off clockwise
14. now grasp the seal and remove, careful you can slip
15. put a 1/2″ socket on the nut on the front and 1/2″ box wrench or adjustable wrench on the inside bolt, and loosen using the socket on the outside, but not remove entirely the front nut
16. then using the same two tools remove the left and right bolts and nuts and lock nuts and plate, noticing the fiber washer
17. then remove the front one
18. remove tub to pump top hose clamp and pull off up 1/2 of that hose, now work the outer tub loose and lift up but not out entirely
19. remove the pressure hose on your rear right side
20. take out the tub
21. stomp (using your foot) out the tub bearing housing from inside the outer tub
22. remove the “metal sleeve collar” on the transmission shaft
22A. you’re half started
23. turn the outer drum over
24. take the new tub bearing and “stomp” it into the outer tank…flush, take your time and double/triple check yourself on these steps, (takes less time to recheck and verify than to tear down and start over)
25. put the new collar over the transmission
26. put the outer tub back on and reattach the pressure hose and pump hose
27. line up the front hole and put the front (short) bolt in, making sure you have the fiber washer on the outside of the tub
28. put the rectangular flat washer on, then the lock washer and the nut by hand…
thread it on a couple of turns but leave loose29. put the right and left bolts and stuff on, tighten well
30. tighten up the front one
31. Put the seal on next, careful not to tear the seal, but it needs to be all the way down. One side has a special edge of carbon or something like that and that needs to be UP towards you. Sometimes taking a little bit of liquid laundry detergent and lining the inside bottom lip of the seal with it can help with the installation of the seal onto the tank.
32. take the torx screw out of the new mount stem, and screw down the stem mount, tighten with spanner wrench ( don’t over tighten! ), install the torx screw
33. put the inner tub on
34. check the spacing around the top of the inner tub (making sure that the tub is not listing one way or another)
35. put the metal cover on and spanner nut
36. put the top cover on and push it all the way down
37. check and clean the gasket and put it back on
38. put the clamp back on over the gasket
39. tighten to a moderately firm but not tight setting
40. carefully with a long straight screwdriver pry up the top part, bit by bit
run your fingers around the clamp to make sure the gasket didn’t pop up41. when you think you have a good position, take your index finger and on the inside put it between the top cover and top of the inner basket and make sure you have this space all round so that the inner basket doesn’t rub against the top cover
42. tighten the clamp
43. reinstall the hose from the injector to the top cover
44. plug unit back in and turn to spin
45. let it spin for a couple of minutes
46. turn timer to fill and put water in
47. water test before securing top and reinstalling front panel
To learn more about your washing machine, or to order parts, click here.
