
Before you even think about undertaking this repair, you’ll want to read this excerpt from The Complete DIY Refrigerator Repair Reference:
If you’ve confirmed a Freon leak and you think you have the huevos to do the sealed system work yourself, you absolutely need this refrigeration service training DVD from Electrolux. (The compressor, its associated tubing, the evaporator, the condenser, and the Freon charge in the tubing are collectively referred to as the “sealed system.”) It takes you through all the procedures you’ll need to master in order to do your own sealed system work. If you have an older refrigerator, you may need to convert from R-12 to R134a.
“But, Samurai, shouldn’t we get an EPA license to buy the Freon so that we can be obedient to the gubmint and do everything they tell us to do?”
Ahh, Grasshoppah, your bootlicking question reminds me of a story… what was it?… ah yes, The Story of O.
For written sealed system service procedures and a list of tools you’ll need, download this reference.
And this topic in the Kitchen Appliance Repair Forum has a good discussion about recharging tips.
Note that the pictures included in this post are just thumbnail pics. Pop quiz: What are “thumbnail pics”? Anyone? Bueller? Bueller? Thumbnails are reduced-size versions of a full-scale picture. To see the full-size version, along with the illuminating annotations, click the thumbnails.
Armed with this essential background information, you’re ready to strut through a pictorial guide. Photos courtesy of my comrade-in-arms and brother-in-the-Craft, Jedi Appliance Guy.
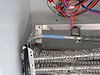
 This is a typical location for a pinhole leak in the evaporator. Can be very hard to spot visually; they’re usually located using a freon sniffer or bubble solution.
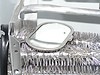
 Once the leak is located, then you apply “The Patch.”
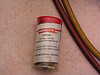 And here’s the special patch goo that you use. This is a specialty item that you won’t find at your neighborhood hardware store. But I just happen to have an extra tube that I can spare– come git you one.
 Here’s a look at some of the special toys, er, I mean, tools that you’ll need to do refrigeration sealed system work.
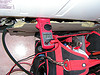
 After the leak is patched, you have to pull a deep vacuum on the sealed system to remove as much water vapor as possible. If you don’t, you could clog the filter-dryer, create ice plugs at the junction where the capillary tube enters the evaporator, and all kinda other bad stuff that results in warm beer.
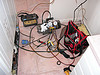
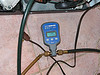
 Check the current draw on the compressor as the system is recharging. The current draw should increase as more refrigerant is added to the system. If not, well, something ain’t right. Could be another leak or a bad compressor. Either way, there’s trouble in Paradise (or, as we professional appliantologists like to say, “Vees badden”… that’s a little German lingo fer ya).
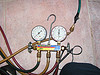 Here’s a closer look at the manifold gauge set that’s part of every refrigeration tech’s bag o’ tricks. In addition to recharging the sealed system, manifold gauges are essential for diagnosing sealed system problems. By measuring the high side and low side pressures, the highly-skilled yet woefully-underpaid appliantologist can draw various diagnostically-useful conclusions about what’s wrong with the refrigeration system.
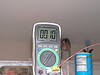 After the system is recharged, we run it and measure freezer temperature. Lookin’ good here. It’s Miller Time!
If you need a more detailed tutorial specifically on repairing and replacing refrigerator evaporators, download this file.
To learn more about your refrigerator, or to order parts, click here.
