Despite the fact that this is one of the crappiest top-loading washers ever built, replacing the clutch (a common repair on this machine) ain’t too bad a job– about half an hour and two mugs on the world-famous SUDS-0-Meter.
Here’s the brand new clutch and pulley assembly you’ll need for this job (click the pic to order it, right here online!):

A talented Senior Apprentice Appliantologist, dh1200s, has written an illustrated step-by-step for this repair and posted it in the Samurai Appliance Repair Forum. For your reading pleasure, I’ve included his fine write-up below.
dh1200s wrote:
Tools required; 3/8 inch socket and socket wrench to remove clutch pulley bolt. Page 47 of the SM1/2 inch socket or wrench to loosen Drive Motor tension bolt; 5/16″ nut driver or 5/16, ¼” socket on an extension to remove front panel see page 41 of the Service Manual.
1. Lean the washer back and blocked up in that position against a wall for a better reach angle. Rotate 3/8” clutch Pulley Bolt CW to remove clutch bolt.
2. Follow SM page 46 & 47 to remove clutch pulley.
3. Remove 4 screws holding plastic cover on clutch, inspect clutch spring to make sure it is not broken. If either clutch spring retaining end is broken off then the clutch must be replaced. Inspect Roller Clutch bearings and clean up with WD-40 and re-lube with bearing grease. Most machine series use an Upper Roller Clutch bearing and always a lower clutch pulley Roller Clutch bearing. My series 16 machine doesn’t use the Upper Roller Clutch one way bearing. These bearings are one way rotation bearings in the Clockwise direction. Make sure the Spinner Shaft Coupler will rotate freely in the CW direction in both Roller Clutch bearings. If the Roller Clutch bearings or Spinner Shaft Coupler will not clean up with WD-40 I recommend a clutch replacement.
4. Replace white bearing plate into clutch pulley hub, insure key slot slips into clutch Spring pin in the clutch hub.
5. Replace Clutch plastic cover with 4 screws.
6. Reinstalling the Clutch Pulley assembly is the most difficult part of the process. With a tight work area try a test fitment of seating (if used) the Upper Roller Clutch bearing with the notches into the bottom of the wash tub. Then insert the Spinner Shaft Coupler into that bearing rotating CW to reseat the coupler notches to the spinner shaft. Then the clutch pulley to the squared end agitator shaft. Rock back and forth the clutch pulley assembly with upward lifting pressure to reseat the clutch assembly. When the clutch assembly is properly seated you will feel a 1/16-1/8″ gap between the Pulley face and shaft end as mentioned and shown on page 47 of the SM. On reinstallation, tighten Clutch Pulley bolt CCW to 96” pounds 8’ foot pounds (Snug no torque wrench required).
7. Do a quick wash and make sure clutch runs true with no wobble or clicking sound. If the clutch has not been seated properly it will spin off. If this happens go to page 16 of the SM Board Output Test and turn on Drain Pump in Service Mode to pump out excess water.8. Repeat steps 6&7 if the clutch has excessive noise or spins off.
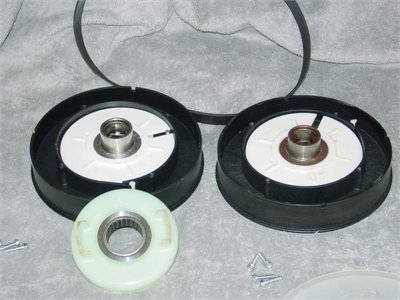
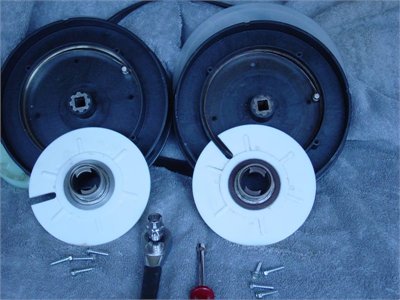
Some Pics for reference; not sure what Mytag calls the coupler that drives the spinner shaft coupler so I named it.
My original clutch is on the right side clutch on the left is a new $50 replacement I wanted to try and it and it works fine in my series 16 nachine. My series 16 machine does not use the upper roller clutch bearing assembly.
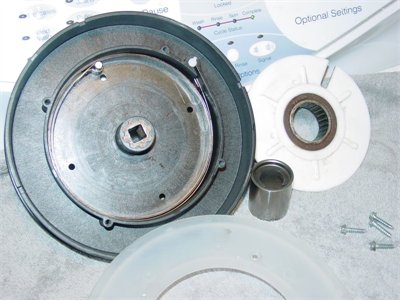
Clutch opened up:
Some folks have found the spinner shaft coupler is rusted solid to the one-way roller clutch bearing.
I hope this will help others with their clutch issues on this machine type. Dick

To learn more about your washing machine, or to order parts, click here.