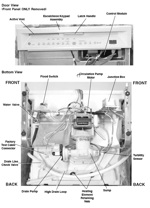
How do I replace
The water valve in my Bosch?
This parchment reveals.
![]()
Buy the water inlet valve for your Bosch dishwasher here.

How do I replace
The water valve in my Bosch?
This parchment reveals.
![]()
Buy the water inlet valve for your Bosch dishwasher here.
 Click the pic for the larger version (opens in a new window). Save a copy for future reference.
To learn more about your dishwasher, or to order parts, click here.
Let this odd techno-babe with the funky voice explain how.
To learn more about your dishwasher, or to order parts, click here.
Just paid out some serious jack for one o’ them fancy Bosch dishwashers, like a SHE45m06UC, and the silly thing doesn’t even dry the dishes? Well, turns out there’s a very good reason for this, compadre: none of the newer Bosch dishwashers have a heated dry cycle. It’s part of the whole greenie-weenie, fuzzy-wuzzy navel gazing so in vogue among appliance manufacturers today. Make sure you keep your rinse aid dispenser filled– that’ll help.
Shhh… don’t tell those poor Bosch owners with wet dishes: for just five hundred bucks more, they coulda bought a Miele that comes with not only a great water heater, but its own water softener and it dries the dishes, too! ![]()
To learn more about your dishwasher, or to order parts, click here.
Got some good suggestions for troubleshooting and de-stinkifying your dishwasher in this topic at the Samurai School of Appliantology.
To learn more about your dishwasher, or to order parts, click here.
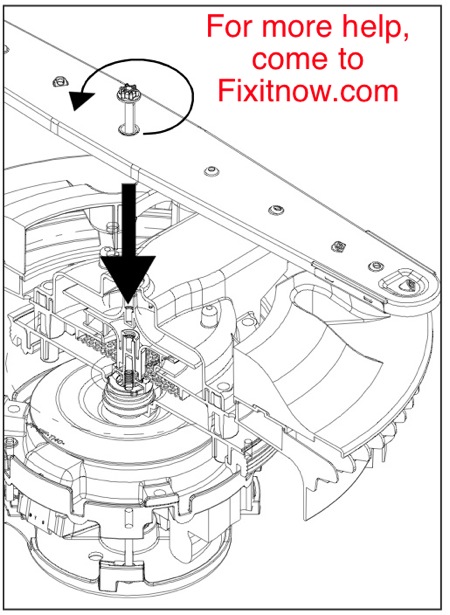
The lower arm is held in place by a large diameter plastic furled nut right in the middle of the lower arm, as shown below. (There’s a large hole in the middle of this nut.) Undo that and the whole lower arm assembly will come out. This exposes the torx bolts that you need to undo to get to the mesh filter. There may be some minor variations among model numbers on this procedure which are explained in this repair forum topic. Piece of pie, tovarish!

To learn more about your dishwasher, or to order parts, click here.
If you have one of the Whirlpool-built dishwashers (also applies to Kitchenaids and some Kenmores) with the dinky wash motors, then one day, maybe someday very soon, you’ll need to replace the wash motor assembly. Here’re some resources that’ll hepya:
To learn more about your dishwasher, or to order parts, click here.
This Tip ‘O Da Day applies to newer KitchenAid dishwashers with model numbers like KUDI02FR.
The flashing Lock light problem is caused by a stuck key on the touchpanel console.
If the control board detects that a key is stuck in the “mashed-in” position, then the dishwasher will suspend operation and maddeningly flash the light for that key until the condition is fixed. If a key without a light is stuck or multiple keys are stuck, the control will flash the Lock light.
The cure is to replace the touchpanel console. Easy job and, conveniently, here’re the part links. Click it to git it, Hoss:
To learn more about your dishwasher, or to order parts, click here.

1. Keep your big stuff at the sides and back, so that they don’t hog all the water and detergent and keep it from reaching the other dishes. This will also keep them from blocking the detergent door.
2. Load the grungy side of the dishes toward the center so they get blasted more directly by the spray arms.
3. Use the top rack for plastic and delicate items, like beer steins and wine glasses.
4. Place glasses upside down on prongs to prevent breakage… and profuse adult language once discovered.
5. Silverware goes in handles down except for knives– load them handles up so you don’t slice your hand open when you pull ’em out. If your dishwasher has a big open basket, mix spoons, forks, and knives so they don’t stick together.
6. If some of your dishes have baked-on food, set ’em in the rack facedown and toward the sprayer in the bottom rack so they can get blasted clean.
For more details on how to load a dishwasher, including water hardness issues, download this file.
To learn more about your dishwasher, or to order parts, click here.
Several months ago, Maytag announced a massive recall on several dozen models of its Maytag and Jenn-Air branded dishwashers. You can see one of the reasons for the recall in this post. The corrective action in the recall was to replace the wire harness. This short video shows you how to do it.
To learn more about your dishwasher, or to order parts, click here.
So you’re happily running your Maytag dishwasher one day, getting the Alpo scrubbed off of your dinner plates when your nostrils are assaulted by a burning smell. You quickly check the pair of skivvies you’re wearing and, finding them to be (reasonably) clean, you discover that Da Schmeel is indeed wafting from your Maytag dishwasher. Your mind shifts from peering intently into your britches and snaps into troubleshooting mode as you open the control panel on the dishwasher, seeking the source of the burning smell. Your keen Vulcan squinties immediately spot a group of burnt wires on the timer harness, similar to what’s shown here:
“WTF?” you exclaim, in astonishment and horror.
Turns out that there is a recall on this dishwasher for a problem with the rinse aid dispenser. Although the depicted problem was not caused by this, but was instead due to loose connections at the timer wire harness, there’s still a good chance that Maytag will cover it for you. Worth a call, right? Here’s the number to the Maytag Recall Team: 1-800-675-0535.
And in case they don’t cover it, here’s the part link to the timer if you want to replace it yourself. Easy job, half a mug on the world-famous SUDS-o-meter.
To learn more about your dishwasher, or to order parts, click here.
For Models: SHE44C / SHE46C / SHE47C / SHE56C / SHU43C / SHX46A / SHX46L / SHX43E / SHV46C / SHE43F / SHE43M / SHX43M / SHE45M / SHV45M / SHX45M / SHE55M
In case you lost yours, you can borrow my copy. Just be sure to return it when you’re done. Domo! ![]()
If’n you need parts for your dishwasher, come git you some! And if you’re having a problem with it, come start a new topic in the Samurai Appliance Repair Forums and we’ll hepya whup-up on that bad boy. ![]()
To learn more about your dishwasher, or to order parts, click here.
See this topic in the Samurai Appliance Repair Forum for some sage advice from Sublime Masters of Appliantology on how to troubleshoot this emerging problem with these dishwashers.
So, how do we deal with water leaks in appliances? Let us open our hymnals to the 7th Law of the Prophecy, wherein it is written, “All leaks are visual.” In observance of the prophecy, remove the kickplates from the dishwasher and run it while peering intently underneath with a flashlight. If you see the leak coming from the location shown below…
Then you just need the drain valve shaft seal. Piece of pie, tovarish! But if you need more help, see this topic and this one at the Samurai Appliance Repair Forums.
Plug n’ chug, bud-row. ![]()
And I do mean literally flakey. Apprentice Appliantologist billccm posted this question in the Samurai Appliance Repair Forums:
Hello All:
I have a six year old KitchenAid Dishwasher KUDR01TJBL0, serial FL5125226.
It is a very mediocre product, but that is a subject for another day.
What I am experiencing is flaking of black, crusty coatings from the heating element. It seems to be cracking off and blasting itself throughout the dishwasher.
I have researched this issue, and it seems that the ’round’ elements are the issue, and Whirlpool has an upgrade kit.
So, kind experts, is this all I need to fix my problem? Is it a job I can tackle in a Saturday afternoon, or shall I call a service company?
Finally, do you recommend that I cut my loss on this very mediocre product and invest in a new Bosch dishwasher?
Sincere thanks for your time in replying, and have a nice day,
Bill
 This repair is very worthwhile doing. On new appliances today, you’ll be doing some type of repair every two to four years. So, buying a new one just because something is broken on Old Faithful is not a silver bullet. Just bite the bullet and do the repair. Here’s the upgrade kit you’ll need. The repair is straight-forward; here’s the service manual if you need it.