Category Archives: Dishwasher Repair

Entering Service Diagnostic Mode in a GE Triton Dishwasher

ge-triton-dishwasher-service-mode.pngService diagnostic mode is one of those indispensable troubleshooting tools built into some appliances with electronic controls. Although electronics on wet appliances, such as dishwashers, is a flagrant violation of the 5th Law of the Prophecy, this is somewhat mitigated by having a service diagnostic mode to help troubleshoot it.

In service mode, you can do things like make the dishwasher fill with water and nothing else. Or make it pump out and nothing else. Real handy if you’re trying to track down the cause for a no fill or no pump out complaint.

Applies to the following GE dishwasher models:

EDW4000

EDW4060

GSD6200

GSD6300

GSD6600

GSD6660

GSD6700

PDW7300

PDW7700

PDW7800

PDW7880

To learn more about your dishwasher, or to order parts, click here.

Dacor Dishwasher Fault Codes

EDW/IDW Models

Display Indicates
F1 Inlet Valve Fault
F2 Circulation Pump Fault
F3 Electrical Heater Fault
F4 Drain Pump Fault
F5 Air Flaw Fan Fault
F6 Controller Fault
F9 WPS Sensor Fault


ED/ID30 Models

FAULT CAUSE EFFECT SOLUTION
Drain Pressure Switch is in the closed position after two full drain procedures Three long beeps, red light
flashes below door.
Press Cancel key twice to reset this fault. Fault will occur again in the first Drain if the conditions are still true. See component diagnosis section for troubleshooting.
Water in
Base Pan
Floor Guard switches to a open position caused by a flood condition in the base Cycle will stop, followed by three long beeps. Drain pump will activate until the floorguard switch is reset. Floorguard LED will turn ON and red light will stay steady below door. Floorguard switch will reset and clear this fault, when water is removed from the base pan.
F3 Controller failure to communicate with the Atmel 16 on the power board. The dishwasher loads will not function. A fault can be visible in the first 15 seconds of initial power-up. “F3” will flash on the display and will be visible to the user. Dishwasher will be disabled. Check Control and Power Board Compatibility. Check power/controller board communication cable.
F4 No response signal from the WPS Wash cycle will go into a default timetable and soil=3; temp=0. F-4 appears for the failure test mode. Check WPS connection. Replace WPS
F5 Controller failure to communicate with PIC or no PIC software in the power board PIC Microcontroller There is no temp or soil information reported to the controller. Controller will default to soil=2 & temp=0. F-5 appears in the failure test mode. Replace power board.
F9 Heater failure Temperature does not increase See component diagnosis section for troubleshooting.

NOTE: There will never be an F4 and F5 error at the same time.


MDW24 Models

Display Codes (Readout)  
LO Low Liquid in the Rinse Aid Dispenser 
PF A Power Failure has occurred 
HO Water Heating Delay 
CL Close and latch the door 
01-04 Hours delay before the dishwasher will start
CF Clean Filters 


ED/ID/PD/MD24 Models

FAULT CAUSE EFFECT SOLUTION
F1 Pressure Switch is in the closed position after two full drain procedures. Three long beeps. F1 will be displayed only during the Diagnostic mode. Press Cancel key twice to
reset this fault. Replace Pressure
Switch.
F2 Inlet Valve does not
close.
Three long beeps. F2 will be displayed to the user and in Diagnostic mode. Drain pump is ON until open door. Press Cancel key twice to reset this fault Replace Inlet Valve. Replace control board.
F3 Low inlet water pressure. Three long beeps. F3 will be displayed to the user and in Diagnostic mode. Press Cancel key twice to reset this fault. Ensure that Inlet hose is ON. Replace Flow Meter. Replace Inlet Valve.
F4 No response signal from the WPS. Wash cycle will go into a default time table soil 3 & temp 0. F4 will be displayed only during the Diagnostic mode. Check WPS connection. Replace WPS.
F9 Heater failure Temperature does not increase. Wash cycle will go into a default time table for Heater ON time. F9 will be displayed only during the diagnostic mode. Replace heater. Replace WPS. Replace Control board.

To learn more about your dishwasher, or to order parts, click here.

Leaking Pump in a Whirlpool DU810DWGQ1 Dishwasher

Leaking Pump in a Whirlpool DU810DWGQ1 Dishwasher

These are cheesy, inexpensive dishwashers that are prone to leaky pumps, as shown here (click the pic for the larger, annotated view).


Whirlpool DU810DWGQ1 Dishwasher Pump and Motor Diagram

The problem is usually a leaky shaft seal kit, shown here as Items 7 and 8 (click the pic for the larger, annotated view).


Fortunately, the shaft seal kit is inexpensive; but it can be a booger to install, depending on how much rust you’re dealing with. May require a destructive removal of the impeller, too, but ain’t no thang ‘cuz the shaft seal kit comes with a new impeller. Here’s a nice, purdy picture of a brand new shaft seal kit. And just to help motivate you a little more, the money you save from replacing just the shaft seal vs. replacing the entire motor-pump assembly is well over a Benjamin. So you go ahead and drill, cut, and chisel all you want on that old impeller!

shaft seal kit for whirlpool-built dishwashers with the horizontal pump and motor assembly--click it it git it

And Whirlpool just came out with a spiffy new DIY repair manual for this dishwasher, which will assist you mightily in the many repair adventures you are certain to have with this dishwasher:

whirlpool dishwasher diy repair manual-- click it to git it

To learn more about your dishwasher, or to order parts, click here.

GE GSD5500G00WW Dishwasher Spray Arm Retaining Clips Broken

lower spray arm assembly for a GE GSD5500G00WW dishwasherIf those little clips break, the spray arm won’t turn and the water will just shoot straight up to the lower rack. You can’t just replace the clips because GE doesn’t make enough money that way. Instead, you get to buy the entire lower spray arm assembly. Thank you, GE!


To learn more about your dishwasher, or to order parts, click here.

Repairing an Incontinent Maytag Dishwasher: A Visual Repair Guideā„¢

(Click the photos below to see the larger version with the illuminating annotations on them.)

Slimey Down UnderSlimey Down Under. This leak had been going on for a while. There was algae growing down there! And water was running down the wall into the basement. It was a real mess! Notice also the partition in the floor. They had a new floor put in IN FRONT of the freaking dishwasher! Hello? Is this thing on? I had to pull the dishwasher outta there to change the upper spray arm water feed tube. Please don’t torture your repair dudes like this!


Drippy Action ShotDrippy Action Shot. Watch with amazement and your mouth agape as you witness water suspended in the air before your very eyes! Right now it’s just dripping vigorously. When the dishwasher switches into drain mode, the water comes spraying out in a fan-like multitude of spray, drenching anything nearby. Honestly, I don’t understand how this could go on more than just one time before someone noticed that something was amiss. You shouldn’t see any water from your dishwasher… ever. Any regular leak should be checked out quickly.


Water-Worn Rubber Fitting on the Old Upper Spray Arm Water Feed TubeWater-Worn Rubber Fitting on the Old Upper Spray Arm Water Feed Tube. Here be the culprit– this rip in the rubber fitting was caused 100% by water! The pump blasts water though this fitting and tube to feed the upper spray arm. After a while, the rubber gets worn thin and rips. Given enough time, water can dissolve anything.


Unscrewing the Upper Spray Arm Retaining NutUnscrewing the Upper Spray Arm Retaining Nut. The upper spray arm water feed tube needed to be replaced. It runs around the outside of the dishwasher to the top where it connects here to the upper spray arm.


Upper Spray Arm Water Feed Tube, External Top ViewUpper Spray Arm Water Feed Tube, External Top View. This is the top, outside of the dishwasher. Note the mouse droppings. Every house has ’em. Decon is your friend!


Upper Spray Arm Water Feed Tube RemovedUpper Spray Arm Water Feed Tube Removed. Notice that the entire dishwasher has to be removed from the cubby to replace the upper spray arm fill tube.


To learn more about your dishwasher, or to order parts, click here.

Mailbag: How to Remove the Front Panel and Drawer in a Fisher-Paykel DD603 Dishwasher

Andy wrote:

How do I remove the front panel of a Fisher Paykel DD603SS dish drawer? I’m trying to resolve an F1 error code problem.
Thanks

Ahh, Grasshoppah, this is one of those repair katas that’s so easy it’s sublime. The only tool you need is a pair of needle nose pliers. All is revealed in this sacred parchment from the Appliantology scriptures.

Drain Hose in a Fisher-Paykel Dishdrawer - click for larger viewF1 error codes are caused by leaks. On the DD603’s, the most common source of leaks is the drain hose– it gets little splits in it and sprays water inside the dishdrawer compartment during drain. These splits in the drain hose are usually caused by one of the white nylon drain hose support rods breaking. The drain hose itself is just a cheesy plastic corrugated tube that gets easily damaged if it gets bent too much, which is what those nylon support rods are supposed to prevent. Click the thumbnail to see the larger version of the annotated photo wherein all is revealed.

Kanpai!


Mystery Leak from a Bosch-built (Kenmore-labelled) Dishwasher

Water Staining from the a Leaking Kenmore-by-Bosch DishwasherGot a call on one of these Kenmore-by-Bosch dishwashers. These are made by Bosch but sold under the Kenwhore label. Complaint was that it leaked a bit on the right hand side during each wash staining the rug in the kitchen.


Puckered Top Seal on a Kenmore-by-Bosch DishwasherOnly thing on the dishwasher itself that looked weird was the top seal.


Following the Detergent Trail Down the DoorAccording to the Seventh Law of the The Prophecy, “All leaks are visual.” So, in my efforts to comply with the sacred appliantological scripture, I took the door apart and could see a detergent trail going from the top of the door to the bottom hinge…


Detergent Residue Inside Door…and running down the inside edge of the door. What do you conclude is the problem and how do you arrive at your conclusion?


Introducing the apophatic method of troubleshooting and Occam’s Razor. These concepts are powerful weapons to have in your troubleshooting arsenal. The apophatic method of troubleshooting is useful when you cannot directly prove that a thing is causing the problem you’re trying to fix. Instead, you prove that everything else is okay, which, by elimination, confirms the suspect item as the offender. The Occam’s Razor concept says, “When all the plausible possibilities seem equally likely, the simplest solution is usually the correct one.”

So I checked out and eliminated the other potential causes of door leaking: gookus or splits in the spray arms, deflected spray from incorrectly loading the dishwasher, loose door latch, overfill condition. The only thing left was the puckered top door gasket. Even though I didn’t have eyeball positive proof (cataphatic proof) that water was leaking past that seal, I did have apophatic proof and the assurance of Occam’s Razor.

So I ordered a new top door seal and replaced it. Problem solved!

To learn more about your dishwasher, or to order parts, click here.

Mailbag: Which Brand of Dishwasher to Buy?

Brent wrote:

Dear Samarai,
Thank you for the great advice on your site. I have Kenmore model you described. Replaced switches and now will replace thermal fuse.

If I have to get new dishwasher, do you have any suggestion for Kenmore or other model that is made well, that is less likely to have same problems with switches and fuse as my current model ?
Thanks for the help.

Grasshopper

Ahh, Grasshoppah, here I present to you a Great and Universal Truth of Appliantology (GUTA): All dishwashers made today suck.

You’re gonna be fixing whatever brand you buy about as often as Grandpa needs his prostate checked. Therefore, your prime criteria in selecting a dishwasher (or ANY appliance, for that matter) is to choose a brand that has the most technically precise and easily-accessible repair information available to the non-appliance tech public free of charge. Currently, only four brands fit this bill: Whirlpool (and its sub-brands: Kitchenaid, Roper, Maytag, Amana, Jenn-Air), Frigidaire, LG, and Dacor. Don’t get me wrong– they still suck. But at least with these four manufacturers you can get the information you need to fix their appliances when they surely break.

If you currently have an older model dishwasher, you’re usually better off fixing what you have rather than buying a new one. And replacing a dishwasher is a little more complicated than plugging in a toaster. You can get help fixing your dishwasher from certifiable appliance gurus in the world-famous Samurai School of Appliantology.

To learn more about your dishwasher, or to order parts, click here.

Glassware Etching and Poor Cleaning in Whirlpool (and Kenmore) or KitchenAid Dishwashers

Now, Grasshoppah, prepare for dishwasher illumination. The Samurai is gonna reveal to you what they never tell you about fixing cleaning problems in your Whirlpool-Kenmore-KitchenAid dishwasher. So, strap yourself in and get ready to download wisdom directly from my brain to yours.

wpl-voyager-dw-motor-pump-diagramthmb.jpgFor newer-model Whirlpool and KitchenAid dishwashers (also sold under the Kenmore label with model numbers beginning with 665)– the so-called “Voyager” platform models– download this scroll for some good tips on improving cleaning performance. You can tell if you have the Voyager style by removing the front access panel (at the bottom) of the dishwasher and looking at the motor and pump layout (click the thumbnail image for a larger view).

For older model Whirlpool or KitchenAid dishwashers with the big honkin’ center-mounted motor without a separate pump, here are some tips to improve cleaning performance. Many of the tips below also apply to any dishwasher, with the obvious exception of the suggested replacement parts.

First, try these two things:

1. Use normal amounts of detergent and keep the rinse agent dispenser
supplied with rinse agent.

2. Use Hi-Temp Wash Cycle and Energy Saver Dry to allow for
proper wash action, and slower dry to allow water to sheet off the dishes.

If no joy, then we gradumutate to the more advanced stuff:

Water Hardness: Check the water with a hardness test strip. A hardness of ten grains or more may cause filming. Run a cleaning solution, such as white vinegar, through the system (refer to the “Use and Care Manual”). Other recommended cleansers for hard water situations are Glisten, or Glass Magic.

Water Temperature: Water temperature at the sink closest to the dishwasher should be between 120°F and 160°F.

Water Level: After a complete Fill cycle, check the water level in the dishwasher. The water should cover the fine mesh pump screen and part of the edge of the pump top. Check for the proper drain hose height (20 “) and verify that the dishwasher is not siphoning.

Spray Arms: Make sure that the upper and lower arms are turning freely. Check each arm for blockage and splits.

Drain: Check the dishwasher to make sure that it is draining completely. The water level in the tank after a proper drain cycle should be below the coarse strainer of the pump.

Rinse Agent Dispenser: Make sure that there is rinse agent in the dispenser, and verify that it is actually dispensing. The recommended setting is Level 2.

Detergent Lid Gasket: Check the detergent lid gasket. If the gasket is not present, install a gasket.

Check Valve: Check the pump check valve for proper operation. Listen for “gurgling” at the drain line while the dishwasher is in the Wash mode. It will indicate that the check valve flapper is leaking, allowing drained water to reenter the dishwasher. Try cleaning the gookus out of the check valve. If you still get the gurgling noise, then replace the check valve.

Pump Motor: On units built prior to code date FF47, the pump drain cover plate was the original “2-ball” design. The drain cover was replaced with a single check ball design after code date FF47. If the pump motor has not been replaced, and the unit was built prior to FF47, install the updated the pump motor assembly.

If all things listed above check okay, then replace the electronic control.

To learn more about your dishwasher, or to order parts, click here.

Older Whirlpool / Kenmore Dishwasher Won’t Drain

These were good dishwashers made back in the day when they used big ol’ honkin’ motors that jacked up the pressure on the water and blasted your dishes clean. An example model number of this vintage is DP940PWPQ2 (these dishwashers were also sold under the Kenwhore label). Alas, they just don’t make ’em like that any more. All the manufacturers have gone to these weenie designs that use a wimpy little wash motor and separate pump.

But, like all machines, these, too, had their quirks and common repairs. The difference, though, between these older Whirlpool dishwashers and the weenie ones made today is that the repairs on these older ones were usually simple and low cost, like the one I’m about to explain to you.

One common problem with these old war horses was that it wouldn’t pump the dirty water out of the basin. Typical symptoms of this problem include:

  • Crud left on dishes at the end of the wash cycle
  • Dirty water in the basin at the end of the wash cycle
  • Washer basin will not pump out

Like I said, this is usually a really easy problem to fix and, if you do it right, it usually doesn’t even require any parts. So, grab ‘hold of those lower cheeks and let’s get ready to r-r-r-umbl-l-l-l-l-l-e!

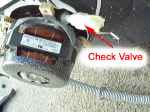
The older Whirlpool-built dishwashers used a check valve at the drain hose port in the pump housing to prevent gooky water from backing up into the basin. This check valve is prone to getting plugged up by what we professional appliantologists call, “gookus.” (This is a technical term reserved for use by professional appliantologists so please don’t use it unless you are one as I cannot be responsible for your safety.)

These check valves are prone to getting plugged up by all kinds of gookus. I’ve cleared some weird stuff out of these check valves such as:

With stuff like this running through the dishwasher, you can see that, most of the time, this problem is self-inflicted. In the immortal and wise words of my good friend from the Samurai Appliance Repair Forums, Sublime Master of Appliantology Reg, “It’s a dishwasher, not a disposal.”

whirlpool dishwasher check valve location
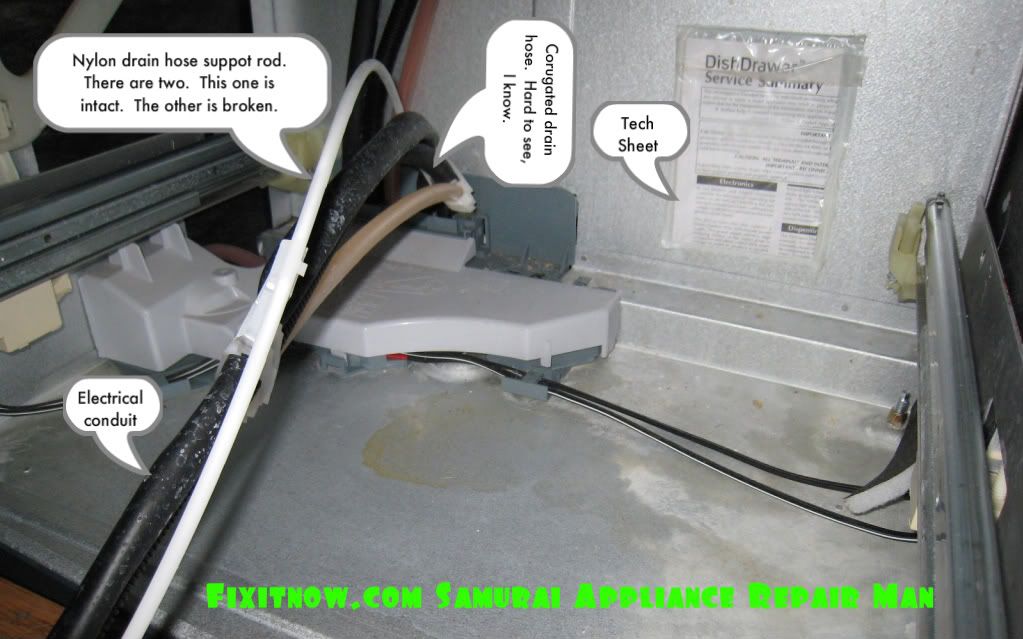
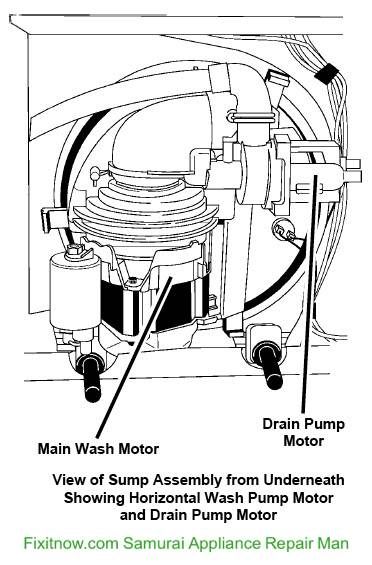
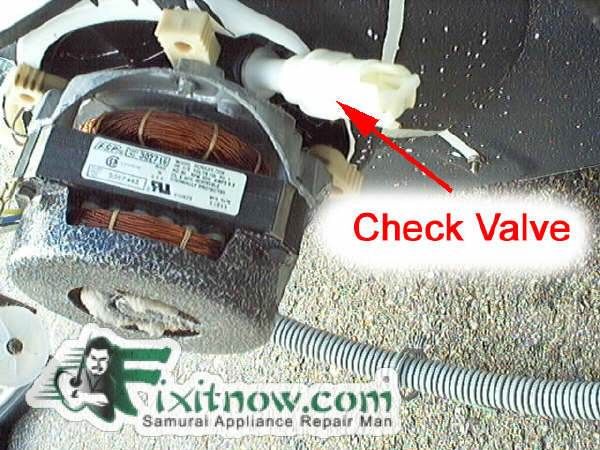
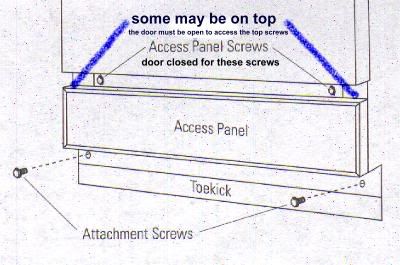
To inspect the check valve for a blockage, you’ll need to remove the access panel from the dishwasher and then remove the drain hose from the check valve. This picture shows you where it be, click it for a larger view.

If the dishwasher basin is full of water and the check valve is, in fact, plugged up, then you probably won’t have to worry about water gushing out… but have a pan ready just in case. OTOH, if’n the check valve ain’t the problem and you have a basin full of gooky water, well, things could get a little messy. The Boy Scout motto applies: Be Prepared!

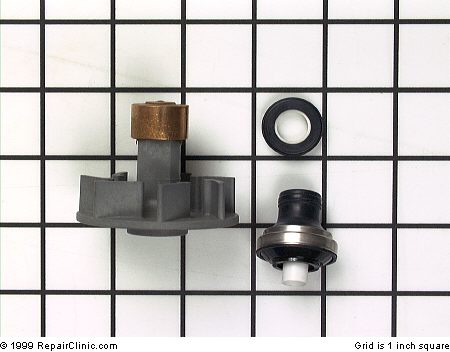
Usually, the plug is readily apparent as soon as you remove the drain hose from the check valve. Sometimes the cause for the plug is not immediately apparent. If you remove the drain hose from the check valve and you don’t see any gookus fall out, this just means that the blockage is further back in the check valve. In this case, you’ll need to unscrew the check valve from the pump housing to get to it.

broken check valve in an older whirlpool dishwasher
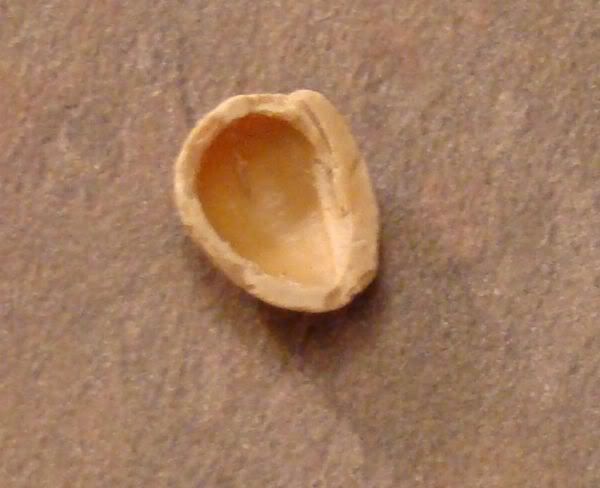
These check valves can be ornery to unscrew but persevere and ye shall overcome. Just be careful you don’t pull to the side or you might snap off the check valve, leaving part of it inside the pump housing, as shown here.

OK, that’s all there is to this bit of rocket science. Now, as our Lord Fixus done told us, “Go ye forth, therefore, and make Apprentices of all nations.”


To learn more about your dishwasher, or to order parts, click here.