
A common problem on ovens and ranges with the digital display is that the display starts to go dim after a while. It usually starts gradually and gets progressively dimmer until you can barely see it. You have two choices of repair tactics:
1. Replace the electronic control board, typical cost: $250. And there’s no guarantee that the display won’t dim again in a another couple of years.
2. Replace the capacitors on the control board, typical cost: $10. And you gotta be able to solder on printed circuit boards.
Here’s the inside scoop on what’s happening. The digital display is powered by very specific DC drive voltages. Theses voltages are created by a transformer and stabilized by capacitors, all of which are located on the control board. Most of these capacitors are only rated to a working temperature of 220˚F. Well, it don’t take a brain surgeon, like yours so very frikkin’ truly, to realize that over time the heat will reduce the capacitor’s ability to capacitate thus lowering the drive voltage and dimming the display. Awwite, that’s all the theory we need to know so let’s get into the generic strategery of this repair…
The specifics will vary with the exact layout and composition of the control board you’re working on but, generally, the flow goes like this:
1. Kill power to the unit.
2. Disassemble whatever you need to to get at the control board.
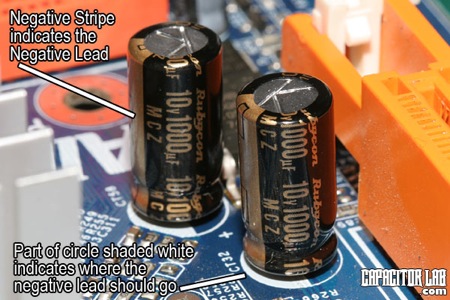
3. Locate the capacitors on the control board. Typically, there are three but, again, go with what you see. They’ll look something like this:
4. Make a list of the capacitors, noting the capacitance, working voltage, and temperature rating printed on each capacitor.
5. Go to your local Radio Shack and buy the replacement caps. It’s OK for the replacements to have a higher working voltage than the original but not lower. Try to buy the ones with the highest temperature rating you can get. And match the capacitance rating (usually given in micro-farads, μf) as close as you can to the original.
6. Unsolder the old caps and solder in the new one – soldering help here. Be careful to observe the correct polarity when installing the new caps!
Now go pop yourself a cold brewski and get me one while you’re at it. Mucho domos!
To learn more about your range/stove/oven, or to order parts, click here.

If banging on the oven gets the display to come back, it is likely not the capacitors! This is likely a bad solder joint or connection…
I had a intermittently dim display clock on a JennAir W256B. I recapped the ERC board (Y04100264) with high temp capacitors (found some 135 C caps!) but the problem wasn’t fixed. I tracked it down to a bad solder joint on the transformer/relay board (Y04100260) in the back of the oven. The transformer on this oven provides 21 VAC and 4 VAC to the ERC board. Resistance of the 4 VAC was about 1.1 and the 21 VAC was about 5.0. Flexing the board and the 4 VAC would open circuit. I refluxed all the solder joints on the board and the oven now works properly, with beefier capacitors!
As you state, the heat working on the capacitors will eventually get them to dry out and fail. Likewise, after 20 years of use, the solder develops micro-fractures and fails.
Repair cost was still $10. ;^)
I replaced the caps as recommended on my Jenn-Air oven and Voila! A nice bright display again! Total cost: $0.44 plus a few cents in gas to drive to my local electronics parts place.