|
|
|
|
| The Samurai Appliance Repair Forums | Appliance Repair FAQ | Live Appliance Repair Help |
Appliance Repair, Tips & Help |
Need help finding something? I can help. If I'm online, send me an IM and I can help you find what you're looking for
Recent Appliance Repair Morsels
|
| Search the vast repository of wisdom at Fixitnow.com: |

FAQs | Forum | Parts | Service | Store | Newsletter | Sitemap | Beer | Home
Add to My Yahoo |
XML/RSS Feed |
Tuesday, September 28, 2004There are as many different ways of installing an icemaker water supply line as there are people doing it. Some are good, most are marginal or just plain wrong. Here's a handy list of reminders on the correct way to install a water supply line from the source to the water inlet valve on the refrigerator:
You can learn more about your icemaker and order parts here.
Samurai Appliance Repair Man cast these pearls at 02:30 ET. [permalink]

Kazantzakis wrote: Read the mailbag about error code F7 on GE profile oven. My board on JTP56COD1CC has gone crazy with spurious messages and numbers. Replaced the board.(rip off cost) Worked fine for a couple of weeks and now the same problem. GE has a problem which is now my problem. From Kyoto Meditation Center of Texas. Not sure which mailbag post you read, but if you had read this one, you must have glossed over my admonition in the last paragraph: It's important that you don't skimp the disconnect test because there's a big difference in price between the ERC and touch pad. So, you want to be right on this one... I can tell you that in my vast and awesome experience, the problem almost always turns out to be the keypad, not the electronic control board. However, I never, EVER skimp on doing the 24-hour disconnect test that I so eloquently explain in my illuminating post. To do so would be in violation of the Samurai's Cardinal Law of Appliance Repair: Thou shalt not replace a part unless you have proof that the part is bad. Many times, while on a service call, I'll quote the repair price to the customer after I've diagnosed the problem and the customer will ask, "How much is the part?" Yanno, any imbecile with a credit card can buy a part, but it takes a highly-trained imbecile to know which part to change and how to install it correctly. How much is that worth? Meditate on that.
Samurai Appliance Repair Man cast these pearls at 01:05 ET. [permalink]
Saturday, September 25, 2004Once upon a time a powerful Emperor of the Rising Sun advertised for a new Chief Samurai. After a year, only three applied for the job: a Japanese, a Chinese, and a Jewish Samurai. "Demonstrate your skills!" commanded the Emperor. The Japanese samurai stepped forward, opened a tiny box
and released a fly. He drew his samurai sword and "What a feat!" said the Emperor. "Number Two Samurai, show me what you do." The Chinese samurai smiled confidently, stepped forward
and opened a tiny box, releasing a fly. He drew his samurai
sword and "Excellent!" nodded the Emperor. "How are you going to top that, Number Three Samurai?" Number Three Samurai, Obi-wan Cohen, stepped forward,
opened a tiny box releasing one fly, drew his samurai sword
and But the fly was still buzzing around! In disappointment, the Emperor said, "What kind of skill is that? The fly isn't even dead." "Dead, schmed," replied the Jewish Samurai. "Dead is easy. Circumcision: now THAT takes skill!"
Samurai Appliance Repair Man cast these pearls at 02:10 ET. [permalink]
Just in case you've had a rough day, here is a step-by-step stress management technique recommended in the latest psychological texts. After a rough day of appliance service calls, this is one of the Samurai's favorite stress-management exercises. 1] Picture yourself near a stream. 2] Birds are chirping softly in the cool mountain air. 3] No one but you knows your secret place. No one. 4] You are in total seclusion from that hectic place called "the world". 5] The water in the stream is crystal clear. 6] You can easily make out the face of the person you're holding underwater. 7] See! You're smiling already! What a relief, huh?
Samurai Appliance Repair Man cast these pearls at 01:47 ET. [permalink]
Thursday, September 23, 2004
Official Samurai Reproductive Unit NH 48-4,000-footer Peakbagging Tally:
Ivey: 10
Stephen and Sam: 14
Samurai Appliance Repair Man cast these pearls at 23:13 ET. [permalink]
Sunday, September 19, 2004If you have a gas oven that's not firing, don't be bonehead and automatically assume the valve is bad (hint: it's usually not). What else could it be? Ah, Grasshoppah, read and learn.
I've talked to lots of shotgun parts-changers about this problem. These are guys who can't be bothered with the theory of operation. Besides, they already know everything anyway, so they just shoot from the hip and end up replacing a bunch of parts that were still good. They blew beaucoup bucks on a new valve and just can't understand why the oven still won't fire up. But now, you know why. To learn more about your range/stove/oven, or to order parts, click here.
Samurai Appliance Repair Man cast these pearls at 01:45 ET. [permalink]
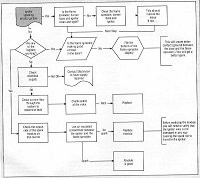
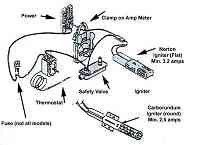
Friday, September 17, 2004Did you know that 90% of the spark modules in gas ranges and cooktops that are replaced are perfectly good? A statistic like that tells me that this topic is screaming for a revelation from the master. So, my incredulous grasshopper, remove your thumb from your dorsal orifice and come with me now on a journey through gas stove spark ignition systems and how to fix 'em.
When you're having trouble getting your stove burners to ignite, usually it takes the form of one of the three types of problems:
Let's take 'em one at a time and list the things you need to look at. You hear clicking but there's no ignition.First thing to do in this case are the following observation checks which do not require any tools, instruments, or taking anything apart.
These following two checks are done by physical inspection "under the hood":
First, verify that the spark module is getting the 120v on terminal L when you turn on any one of the surface switches. If it is, and still no spark, that module is DOA--replace it. Well, there it is, the web's most definitive gas stove electric ignition troubleshooting guide. If this was helpful to you, your donations to The United Samurai Beer Fund® are much appreciated. Cheers! To learn more about your range/stove/oven, or to order parts, click here.
Samurai Appliance Repair Man cast these pearls at 02:03 ET. [permalink]
Sunday, September 12, 2004
Samurai Appliance Repair Man cast these pearls at 20:40 ET. [permalink]
Saturday, September 11, 2004CharlieChan wrote: Man, do I owe you a six-pack!!!!Your web site saved me at least $75.00. I had a venting problem(you were right) and when disconnected, the dryer worked fine. After about 30 mins of swearing and shortening the flex vent,IT STILL DIDN'T WORK!!!!!!!!!! Ah, grasshopper, although the Samurai is honored by your accolades, it is you who deserves the laurel of victory. It is your own persistence that ultimately led to the discovery of the problem with your dryer vent. I merely provided you with a weapon of knowledge, but it was you who applied this knowledge and thus converted it into true appliance wisdom. I have helped other grasshoppers who battled dryer venting demons in their new house. If all my grasshoppers would evince the same fighting spirit as you have, we could eradicate appliance disease from the face of the earth and usher in the era of total union of man and appliance foretold in the Appliantopia Prophecy.
Samurai Appliance Repair Man cast these pearls at 23:09 ET. [permalink]
Thursday, September 09, 2004
To learn more about your washer or to order parts, click here.
Samurai Appliance Repair Man cast these pearls at 01:13 ET. [permalink]
Wednesday, September 08, 2004
Ok, so you did those tests and now your saying, "I'm still getting gookus on my clothes, Mr. Smarty-pants Samurai Guy. Now what?" Hey, you're not happy with the free information you get from the Samurai? Ask for a refund. Ver goot, we shall proceed. Other common usage things to check:
Well, there it is, more wisdom from On High. To learn more about your washer or to order parts, click here.
Samurai Appliance Repair Man cast these pearls at 01:50 ET. [permalink]
Tuesday, September 07, 2004
Refrigerator Repair Revelations--REVEALED!
Samurai Appliance Repair Man cast these pearls at 06:49 ET. [permalink]
Monday, September 06, 2004
Samurai Appliance Repair Man cast these pearls at 13:24 ET. [permalink]
Sunday, September 05, 2004
When you get the new gasket, it'll come in a box, all twisted up with wrinkles and puckers. If you were to just install the gasket as it is right outta the box, you'd have more gaps in the final gasket seal than Clinton's memory during the Lewinsky deposition. A puckered or wrinkled door gasket makes a cruddy seal with the refrigerator cabinet and will cause lots of condensate and temperature control problems inside your fridge. Stick that sucker in the dryer on medium heat for about 10 minutes. That'll give you enough time to do some prep work on the fridge door. First thing you gotta do is take all the food off the door shelves. If'n you don't, you'll probably have a hard time making door square up right with the cabinet when you're all done. Next, loosen all them billion and a half retaining screws all around the perimeter of the door. Your gasket may have a metal strip retainer as shown here or it may be the non-retainer style gasket and just tuck behind the inner door liner. Either way, you're gonna have to loosen all those ¼" screws. One of those Versapak screw drivers with a long ¼" nutdriver attachment takes away alot of the drudgery here. Don't take the screws out all the way, just back 'em out about 2 full turns. Then pull the old gasket out all the way around. By the time you finish pulling the fool thing apart, your new gasket should be nice and warm and soft from its ride in the dryer. Wash your hands at this point so you don't get gookus from the old gasket on your new one. Take the new gasket outta the dryer and untwist it. Lay the new gasket up around the door like it's supposed to go on and start at a corner working the lip into the retaining bracket. On some fridges, there are no retaining brackets, they just use the whole plastic shelf piece to hold the gasket in. Either way, same idea. Get the gasket in all the way around and situated like it's supposed to be before you tighten any of the retaining screws. Now, here's the finesse part. Some of these doors get really floppy when all the retaining are loosened. Start tightening the new gasket from the top working down to the bottom of the door. Periodically, close the door against the cabinet to make sure it ain't warped, like what's shown here. If it does seem to be warping on you, just hold the bottom half with your leg and warp it back into place. On some older refrigerators, the original gaskets are no longer made and you have to buy a universal gasket kit for the door. These kits will have four sections each with welded corners and you cut the straight sections to fit the dimensions of your door. Just keep one simple rule in mind: all corners have to have welded corners--you can't just take a straight section and bend it around the corner. Once you got it looking right, go ahead and tighten the retaining screws. I like to put a little silicone lube along the surface of the gasket that's next to the door hinge so it don't squeak s'damn much. To learn more about refrigerators or to order parts, click here.
Samurai Appliance Repair Man cast these pearls at 05:45 ET. [permalink]
Saturday, September 04, 2004The Samurai Klan bringing Mrs. Samurai home from Franklin Regional Hospital in Franklin, New Hampshire:
Samurai Appliance Repair Man cast these pearls at 20:33 ET. [permalink]
Friday, September 03, 2004Whirlpool is recalling over 2,400 freestanding electric ranges, double ovens and oven microwave combos because of faulty wiring. This wiring can overheat, melt through the insulation and cause a short circuit. It could also pose a shock hazard. This recall applies to Whirlpool and Kitcenaid brands. But wait, there's more! Never to be outdone by quality defects, GE has announced that it's recalling over 28,000 freestanding electric ranges and double wall ovens. The recalled products include General Electric, Hotpoint, Kenmore and Americana brands. They, too, could have faulty wiring which can lead to a short circuit or, better yet, electrocution. Ya gotta love GE. For details about these recalls, go to www.cpsc.gov.
Samurai Appliance Repair Man cast these pearls at 10:22 ET. [permalink]
Thursday, September 02, 2004
GE Old Style Washer: Remove agitator cap by pulling it off and look for a bolt, remove the bolt and pull up hard on the agitator. Not all models of this style washer has a retaining bolt. Picture. GE New Style Washer: Use a old dryer belt or rope to help remove the agitator. Hook the rope/belt under the lower agitator fins and make the loops to the top. Use a board to help "pop" up the agitator, lift up on the side of the board that is sticking out further. Picture. Whirlpool and Kenmore Direct Drive Washers: Remove the agitator cap, some caps unscrew and some will just pull off. Look for a bolt and remove the bolt, lift up on the agitator. Picture. Maytag Dependable Care Washer: Locate a 1/4 inch screw on the side of the agitator, ( about 3/4 of the way down) remove this screw and lift up on the agitator. Picture. Maytag Atlantis and Performa: Remove the cap and softener dispenser by pulling it off and locate the agitator bolt. Remove bolt and lift up on the agitator. Picture. Frigidaire Washer, Older Models: Older style, unscrew the agitator cap and bolt, lift up on the agitator. Variation 1 and Variation 2. Frigidaire Washer, Newer Styles: Remove center cap--this can be difficult to do--by lifting up really hard on the center tab. Locate bolt and remove it and lift up on the agitator. Picture. Amana Washer: The older washers have a bolt under the cap that must be removed to remove the agitator, then grab hold of the agitator and lift up. The newer washer agitator just pulls out, remove cap, if no bolt, just grab hold and lift up hard. Picture. To learn more about your washer or to order parts, click here.
Samurai Appliance Repair Man cast these pearls at 09:42 ET. [permalink]
Wednesday, September 01, 2004
If you open the fresh food compartment of your fridge (the non-freezer compartment), you will most likely see two different controls. One refers to the refrigerator temperature and the other refers to the freezer. Different manufacturers use different wording, but the idea is the same. The first thing you need to know in order to understand what these controls really do is that all the cold air in the entire refrigerator is made in the freezer compartment. A portion of that cold air is then blown into the fresh food compartment. How much cold air gets blown in is controlled by the "freezer" control, which is really just an air baffle that opens or closed to let more or less air into the fresh food compartment. The "refrigerator" control is actually a thermostat that feels the temperature inside the fresh food compartment and turns the compressor on and off according to the temperature that the thermostat feels. Let's run through an example. Suppose you decide that your ice cream isn't hard enough. You adjust the "freezer" control to make your freezer colder. What you're actually doing is restricting the amount of cold air that gets blown from the freezer into the fresh food compartment and so keeping more of the cold air in the freezer. As a result, the freezer will get colder but also the fresh food compartment will tend to get warmer because its cold air supply has been diminished. The "refrigerator" control (the thermostat) will feel this increase in temperature inside the fresh food compartment and will keep the compressor running longer in order to maintain the temperature setting on the "refrigerator" control. So, you can see that any change you make to one control will affect the other. Many people then wonder, "Well, how do I know what the correct setting on the controls should be?" Since the temperature inside a refrigerator will vary according to lots of external factors such as frequency and duration of door openings, it is impossible to say where your controls should be set all the time in order to maintain a desired temperature in the freezer and fresh food compartments without knowing the actual temperature inside both compartments. For this reason, you should place two thermometers in your refrigerator: one in the fresh food compartment (the big one) and the other in your freezer. The controls should then be adjusted to achieve -10 to +10ºF in the freezer and between 36 and 38ºF in the fresh food compartment. Keep in mind, too, that it takes 24 hours for any change in the controls to work through the system and reach steady state so don't look for instantaneous changes in temperature when you make control setting changes. Knowing the actual temperature inside your refrigerator compartments is also a great way to save money on your power bill since you can adjust the controls to avoid running your compressor longer than needed to keep your food cold. To learn more about refrigerators or to order parts, click here.
Samurai Appliance Repair Man cast these pearls at 20:43 ET. [permalink]
|
 Welcome, Welcome,Grasshopper. I am your gracious host, Samurai Appliance Repair Man.

Hey! There are over 3,000 pages of free appliance repair help at this website! Use the site search box below to quickly find ezzzzacly what you need to Fix It Now! 
 |
||||||||||||||||||||||||
Appliance FAQs | Repair Forum | Live Help | Buy Parts | Podcast | Beer Fund | Home
|
Your Appliance Guru:
Samurai Appliance Repair Man 
"If I can't help you fix your appliance and make you 100% satisfied, I will come to your home and slice open my belly, spilling my steaming entrails onto your floor." |
URL: http://www.fixitnow.com
|


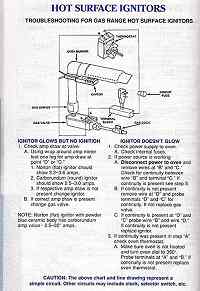
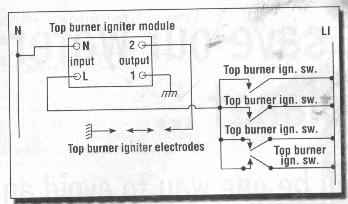 Now, here's what's supposed to happen--refer to the wiring diagram show here and sing along. You turn on one of the surface switches to fire up a burner. When you turn the switch to the "ignite" position, you complete the circuit, through the switch, to the module. This fires up the coils to produce a 15,000 VDC spark to the burners. The path this high voltage spark takes is through the ignitor wires to the ignitor (the ceramic electrode thingy up at the burner) where the spark jumps to the burner base. The voltage then passes through the burner to the grounding strap, through the chassis and then to the grounding strap of its partner burner (remember, each output from the module is tied to two burners), to its burner base and then jumps from the burner base to the ignitor (that's right from the base to the ignitor), passing back through the ignitor wire, to the coil, thus completing the spark circuit. The principle behind this is that the spark module must sense the electrical pulse. If it doesn't, well, your stove won't fire up right and that's why you're reading this illuminating and inspiring repair revelation.