Fisher-Paykel DD603 Dishdrawer Diagnostics
To learn more about your dishwasher, or to order parts, click here.

Fisher-Paykel DD603 Dishdrawer Diagnostics
Tappan Gas Range TGF362BBBA Wiring Diagram
TGF36, TGF362, TGF362BB

(click to enlarge)
Locations of the Main Components in a GE Front Loading Washer

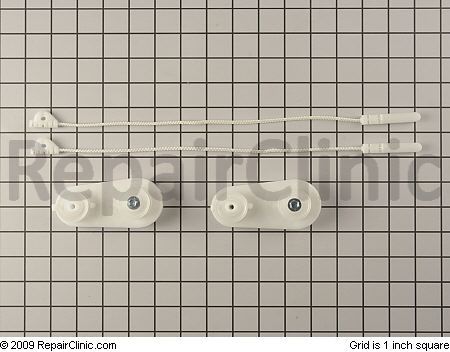
Kitchenaid / Whirlpool Dishwasher Door Link Pulley Routing

(click to enlarge)
(click it to git it)
Kenmore Dryer Model Number 110.66662500 Schematic – Gas and Electric Models
110.66662, 110.666625

(click to enlarge)
Kenmore (LG-Goldstar) 580.54351501 Dehumidifier Schematic
580.54351, 580.543515
 580.54351501 Dehumidifier Schematic")
(click to enlarge)
GE Top Mount Refrigerator Model Number TBX21JABRRAA Schematic and Wiring Diagram
TBX21, TBX21J, TBX21JA, TBX21JAB

(click to enlarge)
GE Washer Model Number S22OOYOWW Schematic
S22OOY

(click to enlarge)
Wiring Diagram for a GE Wall Oven Model Number JKP13GOV1BB
JKP13, JKP13G

(click to enlarge)
Jeff wrote:
The dispenser on my Frigidaire refrigerator, model number FRS6LF7JS3, is acting weird:
1 – Yesterday morning the water dispenser on my fridge began to spray water instead of pour it. Ok I will deal with it later.
2 – By 5 pm I return home and my wife indicates the ice maker is possessed. The ice maker would not stop dispensing crushed ice even without pressing the actuator on the exterior. if the door is closed it attempts to dispense crushed ice and the auger does not stop! Its actually not even really dispensing its building up crushed ice in the door hopper. So when you open the freezer door the crushed ice falls to the floor. I proceeded to unplug the ice container from the back of the freezer.
Any insight to the issue and the exact parts I should be replacing? Thank you in advance
The unpredictable auto-dispensing you describe is usually caused by a bad microswitch in the dispenser assembly. They can get wet from drippage or condensation and go wonky the way you’re describing. Let’s do a walk-through.
Here’s the breakdown of the dispenser where I’ve circled the key parts to check:

(click for larger view)
Unplug the refrigerator and remove item 23 to access the screws in the bottom of item 4. Remove item 4 and get some major eyeball action on items 38 and 38C looking for burn spots– usually (but not always) if one of these boards goes bad, there will be a visible burn spot.
Next, check the micro switches, items 38A, with a meter; simple continuity check while actuating each switch. Disconnect the wires from the switch before testing. Help making basic electrical measurements is in this post. If one is found bad, replace both.
You may also find the water tubing, item 1, disconnected from the fill spout which would explain the spraying action and would also contribute to the early demise of the microswitches from getting doused with water. If this is the case, you may need to replace the tubing, which is done from the front. But first, try pushing up a little slack from underneath the freezer door– you may be able to eke out just enough to re-make the connection. Installing the end of the tube into the spout requires some Samurai Finger Fortitude™ but persevere and ye shall overcome.
Here’s the shopping list of links for the parts you may need to complete this mission, depending on what you find:
– Dispenser Power Board, Item 38
– Dispenser Control Board, Item 38C
Eli wrote:
I found and I believe I repaired the leak in my dishwasher. I am currently re-installing it. I did not remove it to work on it, which is why these questions may seem silly. Do I use teflon tape while installing the water inlet pipe to prevent leaks. Also, I have two wires in the connection coming from the wall, but three in the area where they connect to the dishwasher–what do I do with the extra wire? Thanks.
Sublime Master appl.tech.29501 replies:
If your water supply line to the dishwasher has a compression fitting then no, no tape. If your talking about the elbow fitting that goes into the water valve it should have tape on the valve side only.
So you have 2 wires coming from your power source to the dishwasher and 3 wires coming out of the dishwasher? Should be black to black, white to white and green is your ground that connects to the dishwasher frame.
Read more: dishwasher installation question – The Kitchen Appliance Repair Forum – Do-It-Yourself Appliance Repair Help – ApplianceGuru.com: The Samurai Appliance Repair Forums http://applianceguru.com/view_topic.php?id=26833&forum_id=1&msg=5#ixzz0ws45t0Ta
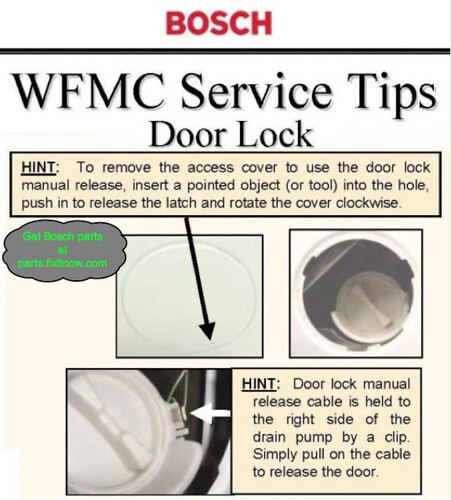
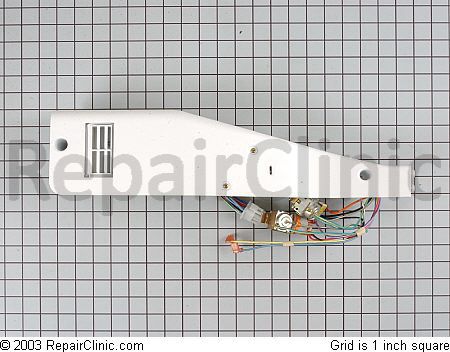
If the door is locked closed and you have to use the emergency rip cord to open the door, then you may need to replace the door latch assembly:

(click it to git it)
This scroll from the famous and coveted Appliantology Archive™ will help you replace it:
Bosch WFMC Washer Door Latch Replacement
Phil wrote:
I am getting the dreaded F70 code on my Whirlpool Duet Sport Washer, model number WFW9200SQ02. I have changed the CCU twice, and changed the R/H User interface with all new parts. Still get F70 and only clicks on the power on button. I checked continuity of the harness between the CCU and Interface and tested ok. I have seen other posts with the same problem with no solution. Anybody know??????
Thanks,
Phil

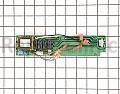
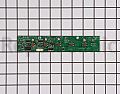
On your Motor Control Unit (MCU) board (down in the bottom, by the motor) you have a three-blue-wire harness. Pull that harness off and let it hang in the air. Close the door and power the unit up. If prior to removing the harness, you got an F70 error code or three quick beeps when you tried to start it but now, with the harness off, it acts like it is going to run, then you have a bad MCU. Now, mind you– the machine will not run with the blue harness removed, but if it now programs and acts like it’s gonna run, then your MCU is FUBAR.
This is all summarized and illustrated in the photo below, go ahead and download it and send it around to all your friends like they do to you with those stupid jokes or useless photoshopped pictures. Except you’ll be sending out something that’s really useful. You’ll have all the babes flocking around you at parties!

If the MCU proves bad using the test that the Samurai has so graciously and benevolently revealed unto you, then you can return the favor by purchasing the replacement MCU here. If not, then you can buy me a brewski. Domo!
(click it to git it)
This pagelet will help you replace the MCU:
http://fixitnow.com/wp-content/uploads/2012/06/Whirlpool-Duet-Sport-Washer-MCU-Removal.pdf
Lee posted this in the Samurai Appliance Repair Forums:
Good day!
Periodically, I lose control of the temperature in the fridge. The fridge is 9 years old, model number PLHS267ZA. We purchased a home 3 years ago that included this fridge.
Several months after purchasing the home, the entire fridge side froze overnight, along with its contents (the worst freezing was on the top shelf). This occurred despite the fact that temperate settings hadn’t been changed at all. Upon adjusting both the freezer and temperate dials down a bit, things got back to normal for a while.
Since then, it has frozen over every couple of months without warning. Other times, the temperature hovers over 40 degrees and we have difficulty getting the temperate below that level without things freezing on the overnight.
The settings on both the freezer and fridge thermostat range from 1 – 6 with 3.5 being marked as the factory setting. Our dials have to be set between 5 and 6 to get the temperature down to the high 30’s (barely cold enough)…in doing so, we periodically experience an entire freezing of the fridge side and the cycle repeats itself.
I checked under the fridge (where the fans and coils are) and it was extremely dusty. I did vacuum things out, but no change in temperature. I’m certainly not a handyman, but in reading other posts in this extremely valuable forum, perhaps my problem is the “Control housing & air damper control kit”? Or, maybe the thermostat? Something else?
Any expert opinions out there? Thanks a bunch in advance.
Lee
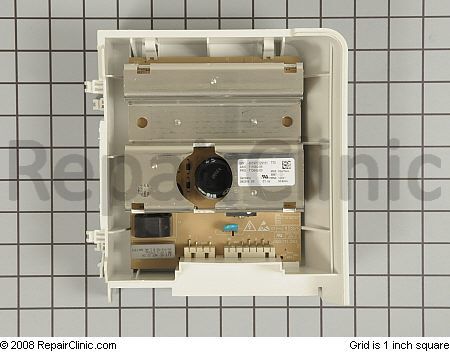
You’ve done your homework well: these units do indeed have issues with the control housing & air damper control kit, as you were suspecting from your research. Here’s the replacement assembly:
(click it to git it)
And here’s an illuminating and illustrated Scroll of Appliantology™ for this repair kata to make straight your path:
Frigidaire Refrigerator Next Generation Controls – Replacing the Control and Damper Assembly