Monthly Archives: September 2004

Appliance Repair Revelation: Installing an Icemaker Water Supply Line

There are as many different ways of installing an icemaker water supply line as there are people doing it. Some are good, most are marginal or just plain wrong. Here’s a handy list of reminders on the correct way to install a water supply line from the source to the water inlet valve on the refrigerator:

  1. ice maker water line installation kit--come git you oneYou’ll find all kinds of el cheapo plastic tubing kits out there in the hardware sections of Wal-Mart or wherever but 1/4″ copper tubing is the gold standard.
  2. Connect the water line to a frequently used cold water line so you’re sure to use only fresh water to make your ice cubes.
  3. If you have a choice between a vertical or a horizontal water line to tie into, always pick the vertical line.
  4. Use a horizontal line if and only if a vertical line is not accessible.
  5. On horizontal water lines make your connection on the top or sides of the pipe, never on the bottom. If you install the saddle tee valve on the bottom of the pipe, you’re pretty much guaranteeing a future plumbing job because that valve will get crudded up with scale, rust, whatever. Additionally, the accumulated crud in the saddle tee valve will restrict water flow and pressure causing other problems like frozen fill tubes. This picture shows you how to properly install the valve:
    a properly installed, drill-type saddle tee valve for an icemaker water supply line
  6. The self-piercing valves included in many kits are trouble waiting to happen. Always use a drill-type saddle-tee valve when connecting to the water supply line–avoid the self-piercing saddle valves.
  7. Be sure to leave enough coils of copper tubing behind the refrigerator so that you can roll the refrigerator out from the wall when you you need to work back there.
  8. If you’re installing a new icemaker in your fridge, these how-to pages will help: Page 1 and Page 2.

You can learn more about your icemaker and order parts here.

Mailbag: GE Profile Oven with Error Codes

Kazantzakis wrote:

Read the mailbag about error code F7 on GE profile oven. My board on JTP56COD1CC has gone crazy with spurious messages and numbers. Replaced the board.(rip off cost) Worked fine for a couple of weeks and now the same problem. GE has a problem which is now my problem. From Kyoto Meditation Center of Texas.

_______________________________
The above message was sent when you were offline, via your LivePerson site.

Message sent from IP: 69.30.135.196

Not sure which mailbag post you read, but if you had read this one, you must have glossed over my admonition in the last paragraph:

It’s important that you don’t skimp the disconnect test because there’s a big difference in price between the ERC and touch pad. So, you want to be right on this one…

I can tell you that in my vast and awesome experience, the problem almost always turns out to be the keypad, not the electronic control board. However, I never, EVER skimp on doing the 24-hour disconnect test that I so eloquently explain in my illuminating post. To do so would be in violation of the Samurai’s Cardinal Law of Appliance Repair: Thou shalt not replace a part unless you have proof that the part is bad.

Many times, while on a service call, I’ll quote the repair price to the customer after I’ve diagnosed the problem and the customer will ask, “How much is the part?” Yanno, any imbecile with a credit card can buy a part, but it takes a highly-trained imbecile to know which part to change and how to install it correctly. How much is that worth? Meditate on that.

To learn more about your range/stove/oven, or to order parts, click here.

The Last Kosher Samurai

Once upon a time a powerful Emperor of the Rising Sun
advertised for a new Chief Samurai. After a year, only three
applied for the job: a Japanese, a Chinese, and a Jewish Samurai.

“Demonstrate your skills!” commanded the Emperor.

The Japanese samurai stepped forward, opened a tiny box
and released a fly. He drew his samurai sword and

*Swish!*

the fly fell to the floor, neatly divided in two!

“What a feat!” said the Emperor. “Number Two Samurai,
show me what you do.”

The Chinese samurai smiled confidently, stepped forward
and opened a tiny box, releasing a fly. He drew his samurai
sword and
* Swish! *
* Swish! *
The fly fell to the floor neatly quartered.

“Excellent!” nodded the Emperor. “How are you going to top
that, Number Three Samurai?”

Number Three Samurai, Obi-wan Cohen, stepped forward,
opened a tiny box releasing one fly, drew his samurai sword
and
*Swoooooosh!*
flourished his sword so mightily that a gust of wind blew
through the room.

But the fly was still buzzing around!

In disappointment, the Emperor said, “What kind of skill is
that? The fly isn’t even dead.”

“Dead, schmed,” replied the Jewish Samurai. “Dead is easy. Circumcision: now THAT takes skill!”

Stress Management Technique

Just in case you’ve had a rough day, here is a step-by-step stress
management technique recommended in the latest psychological texts. After a rough day of appliance service calls, this is one of the Samurai’s favorite stress-management exercises.

1] Picture yourself near a stream.

2] Birds are chirping softly in the cool mountain air.

3] No one but you knows your secret place. No one.

4] You are in total seclusion from that hectic place called “the
world”.

5] The water in the stream is crystal clear.

6] You can easily make out the face of the person you’re holding
underwater.

7] See! You’re smiling already!

What a relief, huh?

Appliance Repair Revelation: Troubleshooting a Gas Oven That Won’t Fire Up

If you have a gas oven that’s not firing, don’t be bonehead and automatically assume the valve is bad (hint: it’s usually not). What else could it be? Ah, Grasshoppah, read and learn.

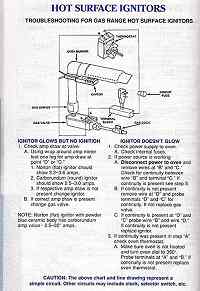
Gas Oven Service Sheet--click for larger viewYou may even see the orange “glow plug” (called a hot surface ignitor) glowing orange and so assume that it’s OK. But you would probably be wrong. Many $$ wrong. You gotsta measure the current drawn by the ignitor before you can say it’s OK or not. The gas valve has a bi-metal that snaps open when a certain amount of current flows through it to heat it up. The ignitor is wired in series with the gas valve. As the ignitor ages, its resistance increases to the point where not enough current is flowing to the gas valve bimetal to open it up. Consequently, the gas valve never opens up. BTW, a common symptom of the early stages of this problem is erratic temperature control in the oven due to delayed firing of the bake burner while cooking. This service sheet illustrates the main players in the ignition system and how to test them.

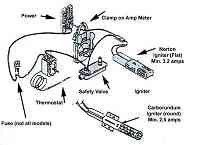
Gas Range Components--click for larger viewHere’s another picture that shows the main components in a gas oven. The big thing to notice is the difference in current draw between the round and flat ignitors. Look, there’s just no substitute for measuring the current draw–this is the gold standard for diagnosing gas oven ignition problems. I’ll let you in a little secret, though: if the ignitor glows but the oven takes longer than three minutes to fire up then, 97.98745987% of the time, the problem is a bad ignitor. Here’s another tip: if you buy the ignitor through this parts link and that doesn’t fix it, you can return the ignitor for a refund. Who else but the Samurai will make you a deal like that?

I’ve talked to lots of shotgun parts-changers about this problem. These are guys who can’t be bothered with the theory of operation. Besides, they already know everything anyway, so they just shoot from the hip and end up replacing a bunch of parts that were still good. They blew beaucoup bucks on a new valve and just can’t understand why the oven still won’t fire up. But now, you know why.

To learn more about your range/stove/oven, or to order parts, click here.