Monthly Archives: May 2009

LG WM2688HNM Washer with the Dreaded LE Error Code

Oooo, you done stepped in it now, Hoss. You messed it up real good. Momma’s gonna whup you good when she gets home… unless you read this topic at the repair forum raht naya and fix that bad boy.

And now, for your further meditation, the haiku version of this post:

LG washer with
dreaded LE error code.
Replace Hall Sensor.

the bamboo knows all, grasshoppah

To learn more about your washing machine, or to order parts, click here.

How to Manually Initiate the Defrost Cycle in a GE Arctica Side-by-Side Refrigerator

Lots of times, when you’re troubleshooting a defrost failure problem in a refrigerator, you want to fire up the defrost circuit and see what it’s doing (or not doing) and catch it in the act. This is easy to do on the older refrigerators with the good ol’ mechanical defrost timers but less than obvious on these newer boxes where the defrosting is controlled by an electronic control board. The new GE refrigerators use a muthahboard to control defrost. It’s essentially a highly failure-prone single-board computer designed to crap out at the first whiff of trouble. More on that here and here.

The procedure in this scroll of Appliantology will let you fire up the defrost circuit from the control panel for most models; may vary slightly for other models due to differences in the touchpanel layout. You can also do it the hardcore way– right at the muthaboard.

To learn more about your refrigerator, or to order parts, click here.

Basic Troubleshooting Kata for Electric Ovens

Here’s the patented Samurai kata for troubleshooting heating element problems in electric ranges:

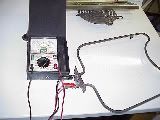
checking the resistance of an electric oven element.Unplug the range, remove the element and detach one of the power wires from the element (doesn’t matter which one). Secure that wire so that it doesn’t touch anything– alligator clips can be helpful here. Next, measure the resistance of the element. Should be something around 30 ohms. If you read something in the K-ohms or mega-ohms range, you be needin’ a new element– come git you one!

Re-apply power and set the oven to bake (if I’m troubleshooting the bake element; broil if I’m troubleshooting the broil element). Using my multimeter, I measure the voltage at each of the power wires with respect to ground. In a normally functioning range, I’d expect to read 120vac at each wire. The wire that’s missing the voltage represents the circuit I need to troubleshoot.

A variation on this procedure for cases where the element heats up with the range turned off is to do the same voltage measurement but with the controls set to off. In this case, the wire that’s still supplying voltage to the element represents the leg of the circuit that I need to troubleshoot.

Recommended Reading: Making Basic Electrical Measurements

To learn more about your range/stove/oven, or to order parts, click here.

Crappy Idler Slider Pulley on Whirlpool-built Dryers Causing Noise and Broken Belts

(Click the pictures for the larger versions with enlightening annotations.)

New-Style (crappy) Idler Slider Pulley that came with the DryerNew-Style (crappy) Idler Slider Pulley that came with the Dryer

Some genius at Whirlpool figured out how to save $0.12/dryer by using the infamous half-moon slider idler. The belt slides across the teflon strip causing accelerated belt wear and much more frequent belt replacements. The extra strain on the motor has caused premature motor failures, too. Good for me because I fix ’em for a living; bad for you because you’re paying for it! Note the black fuzz below and beside the motor. That’s from the belt.


Close up of the Crappy Idler PulleyClose up of the Crappy Idler Pulley

Yep, that’s all there is to it. No roller, just a teflon strip. The belt rubbing across this teflon strip can make weird noises, too. That’s what prompted the customer to call me in the first place.


Old-Style Roller Idler Pulley InstalledOld-Style Roller Idler Pulley Installed

Here, I replaced the slider with the old-style roller idler pulley. Whirlpool has since discontinued the slider style because of all the premature belt failures out in the field. Experience is the price of wisdom. Can I hear an "Amen?"

If your Whirlpool-built dryer (which includes many Kenmore dryers) has the troublesome slider pulley, replace it today with the good ol’ roller style and save yourself some big $$ down the road. You can replace just the idler pulley alone or, for a just few more shekels, you can get the complete repair kit which includes the roller-style idler, belt, and both drum rollers. Parts links below:

Idler Pulley Only

Complete Repair Kit


Related Helps:

Dryer Disassembly

How Does that Dryer Belt Go On?

To learn more about your dryer, or to order parts, click here.

Venting a Dryer into a Garage

Mike wrote:

Hi –
Is it okay to vent my electric dryer into my unheated/uninsulated garage? Right now it vents into the crawl space, and that is not “up to code”.
Thank you!

Venting into a garage is fine as long you’re willing to put with lint coating your vehicles– they’re gonna get messy. But it’s far preferable to venting into a crawl space. Dryer exhaust is dirty and contains lots of ickiness: mites, molds, human skin, dander, pulverized synthetic fibers and their off-gases… not the kind of stuff you want in your nose, lungs or house.

Twitter comment from @TroyColby:

I have seen it cause mold on an entire wall in a garage.

This is a great point! Up here in Yankeeland, it’s not unusual to see dryers vented into garages. I’ve not seen the mold problem up here but houses in warmer climates would be very susceptible to mold infestation. Regardless of where you live, it’s probably a good idea to make sure your garage is well vented if you’re going to run that dirty, humid dryer exhaust into a closed space like a garage.

Recommended Reading:

Where to Run the Dryer Vent

The Ultimate Dryer Venting Guide

Dryer Venting Diseases: Venterialsclorosis

Slow Drying Dryer and Frankenkitty

To learn more about your dryer, or to order parts, click here.

Contaminated Drywall Driving People Outta Their Houses

Seems a bunch of houses were built using contaminated drywall during the 2004-2005 housing boom. Confucius say, “I’ll give you one guess where this drywall was made.” Yes, my fellow Ameedicans, China has sent us yet another poison product. This time, it’s drywall, sheetrock, gypsum board, whatever you want to call that wall material behind the paint or wallpaper in your house. I never woulda guessed that you could contaminate drywall but those clever ChiComs figgered out a way to do it.

This drywall was made with coal ash and other waste products as filler. After a while, the dry wall started emitting poisonous, sulfur-smelling gases causing respiratory infections, nose bleeds, and other serious health problems, driving many people from their homes. More discussion and links to news articles here.