Monthly Archives: February 2011

Convenient maintenance kit for Whirlpool and Kenmore dryers with the lint filter in the top panel

So you have one of those Whirlpool or Kenmore dryers with the lint filter in the top panel? First of all, congratulations! These dryers are tanks and, IMHO, the best dryer design ever put out there. Whatever you do, don’t get rid of this one. The dryers made today don’t even come close to the durability and repairability of this one.

We have one of these dryers ourselves. It’s over 30 years old and still running strong. Only problem we’ve ever had with it was that it started making an intermittent high-pitched squealing sound, which would start after the dryer had been going a while. When I opened it up, I could see the drum rollers were sloppy and would chatter when I spun ’em by hand. The belt was in pretty bad shape, too, and it would just be a matter of time before it broke. And I figured I might as well replace the idler pulley while I was in there.

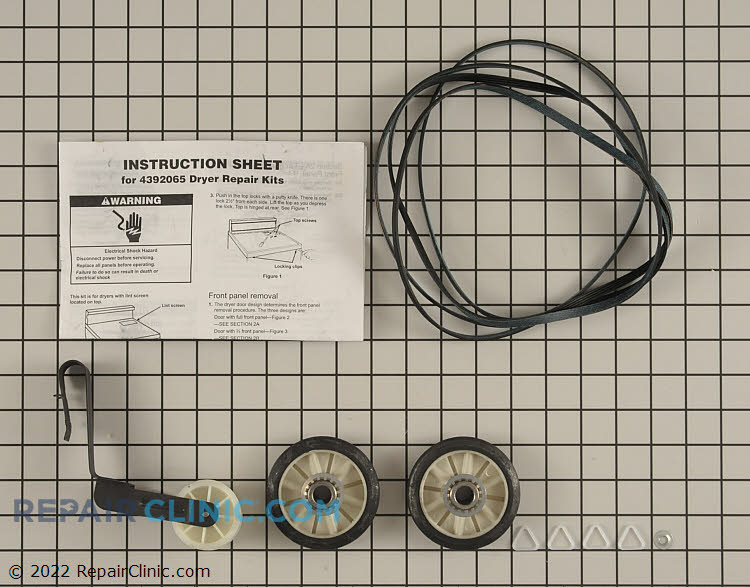
When I started looking up parts, it turns out Whirlpool puts out a handy maintenance kit for this very reason. Contains the belt, two drum rollers, new idler pulley and complete destructions. My, my, how conveeeeenient.

Whirlpool dryer maintenance kit
(click it to git it, Hoss)

And here’s a cool video that shows you how to do it, step-by-step:

To learn more about your dryer, or to order parts, click here.

GE Profile refrigerator beer compartment lights flicker or are dim

Affected models: PFSS6, PFSF6 (Samsung-built units)

So, you’re playing canasta with Frankie and da boyz and, being the good host, you notice it’s about time for another round of brewskis. You leave the canasta table and shuffle over to your spiffy GE fridge. When you open the beer compartment door (women usually call it the “fresh food” door; yeah, as if!) the flashing lights inside give you a flashback to your magic mushrooms days in college when you would stand in front of the fridge for hours with the door open, contemplating the meaning of life as revealed in that mayonnaise jar with green fuzz growing in it. No wonder you flunked out of college, you realize in an epiphany moment.

But this time, you’re wondering what’s wrong with your refrigerator lights. So you surf over to Fixitnow.com Samurai Appliance Repair Man and find out that you need to replace the LED board located in the muthaboard compartment in the back of your refrigerator.

GE Profile refrigerator fresh food lights flicker or are dim

In addition to finding out what the problem is and where the LED board is located, you squeal with delight when you learn that you can buy the part right here with a 365-day, no-hassle return policy!

Still confoosed, Grasshoppah? Come see us in the Samurai School of Appliantology and we’ll confoose you some mo’!

To learn more about your refrigerator, or to order parts, click here.

GE Profile dishwasher making a high pitched squealing noise from control board

This little repair tip is for the GE Profile line of dishwashers with model numbers that begin with PDW, such as PDW9280J00SS.

You load your GE Profile dishwasher and go to start it and… it won’t start. Even more confounding, you hear a high-pitched squeal coming from the control panel area. You cut power to the dishwasher (and the squealing stops) so you can disassemble the panel to get some earballs in there. With the panel open, you reapply power and can absotively, posilootely tell that the noise is coming from the control board. To make sure it’s the circuit board and not the touchpanel, you even disconnect the touchpanel from the circuit board so the touchpad doesn’t have any power and couldn’t make a squealing noise even if it wanted to.

So you order up a new control board from RepairClinic because they have great prices, super-fast shipping, and a 365-day no-hassle return policy on all parts, even electronic parts that have already been installed.

The new control board arrives at your door immediately after you click the Send button on the part order at the RepairClinic site. You slap that board in and… it still makes a high pitched squeal!

“Must be a bad board,” you mutter to yourself, while packing up the board to send back to RepairClinic for a replacement. The new board is on your doorstep waiting for you when you return from the Post Office. You slap it in and… it still squeals!

Finally, you go online to the mostest awesomest DIY appliance repair website on the whole Innernet *and* the Outternet– Fixitnow.com Samurai Appliance Repair Man– and you find this very post that you’re reading now. “Dayyam,” you wonder to yourself,”how’d that Samurai know what I was doing with my dishwasher? He must be one o’ them psychotics who can tell the future, an’ all.”

Well, you could say that. Or you could say, “Samurai, what in tarnation is goin’ on wif my dishwasher?”

What’s going is that the circuit board will make a squealing noise when one of the keypads on the touchpanel has an open or shorted keypad. So, when the touchpanel is disconnected, the control still senses an “open” and will squeal– same effect when a keypad on the touchpanel is shorted or stuck.

To fix your dishwasher, replace the touchpanel.

To learn more about your dishwasher, or to order parts, click here.

Weird plastic insert thingies found in the water inlet valves of an LG washer

Water inlet valve filter inserts in an LG washing machine

Those are sediment filters. It’s normal– LG washers come that way.

Samurai Appliance Repair Man
http://fixitnow.com

Parts==> http://parts.fixitnow.com
Forums==> http://appliantology.org
Twitter==> http://twitter.com/fixitnowsamurai
Facebook==> http://facebook.com/fixitnowsamurai
Newsletter==> http://newsletter.fixitnow.com

– Posted using BlogPress from my iPad

Things to check when troubleshooting the “tE” thermistor error code in LG washers

Example LG model number: WM2277HW but applies to many others.

Sublime Master of Appliantology john63 enumerates the dance steps in this repair for us in the Samurai School of Appliantology:

Possible causes:

1) Damaged/broken wiring at the THERMISTOR PLUG (very common)

2) Weak/Intermittent connection at the THERMISTOR PLUG (add small amount of dielectric grease to plug)

3) Weak/Intermittent connection at PLUG behind CONTROL PANEL (disconnect all plugs behind the “jog dial” add dielectric grease)

4) Failed THERMISTOR (rare)—Should be 2.5 ohms to 180 ohms (changes ohms at differing temperatures)

5) Failed HEATING ELEMENT (rare-but does occur): 10 ohms to 30 ohms

6) Failed MAIN BOARD (rare): 120 volts at HEATER connections during TEST MODE. This test can be performed at the MAIN BOARD connector for the HEATING ELEMENT

The correct MAIN BOARD should be ordered using both the MODEL *and* SERIAL NUMBERS. Several changes occurred on this model during it’s production-run.

Order the board here==> http://repairclinic.com

Samurai Appliance Repair Man
http://fixitnow.com

Parts==> http://parts.fixitnow.com
Forums==> http://appliantology.org
Twitter==> http://twitter.com/fixitnowsamurai
Facebook==> http://facebook.com/fixitnowsamurai
Newsletter==> http://newsletter.fixitnow.com

– Posted using BlogPress from my iPad

Accessing and removing the drain pump in an LG front load washer

Example LG model number: WM2487HWMA but applies to many others.

If you’re having intermittent drain problems or seeing the “OE” error code, you need to get some fingers and eyeballs inside the pump volute and impeller area to see if there’s some gookus in there jamming the pump impeller.

Y’all go grab you a cold one and gather round the campfire to hear Sublime Master john63 from the Samurai School of Appliantology explain how it’s done:

Most likely there’s a small obstruction in the DRAIN MOTOR housing (dime/button etc).

The DRAIN MOTOR is on the *left* side of the washer (if facing the front of the washer)and the RECIRCULATION MOTOR is on the *right* side.

Gaining access to the pump assy can be attempted from the bottom of the washer—but is more difficult due to limited space.

The correct way to do it:

1) Unplug washer

2) Remove 2 lower “phillips” screws from the rear of the *top cover*. The top 2 screws at the rear/top cover secure the plastic brackets to the top cover & need not be removed.

3) Slide the TOP COVER rearward about 2 inches & lift off.

4) Standing in front of the washer—-look behind the CONTROL PANEL. At each corner there’s a “phillips” screw–remove them (some LG washers only use 1 screw at the right-side corner).

5) Slide out & remove the DETERGENT DISPENSER TRAY (press a release tab to allow the drawer to slide out).

6) Remove 2 “phillips” screws from each side of the DISPENSER HOUSING opening/hole (on the control panel)

7) Disconnect the PLUGS to the CONTROL PANEL (behind the large knob/dial).

8 ) Grasp the top edge of the CONTROL PANEL & *snap it* off from the washer & put aside (May require some effort but the plastic is quite strong).

9) Open the door of the washer & remove two “phillips” screws to the DOOR LOCK/LATCH ASSY.

10) Using a *flat screwdriver* pry the DOOR GASKET SPRING from the 6 o’clock position of the gasket. Remove the entire wire/spring type “clamp”.

11) Pull the GASKET from it edges until completely off the FRONT PANEL & fold-over the rubber gasket into the washer tub—out of the way.

12) Remove the ACCESS PANEL on the lower front corner of the washer.

13) Pull the black rubber (small diameter) drain hose form the plastic retainer clip & leave the hose loose.

14) Remove 1 “phillips” screw from the bottom of the *screw-on” strainer cap. Pry out the *plastic housing* completely using a flat screwdriver of puttyknife. Use care not to damage the painted finish around the opening.

15) Remove 2 “phillips” screws below the *screw-on drain strainer cap* & 1 more screw below those.

16) At the top of the FRONT PANEL—there are at least 4 (some have 5) “phillips” screws that secure the FRONT PANEL. Remove all & lift away the entire FRONT PANEL ASSY.

17) Pull the plastic cap off of the *small* drain hose—and using a pan or small cup—remove all remaining water from the tub. Several cupfuls may be needed before fully emptied. Use a large rag/towel to “capture” any remaining water when the *large* STRAINER CAP* is unscrewed & pulled out.

18) Looking at the PUMP ASSY—which has *two* motors on it—-reach behind the center of the PUMP HOUSING & locate / depress a plastic *locking tab*. When this *tab* is pressed downward—the entire PUMP ASSY can be slid rearward about 2 inches & lifted up somewhat.

19) Remove the WIRES to the DRAIN MOTOR & RECIRCULATION MOTORS.

20) Remove the HOSES from the PUMP ASSY & pull out the entire unit.

21) Remove 3 “phillips” screws that secure the PUMP MOTOR to the PUMP BODY.

22) Pull off the motor & inspect for debris.

23) Re-assemble in reverse order.

Samurai Appliance Repair Man
http://fixitnow.com

Parts==> http://parts.fixitnow.com
Forums==> http://appliantology.org
Twitter==> http://twitter.com/fixitnowsamurai
Facebook==> http://facebook.com/fixitnowsamurai
Newsletter==> http://newsletter.fixitnow.com

– Posted using BlogPress from my iPad

Accessing and removing the drain pump in a Frigidaire Affinity front load washer

Example model number: ATF7000

In most front load washers, including the older Friggidaires, you can get to the drain pump by simply removing a front panel at the bottom. But that was too easy, so in Friggidaire’s latest offering, curiously named the “Affinity,” it’s a go-around-your-elbow-to-get-to-your, uh, kneecap kind of a deal.

The most direct way to get to the drain pump in the Affinity washer is to simply tilt it back and get at it from underneath thru the access port. But if the washer is on a pedestal– increasingly popular these days– you’ll have to get to the pump from the back of the machine.

Either way, a common cause of drain problems in these washers is that the filter in the drain boot gets clogged. Clean it and you should be good to go. Sometimes, a piece of plastic or a nail or something can get lodged in the pump impeller– that’ll cause the pump to not run.

In case your pump turns out to be FUBAR, here’s the part link to come git you a new one==> http://www.repairclinic.com/PartDetail/Drain-Pump-and-Motor/1467779

Samurai Appliance Repair Man
http://fixitnow.com

Parts==> http://parts.fixitnow.com
Forums==> http://appliantology.org
Twitter==> http://twitter.com/fixitnowsamurai
Facebook==> http://facebook.com/fixitnowsamurai
Newsletter==> http://newsletter.fixitnow.com

– Posted using BlogPress from my iPad

The Sound of Shopping for a New Refrigerator

If the compressor in your refrigerator sounds like this, then you just won a no-expenses paid trip to your appliance dealer to shop for a brand new refrigerator!

The cause of the noise is probably one of the mounting springs inside the hermetic compressor. But, as the name implies, these compressors are hermetically sealed at the factory and are non-serviceable.

Oh, sure, you could pay to have the compressor replaced by a Master Appliantologist who specializes in this repair but that’ll run you $300 minimum. That’s why for most home refrigerators, a bad compressor or a leaking sealed system is a terminal event unless you have one o’ them high-dollah refrigerators, like a Sub-Zero, where you paid so much for it that you’re married to it.

“Hey, what about the warranty?”

Yeah, what warranty? A long, long time ago, in a land far, far away, home refrigerators came with a five-year sealed system and compressor warranty. But that’s back when the present day country of Ameedeeka was known as “America,” a nation that had a sense of purpose, identity, pride in workmanship, and actually made stuff– you know, “land of the free and home of the brave” kind of a deal. Nowadays, Ameedeeka is a burnt out, decadent nation that bullies and threatens other nations around the globe, including its own citizens, it gropes its citizens’ genitals at airports, murders 51 million unborn babies and calls it a “right” and it doesn’t make anything that anyone wants to buy; it’s become the “land of the freeloaders and home of the depraved.”

It used to be that you could expect to have at least a five-year parts only extended warranty on sealed system repairs. In today’s refrigerators, most often made in Mexico or China, very seldom if ever do you get any more than the standard full one-year parts and labor warranty.

A few of the high end brands such as Sub-Zero still have the extended 10-12 year warranty on the sealed system. But the prices for these units are out of reach for most people.