Author Archives: Samurai Appliance Repair Man

Protect your Electronified Appliances with Surge Suppressors

Most smart compooter owners use a surge suppressor to protect their precious silicon from surges, spikes, and other nasties that frequently haunt home power. This is good. But did you know that almost all home appliances made today also have a compooter inside of them? Yes, my leetle grasshoppers, I shi’ite you not.

Even wet appliances, like washers, dryers, and dishwashers, use a cheesy compooter board to make decisions about what to do when (in violation of the 5th Law of the Prophecy, I might point out). Ovens, dehumidifiers, and refrigerators made these days all use electronic control boards, too. These control boards are nothing more than really dumb, special purpose compooters and are just as vulnerable to voltage surges at your electrical outlet as is the compooter that you’re using to read this post right now.

As a bonus editorial comment, it’s worth noting that these boards have replaced the simple but rugged and ultra-reliable mechanical switches used on older models. Why? Well, after-market parts sales comprise almost a third of the total corporate profits for appliance manufacturers, so…

To protect your appliances and avoid having to shell out big $$ for an overpriced, cheesy electronic board that got fried by garbage on your power lines, you need to use a surge suppressor on all your appliances. They don’t cost much and will pay for themselves many times over in avoided repair costs. Here are three good ones to choose from. These are all for 120vac outlets. If you want protection for your 240vac appliances (for example, your electric oven, electric dryer, or air conditioner) you’ll need a whole-house surge suppressor.

Wolf Appliance Recalls Gas Ranges Due to Burn Hazard

This is old news, but in case you haven’t heard…

Wolf Appliance Recalls Gas Ranges Due to Burn Hazard WASHINGTON, D.C.

The U.S. Consumer Product Safety Commission, in cooperation with the firm named below, today announced a voluntary recall of the following consumer product. Consumers should stop using recalled products immediately unless otherwise instructed. Name of Product: Wolf Appliance Gas Ranges Units: About 24,000 Manufacturer: Wolf Appliance Inc., of Madison, Wis. Hazard: Delayed ignition of gas in the 18-inch oven can cause a flash of flames to be projected at a consumer when the range door is opened, posing a burn hazard to consumers. Incidents/Injuries: Wolf has received 97 reports of units experiencing delayed ignition, including 15 minor burns. There have been no reports of fires or property damage.

Description: This recall involves the following Wolf Appliance 48-Inch gas ranges with model numbers: P48, PS48 and R48. The gas ranges are stainless steel with a double oven. A “Wolf” appliance logo is on the front of the larger oven door. Sold at: Home builders and appliance stores nationwide from January 1998 through June 2008 for between $5,000 and $9,000. Manufactured in: United States Remedy: Consumers should immediately stop using the recalled gas range 18-inch oven and contact the manufacturer to schedule a free, in-home repair. The large oven and all cooktop burners are not affected and may be used. Consumer Contact: For more information, consumers can contact Wolf Appliance toll-free at (866) 643-6408 between 8:30 a.m. and 5 p.m. CT Monday through Friday or visit the firm’s Web site at http://www.wolfappliance.com/recall.aspx

GE Profile Arctica: No Water from the Door Water Dispenser

Start with the simple stuff first (and, in this case, the easiest): the water supply tube that runs inside the door. This has been a common problem with these units. So, how do you check a water tube that’s inside the door? Well, you don’t. Just follow this sage advice from the talented and lovely Sublime Master of Appliantology Pegi:

Most likely the water line is frozen inside of the door…can turn up the temp in the freezer to see if it thaws in a couple of days, turn on the disp light and leave it on, will thaw the line and keep it thawed, can order and install a heater kit to thaw the line and keep it thawed, or you can replace the whole door if this line is in fact frozen….or the water tank is frozen in the food side, or the fill valve went bad on the water thru the door side…switch went bad in the dispensor for the water side,…..lots of reasons….my bet is on a frozen water line…

There’s more ‘pacific help fer ya in this topic at the Samurai Appliance Repair Forums.

If’n that don’t git it fer ya, start a new topic in the Kitchen Forum and we’ll dazzle you with some other tricks.

To learn more about your refrigerator, or to order parts, click here.

How to Remove the Lower Spray Arm in a Maytag MDB Dishwasher

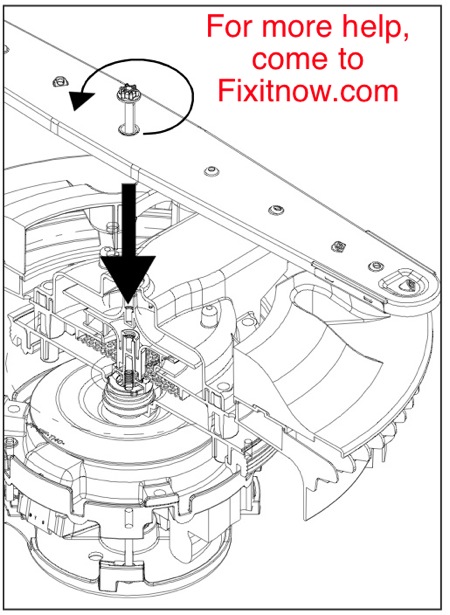
The lower arm is held in place by a large diameter plastic furled nut right in the middle of the lower arm, as shown below. (There’s a large hole in the middle of this nut.) Undo that and the whole lower arm assembly will come out. This exposes the torx bolts that you need to undo to get to the mesh filter. There may be some minor variations among model numbers on this procedure which are explained in this repair forum topic. Piece of pie, tovarish!

maytag-mdb-lower-spray-arm.jpg

To learn more about your dishwasher, or to order parts, click here.

Whirlpool Duet Washer with F-21 Fault Code

This problem is a good illustration of how there’s just no substitute for actual hand-to-hand combat with broken appliances. Here’s an excerpt from the service manual on this fault code:

EXPLANATION AND RECOMMENDED PROCEDURE
F21 LONG DRAIN

If the drain time exceeds 8 minutes the water valves turn off.
NOTES:After 4 minutes the “Sd” error will be displayed, then
4 minutes later the “F/21” error code will be displayed. Press
PAUSE/CANCEL two times to clear the display.

Possible Causes/Procedure
1. Check the drain hose and make sure it is not plugged or
kinked.
2. Unplug washer or disconnect power.
3. Check the electrical connections at the pump and make sure
the pump is running.
4. Check the drain pump filter for foreign objects.
5. Plug in washer or reconnect power.
6. If the above does not correct the problem, go to step 7.
7. Unplug washer or disconnect power.
8. Replace the pump.

I’ve worked on dozens of these washers and have only found the above service manual solution to apply once or twice. The vast majority of the time, I’d arrive and all the washer would do is drain and flash F-21 in the display. I couldn’t even get the control board to go into diagnostic mode.

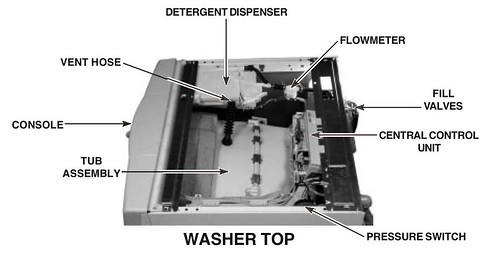
Using my keen Samurai Insight®, I unplugged the washer and removed the molex connector from the water level switch (also called a pressure switch). To get to it, remove the top panel by taking out the three screws in the back of the washer. The pressure switch is right there on top, as seen in the picture below:

Under the Top Panel of a Whirlpool Duet / Kenmore HE3/4 Front Load Washer

Anyway, I plugged the washer back in and, lo!, the washer did enter diagnostic mode and the people did sing and the Lord did grin. And there was much rejoicing. Especially after I replaced the water level switch whereupon appliantological harmony was restored.

pressure switch or water level control switch - click it to git it

To learn more about your washing machine, or to order parts, click here.

Weird Timer Problems in a Whirlpool / Kenmore Dryer with Electronic Control

This nugget of Appliantological wisdom applies to the Whirlpool-built dryers with the “Even Heat” control board, also sold under the Kenwhore label. The typical problem description runs thusly:

My dryer runs for about two minutes and then shuts down. The timer continues to run down to the end but but it does it really fast. For example, 70 minutes will run down to the OFF position in five minutes. I checked the vent and its clear. I replaced the timer and I still have the same problem. Help!

Ahh, grasshoppah, this ain’t yo pappy’s timer. In yo pappy’s dryer timer, there was a little motor that got 120vac and advanced the timer cycles in a steady, uniform manner. But that ain’t the case with this bad boy, nawsir.

Y’see, Hoss, in this dryer, with all its over-blown electronical garbage, we have what’s called a step timer.

“What’s a step timer, o mighty and omniscient Samurai?” Well, no one knows. But I can tell you a little about how it works.

Like I already said, conventional timers are controlled by the little motor built into the timer which acts just like a clock. Things just plod along, it runs the cycle for the time indicated on the dial and that’s pretty much it.

The step timer in this dryer is controlled by the electronic control board, not the timer motor. So the board makes decisions about when to send power to the timer and for how long. It does this in steps so as to advance the dial and switch contacts as needed. Once the board decides that the clothes are dry enough, it sends steady power to the timer to rapidly advance it to the OFF position. Now we come full circle to the original complaint: dryer shutting off prematurely and rapidly advancing the timer to OFF.

Let’s connect the dots: the rapid advance seen in the timer is a result of the control board thinking the cycle is done (when, in fact, it ain’t).

“Aha!” you exclaim triumphantly, “it’s a bad control board!” You then run out, skipping and frolicking, to buy a new control board, slap that sucker in the dryer, start a cycle and… same problem. And you’re out a Benjamin. Now, siddown and keep reading.

Maybe the board thinks the clothes are dry because one of the components it relies on for “feeling” the clothes is broken. Fer ezzample, the board thinks the clothes are dry when the sensor bars do not short to ground (as it would if the clothes were wet) or if the thermistor stays hot (since the thermistor is cooled down by wet clothes and heats up when the clothes are dry). Experience in the field is that the thermistor is the more common problem so try replacing it first. And the good news is that they cost waaay less than a control board. Ya hey, come git you one.

dyer thermistor - click it to git it

To learn more about your dryer, or to order parts, click here.

De-Stinkifying Your Front Loading Washing Machine

A common complaint about front loading washers is mildew odor, or Das Schmeel. We professional appliantolgists refer to this condition as Funk from Within Syndrome (FFWS). So, here are some causative factors and other Fun Facts to Know and Tell (FFTKAT) about FFWS:

1. Using conventional detergent instead High Efficiency (HE) detergent.

Why would someone spend the extra money to buy an expensive front loading washer and then try to pinch pennies using conventional detergent? Even though you and I immediately recognize this as the penny-wise, dollar-moron type thinking so in vogue among the Great Unwashed, this is exactly what many people do. I dunno, I reckon they think they’re being clever and wise by disregarding the manufacturer’s explicit instructions about this. Open your Appliantology Hymnal to the Book of Washers and sing along with me now:

But the truth is that the ichiban killer of drum bearings in any front-loading washer is non-HE detergent. HE: High Efficiency. And no, using a smaller quantity of conventional detergent is not the same as using HE detergent, as explained below.

Y’see, HE detergent is not simply a concentrated formulation of the regular stuff. Since front loaders use much less water than top loaders (about 12 gallons per wash load vs. about 56 gallons in a conventional top-loader), front-loaders require a detergent with a whole different chemistry. So let’s answer some common questions and dispel common myths about front-loaders and HE detergents. [read more]

Ahh, nothing like a good, rousing hymn to really get me going on my soapbox (I know, I know, but I just couldn’t resist).

So, using the wrong kind of detergent in your fancy front loader is a great way to funkify your washer and impart some o’ dat funk onto your clothes. And it accelerates the mechanical deterioration of your washer. Smooth move, Ex Lax!

2. Using too much fabric softener and/or detergent.

Liquid fabric softener does not break down very well in cold water and the residue collects on the outer tub and basket along with the lint left from the wash. We professional appliantologists refer to this accumulated grunge as Gookus (that’s a professional term, please don’t use it at home as I cannot be responsible for your safety). Once formed, this gookus collects ever more additional soap, dirt, grease, human waste, mites, flea doo-doo, parasites… and then some really bad stuff.

As it turns out, this gookus makes a perfect substrate for microbial life forms. Over some time– not very much time in warmer climates– those little bacterial colonies build up lots of microbial sewage, just like we do (bacteria are kinda like people that way) until one day you open the door to the washer and exclaim, “Lord, he stinketh!”

Bonus FFTKAT: Using too much fabric softener will waterproof your clothes. Pop Quiz: How clean do you think your clothes will get if they repel water inside the washing machine?

3. Doing all your wash loads in cold water only.

Detergents don’t dissolve as well in cold water. As a result, cold water washes leave behind more gookus. So… do an occasional wash in hot water. OK, maybe more than occasional. Like, I hope you at least wash your skivvies in hot water. Oy!

4. Leaving clothes in the washer at the end of the cycle.

Front loaders don’t have as much access to open air as top load machines. Consequently, leaving clothes in the washer for more than eight hours will increase mold and mildew build up. Think warm, dark, moist and you’ll get inside the brain of a mold spore. Visualize the spore; BE the spore!

:::

Now that we have a vast and awesome under-stinking-standing of FFWS, I’ll offer some of the preferred Samurai-Approved Maneuvers for Front-Loader Olfactory Bliss (SAMFOB). These sacred techniques are three ancient Hot Bath Washer Purification Rituals (HBWPR) referred to as Ichi, Ni, and San:

1. Ichi: Add one additional gallon of hot water to the unit before sending it into a hot wash. This will raise the water level high enough to remove the Gookus Hiding Behind the Basket (GHBB).

2. Ni: Same as Ichi, but with bleach added to all dispensers. Clean the fabric softener cup with a rag first (bleach will not break up fabric softener since it is introduced in the rinse cycle with the fabric softener).

3. San: Same as Ichi and Ni but with a cap full of pine cleaner added to the wash water (NOT the dispenser). Add some old rags (they don`t need to be dirty) and select the extra rinse cycle. The wash action will help remove the accumulated gookus from the components

Once again, make sure you’re only using high efficiency (HE) detergents in your front loader. See this page for the gory details on why dis be.

And here’s a bonus tip from a loyal reader of these hallowed pages:

Jo, moderate fix-it-myselfer, maximum beer drinker, wrote:

If it please the Samurai, a great way to keep front load washers smelling sweet and also clean is to add up to one cup of vineagar every couple of loads. Economical, and a nice mild disinfectant as well. Can be added during wash cycle, or rinse if you don’t mind a mild vineagar smell.

Awwite, go whup up on some stanky!

To learn more about your washing machine, or to order parts, click here.

How to Replace the Wash Motor Assembly in a Whirlpool-built Dishwasher

If you have one of the Whirlpool-built dishwashers (also applies to Kitchenaids and some Kenmores) with the dinky wash motors, then one day, maybe someday very soon, you’ll need to replace the wash motor assembly. Here’re some resources that’ll hepya:

To learn more about your dishwasher, or to order parts, click here.

KitchenAid Dishwasher Lock Light Flashing

This Tip ‘O Da Day applies to newer KitchenAid dishwashers with model numbers like KUDI02FR.

The flashing Lock light problem is caused by a stuck key on the touchpanel console.

If the control board detects that a key is stuck in the “mashed-in” position, then the dishwasher will suspend operation and maddeningly flash the light for that key until the condition is fixed. If a key without a light is stuck or multiple keys are stuck, the control will flash the Lock light.

The cure is to replace the touchpanel console. Easy job and, conveniently, here’re the part links. Click it to git it, Hoss:

Black Console

White Console

Stainless Console

To learn more about your dishwasher, or to order parts, click here.

How to Load a Dishwasher

dishwasherscrmar08-1.jpg

1. Keep your big stuff at the sides and back, so that they don’t hog all the water and detergent and keep it from reaching the other dishes. This will also keep them from blocking the detergent door.

2. Load the grungy side of the dishes toward the center so they get blasted more directly by the spray arms.

3. Use the top rack for plastic and delicate items, like beer steins and wine glasses.

4. Place glasses upside down on prongs to prevent breakage… and profuse adult language once discovered.

5. Silverware goes in handles down except for knives– load them handles up so you don’t slice your hand open when you pull ’em out. If your dishwasher has a big open basket, mix spoons, forks, and knives so they don’t stick together.

6. If some of your dishes have baked-on food, set ’em in the rack facedown and toward the sprayer in the bottom rack so they can get blasted clean.

For more details on how to load a dishwasher, including water hardness issues, download this file.

To learn more about your dishwasher, or to order parts, click here.

Getting Started in the Samurai Appliance Repair Forums: The Movie

The Samurai Appliance Repair Forums are where you can get interactive help with your appliance problem. I get lots of emails from folks who are new to compooters and/or new to online forums and can’t figger out how to get help in the repair forum. Since he is compassionate and of great gootness, the Samurai made a short video for his precious grasshoppers on how to get started using this forum. It includes how to register and how to post a question.

To watch the video, download it from the link below:

http://www.mediafire.com/?h3pn9eo1z3z

It’s less than 10 minutes long and it’s full screen so you can easily see what’s going on. You’ll need Quicktime to view it, which you can download for FREE ratcheer.