LG LRSC SxS Refrigerator Dispenser Disassembly
To learn more about your refrigerator, or to order parts, click here.

LG LRSC SxS Refrigerator Dispenser Disassembly
To learn more about your refrigerator, or to order parts, click here.
The Central Control Unit (CCU) is the electronic board that controls all the go-go on this Whirlpool-built machine. If you ever need to replace it, here’s where it lives:

And you can buy the replacement CCU ratcheer.
To learn more about your washing machine, or to order parts, click here.
If you’re trying to get repair help in the Samurai School of Appliantology or you need to find and order parts for your appliance, snow blower, or lawn mower, you gotsta have the full and correct model number. The photos and videos on this page will help you find it.
Frigidaire used to make dryers for GE (example model number: WSM2700HBWWW) back when GE was too busy building shoddy Mark 1 nuclear power plants to build their own shoddy dryers; those came later… and they’re pretty damn shoddy. The Frigidaire-built units were better, though not nearly as good as the Whirlpool units with the lint filter in the top panel.
Anyway, if your Frigidaire-built GE dryer– or if your Frigidaire-built Frigidaire dryer– is making a squealing noise in back, you probably need to replace the rear bearing kit.
Here’s the link to the bearing kit which includes a how-to video:

(click it to git it, Hoss)
To learn more about your dryer, or to order parts, click here.
Example model number: GEW9200
This problem is caused by a bad door switch. Here’s the link to the door switch, click the picture:
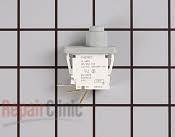
(click for larger view)
You can test using an ohmmeter. There are 3 prongs on switch, identified as C,NC, and NO.
C-NC should be closed circuit until you push switch and then it should be open.
C-NO should be open circuit until you push switch and then read closed.
Buying the switch through this site is a risk-free proposition because you can return the switch for a refund if that doesn’t fix it. 
The dispensers on some of these older Whirlpool-built refrigerators are famous for the annoying and potentially floor-damaging drip-drip-drip problem where water will continue to drip for some time after dispensing water. Changing the water inlet valve or checking house water pressure are probably wild goose chases on this one.
Turns out there’s a design flaw in these units that use a coil of tubing for the water “tank” inside the refrigerator. When water is dispensed, it’s immediately replaced by warmer water from outside the refrigerator. As the water cools, it expands. In the coiled-tube tank, there’s no place for it to expand except to force its way out the nozzle, much to the dismay of many owners of these refrigerators.
Fortunately, there is a fix and it’s not too bad of a spanking. You need to install this tubing kit, sometimes called “the slurp kit.”
The kit comes with instructions but they don’t apply to models made between 2000 and 2001. But not to worry, Grasshoppah, because the Samurai shall be your beacon of appliantological wisdom in this dark time of your appliance morass.
First, you’ll unsnap the dispenser frame off. Underneath the bottom edge of the frame, you will see two slots. Just take a flathead screwdriver and pop that plastic frame off, then you can get good access to it.

(click for larger view)
Depending your manual finesse level, you may need to remove the control bracket, called out in the diagram. The dispenser nozzle is also labelled in the diagram.
Next, drop down on your knees and pull the toe grill off. Undo the union connector behind the grill. Remove the nozzle retaining screw and pull the tubing up from the front dispenser.
When installing this new one, push the new tubing down through the channel hole that the old one was in all the way down. Then just get something small to fish up in the bottom of your door channel, like a stubby screwdriver or pocket screwdriver and pull the tubing down. Another pair of hands can save some adult language that might otherwise be forthcoming to push down on the tubing while you fish it through the bottom.
Don’t worry, I’ve changed lots of these and never even came close to breaking the line half way through the door when pull it out from the front dispenser.
To learn more about your refrigerator, or to order parts, click here.
No harm in buying and trying! Electrical parts? Out of stock parts? No problem! Get a free replacement or your money back if you return a part within one full year. This is the best return policy in the industry and applies to all parts purchased through any of the Repairclinic banners and links at all Samurai appliance repair websites: www.appliantology.org, www.fixitnow.com, www.applianceguru.com, and fixitnow.posterous.com.
Let’s listen with amazement as Sublime Master john63 from the Samurai School of Appliantology unveils the mysteries of disassembling an LG dryer. This particular procedure was for model number DLE7177WM but is largely applicable to all current LG models.
1) Unplug the dryer.
2) Remove 3 “phillips” screws from the TOP COVER of the dryer. These screws are at the rear of the top cover.
3) Slide the top cover rearward about an inch & lift-off.
4) Open the DOOR of the dryer & remove 2 screws under the *opening*. Roughly located at the 5 and 7 O’clock locations.
5) Standing in front of the dryer & looking behind the control panel—unplug all wire connections to the MAIN BOARD.
6) Now remove the screws from the *corners* of the CONTROL PANEL (Note: Some dryers only have one screw on the right side
7) Grasp the top of the CONTROL PANEL & forcefully “peel” the panel off (This plastic is tough).
8) With the CONTROL PANEL removed—you’ll notice 4 screws that secure the FRONT COVER. Remove those & slowly tilt the FRONT COVER towards you—disconnect the DOOR SWITCH PLUG. Set aside the front cover. Step back & look at the front of the dryer. On the lower right side is a *white* plug. Squeeze the tab on this plug & pull apart to disconnect. This is the plug for the MOISTURE SENSOR. (During re-assembly—don’t forget this little guy).
9) Grab a FELT-TIP MARKER & place a *dot* next to the 2 screws on the front of the *silver* bracket that the CONTROL PANEL *snaps* onto. Then remove the 2 screws. Remove the other 2 screws at the top of the *silver* bracket and remove the silver bracket by pulling upward.
10) Remove 4 screws at each corner (or ear) of the FRONT DRUM SUPPORT ASSY.
11) Pull the SUPPORT ASSY upward & towards you–set aside.
12) Grab the DRUM & rotate counterclockwise while pulling towards you. The belt will slip off. Remove the DRUM.
13) You’ll see a silver/square box on the right-hand side. Pull off the wires to the THERMAL LIMITER & test it for *continuity* with the test meter. If “open”—replace the THERMAL LIMITER and the other THERMOSTAT next to it.
14) If the THERMAL LIMITER has failed—the home exhaust vent *must* be cleaned. 100%.
15) Use a shop vac to clean everything up.
To learn more about your dryer, or to order parts, click here.
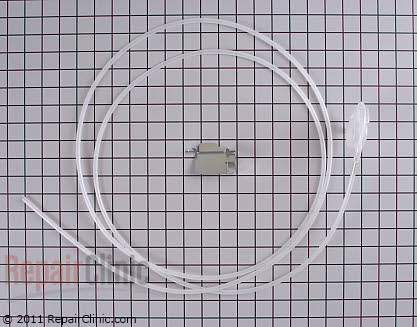
That would be the temperature sensing thing called a thermistor. The icemaker uses it to make decisions about when to make ice.

(click for larger view)
This particular example is from an LG refrigerator model LRSC26923TT but all the LG models are similar. Samsung’s icemaker’s use the same thermistor arrangement, too.
Usually the thermistor can be clipped right back in place as shown below:

(click for larger view)
If yours is broken for some reason, you’ll need to replace the icemaker, which you can get right here for the LG model LRSC26923TT ==> http://www.repairclinic.com/PartDetail/Ice-Maker-Assembly/1266867?modelNumber=LRSC26923TT
For other models and brands, you can look up the icemaker using your model number on the icemaker page, right here ==> http://www.repairclinic.com/Ice-Maker-Parts
This vintage dishwasher was from back on the good ol’ days when Kitchenaid dishwashers were made by Hobart. These were the heavy artillery, the battle tanks of the kitchen. If you’re blessed to have one these old war horses, you’ll want to hang on to it as long as you can because all dishwashers made today suck. The problem you’ll run into is that many of the parts are no longer available– NLA, as we professional appliantologists say with a wizened look while shaking our heads at the parts counter. One such NLA part is the door latch assembly. If yours craps out, this DIY guide will help you restore it back to service.
Rehabilitating the Door Latch Assembly on an Old Kitchen Aid (Hobart) KDC-20A War Horse Dishwasher
To learn more about your dishwasher, or to order parts, click here.
These sensors are also called thermistors. They’re used in lots of the recent brands to sense temperature. The old way was with a mechanical thermometer with a capillary tube. Ahh, those were the days.
The idea behind these newfangled sensors is that their resistance increases as temperature decreases. On LG refrigerators, the sensor should have a resistance 16 K-ohms ±5% at 32℉. To test the sensor:
– Measure the temperature of the sensor or the space the sensor is in. I use an infrared temperature sensing gun for this.
– Measure the sensor resistance. Make sure your meter is zero’d out and calibrated. You’re looking for readings in the k-ohms range. Note the resistance.
– Place the sensor in a glass of ice water. Let it sit for a minute or two to stabilize.
– Measure the resistance again.
You’re looking for two things:
1. That the sensor resistance did change, either up or down depending on whether you’re starting from a temperature higher or lower than 32℉. If you’re starting from a temperature higher than 32℉, then you should see the sensor resistance increase; if the starting temperature was lower than 32℉, then you should see the sensor resistance decrease.
2. The sensor resistance should be 16 ohms ±5% at 32℉.
This same procedure can be used to test any sensor in any refrigerator (many ovens use the same kind of temperature sensing technology) as long as you know the specification of the sensor at a given temperature that you can reliably produce. That’s why 32℉ is a nice test temperature to use because it’s easy and reliable to produce with ice water.
To learn more about your refrigerator, or to order parts, click here.
Appliantology Newsletter, Winter 2011
0. Introduction
1. It’s the exciting dishwasher issue!
2. Uncommonly delicious parts return policy
3. New merit apprenticeship program
4. Samurai News®
5. Mrs. Samurai’s dojo
6. Story time
7. Hillstomping update
8. Domo!
### ### ### ###
0. Introduction
From deep within the bowels of frozen Yankeeland, in the foothills of the White Mountains and finally dug out from under 13 feet of fresh, pristine global warming, it’s another steamy issue of Appliantology. Movin’ on…
### ### ### ###
1. It’s the exciting dishwasher issue!
This is the issue you’ve all been laying awake at night for, checking the inbox on your iPhone every hour, suffering irritability with your spouse and fatigue at work. Now, the wait is over. Yes, my brothers and sisters, just in time for that visit from your mother-in-law, I bring you _Appliantology: The Dishwasher Issue_.
Here are some recent pearls of dishwasher wisdom I’ve cast since the last issue of Appliantology:
Cheat sheet for whupping up on the “Clean light blinking 7 times” problem in Whirlpool and Kitchenaid dishwashers – http://fixitnow.com/?p=5842
Putting a GE Monogram dishwasher with membrane control pad into Test Mode – http://fixitnow.com/?p=5834
GE Profile dishwasher making a high-pitched squealing noise from control board – http://fixitnow.com/?p=5826
Special repair trick for LG dishwashers with slow or no drain problem – http://fixitnow.com/?p=5654
Maytag dishwasher MDBH955AWB: He’s dead, Jim – http://fixitnow.com/?p=5579
KitchenAid Dishwasher KUDI24SE — No power – http://fixitnow.com/?p=5568
Dishwashers and hard water: getting the best possible results – http://fixitnow.com/?p=5536
A fantastic photo essay detailing the disassembly of the motor-pump on the new Bosch Ascenta dishwashers, an Internet premiere exclusive! – http://fixitnow.com/?p=5403
All dishwasher repair posts – http://fixitnow.com/category/appliance-repair-posts/dishwasher-repair/
### ### ### ###
2. Uncommonly delicious parts return policy
OMG, so you know my crazy parts partner has finally gone off the deep end. Yeah, they’re like teutally giving a 365-day, no-hassle return policy on ALL appliance parts, even electronic parts that have already been installed! Is that nuts? Ya sure, ya betcha! So they’re like teutally taking the risk out of DIY appliance repair.
Look, I can help you troubleshoot your appliance and I can usually get you right to the problem. But the fact is that you’re out there somewhere and and I’m up here in Yankeeland; it just ain’t the same thing as being right there at the appliance, listening to it, smelling it, feeling it, tasting it… yes, appliance repair is a full contact sport!
Well, to level the playing field, my crazy parts partner is offering an unheard of return policy: return parts for a full year with no hassle. Just use the parts search box in the sidebar at Fixitnow.com ( http://fixitnow.com ) or the parts search box at the top of Appliantology.org ( http://appliantology.org ) or any of the appliance parts banners or links on those sites to buy parts.
Read more about this insane return policy here: http://fixitnow.com/?p=5777
### ### ### ###
3. New merit apprenticeship program
Here at Samurai International Headquarters, we are impassioned supporters of meritocracy. Any meritocracy. As far as we’re concerned, the more the meritier… or something like that. As someone who speaks 17 self-invented languages fluently, it is difficult gearing down to this guttural gum-smacking that you Ameedeekans call “Engrish.”
So, anyone who contributes good repair content can earn an upgrade from Grasshopper to Merit Apprentice in the repair forums.
Apprentices at the Samurai School of Appliantology ( www.appliantology.org ) enjoy many perks over Grasshoppers:
– request service manuals in the Appliance Service Manual Request forum;
– access the other forums besides just the Kitchen and Laundry forums;
– edit your own posts;
– send and receive private messages (PMs) which can include links to service manuals;
– download/upload/view the thousands of illustrative and illuminating attachments;
– post replies to other topics that you didn’t start.
To be an Apprentice, you can either subscribe to one of the Apprenticeship programs (Basic, Annual, or Permapprenticehip) or you can earn it. Yep, all of us here at Samurai International Headquarters are tickled to the point of incontinence to announce our new Merit Apprenticeship program where you can earn your apprenticeship through a quid pro quo kind of a deal. It made a big splash. (Sorry, I couldn’t help myself.)
Here’s the deal: if you contribute original repair material suitable enough to be featured on Fixitnow.com you will be awarded a Merit Apprenticeship. An example of this would be a series of photos of an appliance repair you did with captions that explain what’s going on. The common way a Grasshopper will earn his (or her) Merit Apprenticeship is by posting photos of his craftsmanship in the Samurai School ( www.appliantology.org ) as the culmination of their forum topic, kind of like a Master’s thesis. The criteria is this: could another Grasshopper come along later and gain crucial insight into doing the repair from your original photos and commentary? If yes, then *ding-ding-ding!* you win the Golden Calf. But since a grumpy old dude with a shiny face melted down our last golden calf, you’ll have to settle for a Merit Apprenticeship.
### ### ### ###
4. Samurai News®
>> I’ve been experimenting with offering help via texting. It’s been great for answering quickie questions, helping folks find information at my site, and resolving site log-in problems. Because of the limiting and kludgy nature of texting, if someone needs more detailed troubleshooting and repair help, I’ll refer them to the Samurai School. But texting can be a good way to get started. Or maybe you just wanna reach out and say, “Konnichiwa, Samurai-san! Anata wa buto des, na?” Bring it: 603-505-8460.
>> The new home of the Samurai appliance repair forums, a.k.a., the Samurai School of Appliantology ( www.appliantology.org ), is rockin’ along. Stop by and say hey. If you’re a professional appliance repair tech, email me and let me know, tell me a little about your background, and you’ll get upgraded to Master Appliantologist at the forums.
>> Well, after being on Flickr for over five years, I’m being evicted. Seems that someone complained to Flickr about some of my appliance repair photos having the text, “Buy appliance parts at parts.fixitnow.com” imprinted on them. They thought it was too commercial on how-to appliance repair photos and diagrams that I was giving away for FREE. Yep, some people will even complain about something when it’s free. And Flickr agreed with them.
So I’ve moved all my photos to Smugmug.com ( http://appliantology.smugmug.com/ ) which, as it turns out, is a superior image hosting service anyway and they don’t have a neo-marxist hangup about someone promoting their website or bidness through their photos. But it also means I need to change the photo links embedded in over 400 posts at my blog, Fixitnow.com, from Flickr to Smugmug. Oy!
BTW, if you want to try out Smugmug, here’s my referral link to signup for a free trial: https://secure.smugmug.com/signup.mg?Coupon=wA98wSm1iMAKM . If you do decide you like ’em and sign up for a permanent account, I’ll earn a $10 referral credit to use toward my account renewal. Domo!
### ### ### ###
5. Mrs. Samurai’s dojo
Take a little respite from your appliance repair concerns in Mrs. Samurai’s dojo. Come on in and make yourself at home, and I’ll serve up some tasty tidbits on other aspects of home living, such as some of the Samurai’s favorite recipes.
Everybody from Popeye to your mama has been telling you to eat more greens because they’re so good for you. But the leafy greens aren’t always popular with folks, especially kids, because they think they are gross in some way. Here is an awesome recipe either for the greens nay-sayers, or those who just want a different way to cook ‘em than what they’ve been doing. My kids fight over these.
Krispy Kale
What you’ll need:
Kale – either one really big bunch or two smaller (see note)
Extra-virgin olive oil
sea salt
large bowl
a couple of large baking sheets
2 wire cooling racks that fit on top of the baking sheets (see note)
What to do:
Preheat your oven to 350 deg.
Tear the kale leaves off of their stems. They should be torn roughly the size of tortilla chips. Rinse and dry them as much as possible (a salad spinner works perfectly).
In a large bowl, toss the kale with a pretty good-size drizzle of olive oil and some salt, then spread it evenly on the wire racks placed on top of the baking sheets. Bake for about 15 minutes until nice and crispy. The leaves will darken somewhat. Enjoy right away!
Serves about 4-6 as a side dish.
Note: this recipe only seems to work with kale and its curly leaves. Any of the flat-leaved greens don’t crisp up properly. Also, be sure to use the wire racks – if you put the kale directly on the baking sheets, you would have to turn all the pieces halfway through the cooking to avoid sogginess – tedious!
### ### ### ###
6. Story time
Lance DeMoi and the Blood Wand
A short story by Stephen Brown
[Lance DeMoi, the top agent of the Department of Paranormal Investigation and Research, is sent on a mission in England where a mysterious group of vampires have threatened to use an ancient artifact against the living. Lance must venture through a dark and menacing forest to stop them, where he will meet both new friends and new enemies. If he does not find and destroy the relic in time, then all of the UK could fall under a vampiric shadow. But will Lance be able to defeat the chief vampire before it is too late?]
Lance DeMoi leaned against a bulkhead in the plane; he could feel the vibrations of the engines on his back. DPIR agents milled about the plane, carrying out different tasks. Lance’s handler, Agent Grey, walked over to where he was sitting.
“DeMoi, you know the mission, you know who to kill, and to retrieve the Blood Wand. You’ll be dropped in this forest,” Grey pulled out a map. “Here, a few miles south of London, the vampire colony is nested here, in some ruins of a faerie fort. We need you to execute this quickly DeMoi – we believe they are on some ceremonial schedule – get the Wand before sunrise.”
Lance nodded sleepily; it was 11:30 PM. He had drunk two cups of coffee, but he was still tired.
“Getting fatigued in my old age,” Lance mumbled.
“Oh please,” Grey sighed as he walked away.
The plane reached London, a great sea of lights in the early morning darkness. Lance pulled on his parachute and proceeded to the hatch. Grey ambled over.
“Parachute?” The handler asked.
“Check.”
“Headset?”
“Check.”
“Extra headset?”
(krk)”Check. Over.”(krk).
“Array of stakes?”
Lance slapped his belt, jangling the stakes together.
“Revolver with silver bullets?”
“Shiny.” Lance pulled out his revolver and cocked it.
“All right, Jason open the hatch,” said Grey. The agent by the door opened it; a blast of cold, morning air smacked Lance in the face, and his ears were filled with the roaring of the engine and the wind. He braced himself against the doorway, his face turning slightly green; heights had always bothered him.
“Afraid of heights? Even after all these years?” Grey smirked as he started to walk away.
“Aren’t you going to wish me luck?”
Grey grunted.
“I’m so lucky to have you as my handler.” And with that, he jumped from the plane, into the night and the forest below.
Read the rest of Part 1 of this story here:
http://dpirfiles.blogspot.com/2011/02/lance-demoi-and-blood-wand-part-1.html
### ### ### ###
7. Hillstomping update
An Appliantology newsletter just wouldn’t be complete without a hillstomping update. Thankfully, all this global warming has brought tremendous amounts of snowfall and record cold temps, so the winter hiking in the White Mountains has been outstanding this year. The best one so far, though, was the recent hike the Oz Man (my semper fi canine hiking partner) and I did up Mts. Methodius and Elijah in the Northern Saints range (some people still call these by their old political names of Mts. Madison and Adams in the northern presidential range).
Turn your speakers up and click full screen mode to get the full effect of the slideshow. Kick back and enjoy!
http://albums.phanfare.com/slideshow.aspx?i=1&db=1&pw=obuTyVFB&a_id=5027731
### ### ### ###
8. Domo!
Finally, I want to shout out a big fat “DOMO!” to all the fine Master Appliantologists who help answer questions in the repair forums. We learn from each other and we freely share our knowledge with all seekers as a totally free-will, voluntary love-offering to you. If one of these fine Masters helped you with your repair and saved you some coin, let ’em know!
ACtechGUY
appl.tech.29501
BrntToast
Budget Appliance Repair
certified tech group 51
denrayr
DIAMOND GAZZA
dkpd1581
DurhamAppliance
john63
kdog
KurtiusInterupptus
LLAMBERT
Moostafa
nickfixit
RegUS_PatOff
ROBBYRIG
SANTA
Southern Appliance
Strathy
Toranaga
Tronicsmasta
Trying to help
~~~fini~~~
Samurai Appliance Repair Man
Parts==> http://parts.fixitnow.com
Forums==> http://appliantology.org
Facebook==> http://facebook.com/fixitnowsamurai
Twitter==> http://twitter.com/fixitnowsamurai
Newsletter==> http://newsletter.fixitnow.com
SMS==> 603-505-8460
First, verify that you have 240 VAC at the power cord terminal on the dryer. No cheating here! You gotta get eyeballs and meter on that terminal ‘cuz you might find something like this:

Okay, if it passes the Essential Eyeball Test®, then it’s time to put your meter on it. Check for the voltages as shown in the diagram below:

(click to enlarge)
If all that looks good, then and only then are you ready to look for trouble inside the dryer. Here’s a spiffy troubleshooting technique for splitting the problem in half, L1 side from the L2 side, developed by Sublime Master RegUS_PatOff, a sensei at the Samurai School of Appliantology:
Set the Dryer to run a Regular Heat Cycle.
Keep the Door open so the Drum Motor (and Heater) doesn’t run.
Test for 120v AC from each side of each Thermal device to chassis (ground).
and from each side of Heater to chassis (ground).With the Door open, and the Drum Motor not running, that disconnects L2 power.
L1 power should flow all the way through, from the Timer, (120v measured to chassis, ground) and from each side of the following:
Operating Thermostat, Thermal Fuse, Hi-Limit Thermostat, Heater Element, all the way up to one side of the Motor Centrifugal Switch,
The other side of the Centrifugal Switch will (should) have 120v to chassis (ground), but that would be from L2.
To learn more about your dryer, or to order parts, click here.
If the beer is getting warm in your refrigerator or the ice cream is melting in your freezer, the first thing you’re gonna want to do is get some eyeballs on the evaporator coil. The evaporator is the aluminum coil hidden behind a panel in the freezer compartment that makes all the cold air in your fridge. Side x Side, Top ‘n Bottom, French Door– doesn’t matter what kind of refrigerator you have, it will have an evaporator coil.
That evaporator coil is supposed to run at a temperature somewhere around -10℉. Well, it don’t take a nucular fizzicist like yours so very freakin’ truly to realize that, at that temperature, the coil will choke up with frost and ice in no time. When that happens, air can’t flow across the coils and get chilled so no cold air circulates throughout the entire box. Now we’re talkin’ warm beer. 
Another thing that’ll make warm beer is if the evaporator coil doesn’t get cold enough. This usually means either the refrigerant has leaked or there’s a problem with the compressor or condenser fan motor— the one back in that cubby near the compressor.
For specific diagnostic help as to why the refrigerator is warming up, check out the warm refrigerator flow chart. The point of this post is to show you how to interpret the frost pattern on the evaporator coil when you do that essential eyeball check. Here now, for the first time ever in the history of the Universe, are three self-explanatory photos that reveal this arcane wisdom to the Great Unwashed Refrigerati:


To learn more about your refrigerator, or to order parts, click here.
Oh my, crusty skivvies! 
Okay, let’s stop all this cryin’ and get scientifical on this bad boy. First, feast your peepers on the diagram below:

(click to enlarge)
Valves 1 and 2 are energized together so the flow from each valve meets smack dab in the middle and flows down the center dispenser chute to the fabric softener cup. If one or the other valve do not work OR if the flow is greater out of one valve compared to the other, then the flow will not meet in the middle and be sent down the center chute. Use the tech sheet taped to the rear panel of the washer and run the diagnostic mode to power each valve and get a visual on the flows. Also, make sure the top of the dispenser above the softener cup is not clogged with softener.
If the stream does turn out to be off-center, the fix is to replace the water inlet valve, come git you one==> http://www.repairclinic.com/PartDetail/Valve-or-Float-Component/1067883
To learn more about your washing machine, or to order parts, click here.