Category Archives: Appliance Repair Posts

All appliance repair categories.

Early model Maytag Neptune stacked laundry unit: washer won’t spin

Model numbers MHS2000 MHW2000 MLE2000

If you have a unit with the MHS model number, it’s the same as the MLE and MHW units. Maytag labeled the washer MHS so they could be tracked at the assembly plant and just to confuse everybody else outside of the assembly plant.

Here are some things to check when this washer isn’t spinning even the though the door lock light is lit:

– The door latch wax motor could have taken out the Machine Control PCB. This was a very common problem back in the “the day” and was a huge débâcle for Maytag. The washer Machine Control board is in the top right hand front corner of the dryer.

– Also check the spin enable switch in the door latch assembly to make sure it’s getting actuated by the wax motor. Sometimes that steel z-spring on the back of the wax motor gets compressed and you need to stretch it a bit. The switch itself may also be bad.

– Run the basic motor and motor control function test. If the motor doesn’t run at 50 RPM for this test, time to install a new motor and control kit.

– Check the drum unbalance switches. There are usually three. Two are push button style switches, one on the bottom and one on the right side of the outer drum assembly. If they fail or trip, the machine will not spin. Can also trip due to excessive movement. The third switch is the most common one I have seen fail, called the inertial unbalance switch. It is located on top of the drum and can become oversensitive to movement and cause a redistribution action to occur instead of spinning.

If you need more detailed help troubleshooting this problem, come start a new topic in the Laundry Forum at the Samurai School of Appliantology.

To learn more about your washing machine, or to order parts, click here.

Troubleshooting the “E3” error code in Maytag MAH6700, MAH8700, and MAH9700 washers

These codes in your (made-by-Samsung) Maytag washer might pop up during the rinse/spin cycle with the motor sounding like it wants to spin but it ain’t. In fact, the E3 error code means that the Machine Control wants to make the motor spin but won’t do it because it’s getting a weird reading from the tachometer. This could be because there’s a piece of clothing stuck between the basket and outer drum– open the door and spin the basket by hand to make sure it moves freely. If it doesn’t then there’s either a jammed piece of clothing or, worst case, a burnt out drum bearing– and we’ll deal with these problems at the Samurai School of Appliantology.

If the drum spins by hand, the problem may just be bad wire connection. Turns out the motor harness connector has been a bit of a troublemaker in some vintages of these machines at the washing machine farm in Korea.

Unplug the motor harness connector and pull on each wire. If a wire connector comes loose from the plug, use a small straight slot screw driver and bend the locking tab on the terminal up a tad to help it make a tighter connection.

Also, get some serious eyeball action on the terminals on the motor side of the connector. If you see any bent terminals, use a pair of needle nose pliers to straighten ’em out. Recheck the harness side of the terminal block for bent terminals, too. Bent terminals can indicate a problem with the locking tab inside the plug.

Motor terminal block in Maytag MAH6700, MAH8700, and MAH9700 washers

Okay, if the drum movement and motor connections check out, then the only thing that could be causing the problem is that the Hall Sensor connector is not in there goodntight or the Hall Sensor itself is FUBAR (that’s a technical term for, well, let’s just say it means you need to get a new one). The job of the Hall Sensor is to sense the motor’s RPM. It’s a little printed circuit board (PCB) located on the back of the motor in the locations shown below.

Hall Sensor in Maytag MAH6700, MAH8700, and MAH9700 washers

Undo the wire harness connector to the Hall Sensor and eyeball it carefully for gookus, rust, moisture… anything that isn’t supposed to be there. Should be a good, clean, tight connection. It it looks good, then the problem boils down to one thang: the Hall Sensor itself.

Now, here’s the kick in the pants: the Hall Sensor is not a separate part; it is an integral part of the motor. Which means if the Hall Sensor is FUBAR, you gotta buy a whole new motor. Oh, don’t worry– ol’ Samurai done sent out a hit team to hunt down the squirrelly engineer who designed it that way. Looks like they got him, too, Hoss. Yeee HAWW!

Anyhoo, here are the part links to the motor and Hall Sensor kits by model:

MAH6700 and MAH8700 models (they use the same motor)

MAH9700 models

To learn more about your washing machine, or to order parts, click here.

GE Triton XL Dishwasher Wiring Diagram

GE Triton XL Dishwasher Wiring Diagram

Example model numbers:
PDW7300 PDW7700 PDW7800 PDW7880 GSD6200 GSD6600 GSD6660 GSD6700 EDW4000 EDW4060

GE Triton XL Dishwasher Wiring Diagram
(click to enlarge)

To learn more about your dishwasher, or to order parts, click here.

Samurai Appliance Repair Man

The Samurai Family of Appliance Repair Websites

Parts==> http://parts.fixitnow.com
Forums==> http://appliantology.org
Facebook==> http://facebook.com/fixitnowsamurai
Twitter==> http://twitter.com/fixitnowsamurai
Newsletter==> http://newsletter.fixitnow.com
SMS==> 603-505-8460

“Steam technology” part of Whirlpool’s latest dryer?

From a Whirlpool press release:

Steam relaxes wrinkles and removes odors from garments inside the Whirlpool Duet Steam dryer.

Using the water line from the washer to spray a fine mist on clothes, the dryer converts water into steam that lifts out odors and smoothes wrinkles as it penetrates fabrics. A 15-minute Quick Refresh cycle applies this feature to clothing that isn’t dirty but merely needs deodorizing and de-wrinkling. And a 20-minute Enhanced Touch-Up cycle performs the same tasks on clean clothing left for long periods in the dryer drum after drying is completed. Other dryer features include the AccelerCare system, which minimizes drying time so that loads in both a washer and dryer are completed in more nearly the same time periods. Whirlpool has already begun training authorized service personnel in the technology and service procedures on the product, which has a suggested retail price of $999.

In fact, the Whirlpool “steam dryer” unit just sprays a mist of cold water on the clothes to remove the wrinkles and the heat of the dryer works with this mist to remove wrinkles and odors.

Sounds gimmicky to me.

LG apparently thinks so, too, because they’re suing Whirlpool for using the words “Steam Dryer.” The LG steam dryers have a steam generator that actually makes steam for the clothes to remove wrinkles and odors.

I suppose that technically the Whirlpool dryer is a stream dryer if you’re calling the warmed-up mist steam. But, by that definition, all dryers are “steam dryers” because, as long as the clothes are wet, there is a vapor pressure of steam in the air space inside the drum.

If that’s what you mean, then how ’bout just dampen your wrinkled clothes that sat in the dryer too long with a spray bottle and run ’em another 10 minutes?

To me this just looks like a sales ploy since it does not actually spray steam onto the clothes, just a cold water mist. If you really want a steam dryer for whatever reasons you’ve convinced yourself that you need one, buy the LG unit– at least you’ll be a getting a real steam dryer.

Samurai Appliance Repair Man

The Samurai Family of Appliance Repair Websites

Parts==> http://parts.fixitnow.com
Forums==> http://appliantology.org
Facebook==> http://facebook.com/fixitnowsamurai
Twitter==> http://twitter.com/fixitnowsamurai
Newsletter==> http://newsletter.fixitnow.com
SMS==> 603-505-8460

Microwave oven repeatedly blowing the internal fuse – what keeps making ’em blow?

Sublime Master Willie in the Samurai School of Appliantology dispenses these indispensable pearls of appliantological wisdom for troubleshooting a microwave oven that keeps blowing the internal fuse:

Quick n’ easy way to see if the high voltage system is blowing the fuse, disconnect the wires to the primary side of the high voltage transformer and make sure they are safely away from any part of the microwave.

Turn the unit on and if all operates OK, (except no heat of course), then the high voltage system is blowing the fuse and you would need to diagnose that section. If fuse still blows with transformer disconnected then it time to replace all the door switches.

To learn more about your microwave oven, or to order parts, click here

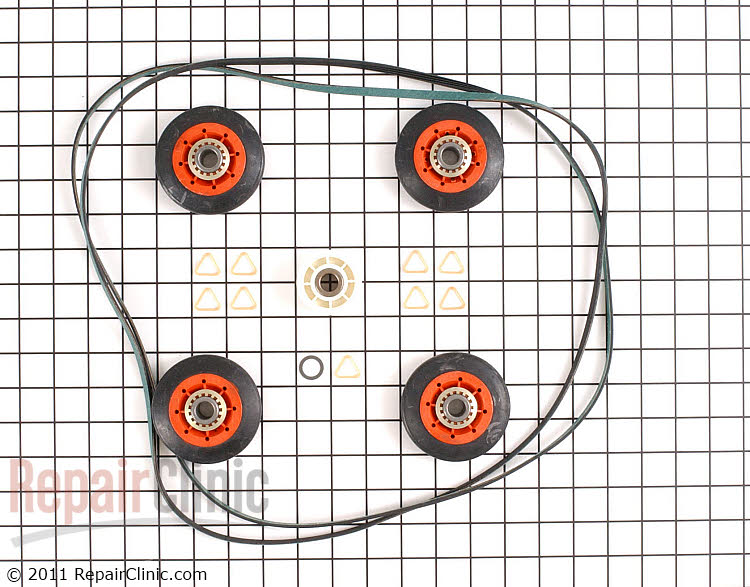
Maintenance kit for Whirlpool / Kenmore dryers with the lint filter in the door

Okay, boys and girls, last time on the Freaky Uncle Samurai Show, I told y’all about a nifty maintenance kit for Whirlpool-Kenmore dryers with the lint filter in the top panel. But Whirlpool makes another style of dryer with the lint filter in the front panel where you open the door. This is the so-called DOTT dryer which stands for the “dryer of tomorrow, today.” No chit, boys and girls, that’s really what they call it. Ol’ Samurai may be a little freaky and smell kinda funny, but he ain’t no liar. These dryers aren’t nearly as tough and durable as the other kind with the lint filter in the top panel but I rectum that’s progress for ya.

Whirlpool makes a maintenance kit for these dryers, too. Check it out:

Drum Roller, Belt and Pulley Kit for Whirlpool-Kenmore DOTT dryer
(click it to git it, l’il chillun)

And they’s even a fixemup video for this kit, too. Grab some popcorn and let’s watch:

To learn more about your dryer, or to order parts, click here.

Removing a wash tub in a Fisher Paykel DD603 Dish Drawer

Easy as bip, bap, boom!

Fisher-Paykel DD603 Drawer Removal

If you need more help fixing your own appliances, come see us in the Samurai School of Appliantology.

Samurai Appliance Repair Man

The Samurai Family of Appliance Repair Websites

Parts==> http://parts.fixitnow.com
Forums==> http://appliantology.org
Facebook==> http://facebook.com/fixitnowsamurai
Twitter==> http://twitter.com/fixitnowsamurai
Newsletter==> http://newsletter.fixitnow.com
SMS==> 603-505-8460

Cheat sheet for whupping up on the “Clean light blinking 7 times” problem in Whirlpool and Kitchenaid dishwashers

Whup-AssGot that Clean light blinking seven times, pausing, then doing it again? Well, it’s time to break open a USDA Grade A can o’ whup ass on that bad boy! Use this cheat sheet to nail down the problem. The Tech Sheet that it refers to is located in a pouch behind the kickplates of your dishwasher.

Whirlpool dishwasher blinking clean light check sheet
(click to enlarge)

To learn more about your dishwasher, or to order parts, click here.
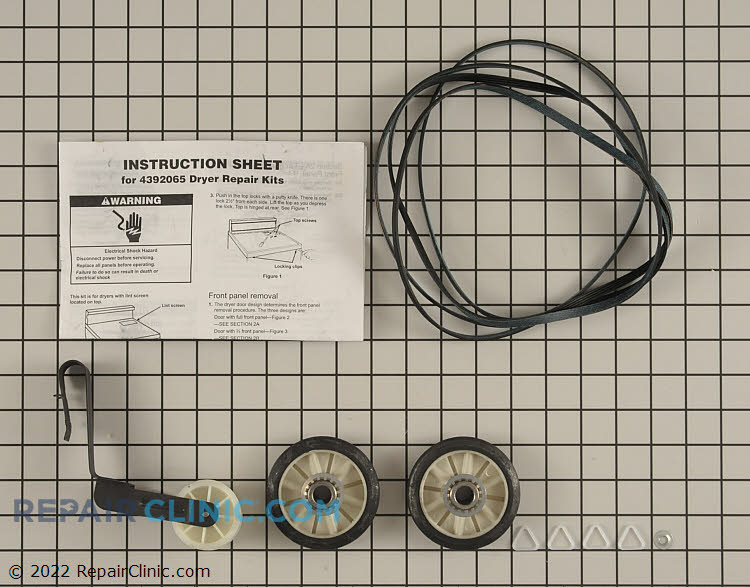
Convenient maintenance kit for Whirlpool and Kenmore dryers with the lint filter in the top panel

So you have one of those Whirlpool or Kenmore dryers with the lint filter in the top panel? First of all, congratulations! These dryers are tanks and, IMHO, the best dryer design ever put out there. Whatever you do, don’t get rid of this one. The dryers made today don’t even come close to the durability and repairability of this one.

We have one of these dryers ourselves. It’s over 30 years old and still running strong. Only problem we’ve ever had with it was that it started making an intermittent high-pitched squealing sound, which would start after the dryer had been going a while. When I opened it up, I could see the drum rollers were sloppy and would chatter when I spun ’em by hand. The belt was in pretty bad shape, too, and it would just be a matter of time before it broke. And I figured I might as well replace the idler pulley while I was in there.

When I started looking up parts, it turns out Whirlpool puts out a handy maintenance kit for this very reason. Contains the belt, two drum rollers, new idler pulley and complete destructions. My, my, how conveeeeenient.

Whirlpool dryer maintenance kit
(click it to git it, Hoss)

And here’s a cool video that shows you how to do it, step-by-step:

To learn more about your dryer, or to order parts, click here.

GE Profile refrigerator beer compartment lights flicker or are dim

Affected models: PFSS6, PFSF6 (Samsung-built units)

So, you’re playing canasta with Frankie and da boyz and, being the good host, you notice it’s about time for another round of brewskis. You leave the canasta table and shuffle over to your spiffy GE fridge. When you open the beer compartment door (women usually call it the “fresh food” door; yeah, as if!) the flashing lights inside give you a flashback to your magic mushrooms days in college when you would stand in front of the fridge for hours with the door open, contemplating the meaning of life as revealed in that mayonnaise jar with green fuzz growing in it. No wonder you flunked out of college, you realize in an epiphany moment.

But this time, you’re wondering what’s wrong with your refrigerator lights. So you surf over to Fixitnow.com Samurai Appliance Repair Man and find out that you need to replace the LED board located in the muthaboard compartment in the back of your refrigerator.

GE Profile refrigerator fresh food lights flicker or are dim

In addition to finding out what the problem is and where the LED board is located, you squeal with delight when you learn that you can buy the part right here with a 365-day, no-hassle return policy!

Still confoosed, Grasshoppah? Come see us in the Samurai School of Appliantology and we’ll confoose you some mo’!

To learn more about your refrigerator, or to order parts, click here.

GE Profile dishwasher making a high pitched squealing noise from control board

This little repair tip is for the GE Profile line of dishwashers with model numbers that begin with PDW, such as PDW9280J00SS.

You load your GE Profile dishwasher and go to start it and… it won’t start. Even more confounding, you hear a high-pitched squeal coming from the control panel area. You cut power to the dishwasher (and the squealing stops) so you can disassemble the panel to get some earballs in there. With the panel open, you reapply power and can absotively, posilootely tell that the noise is coming from the control board. To make sure it’s the circuit board and not the touchpanel, you even disconnect the touchpanel from the circuit board so the touchpad doesn’t have any power and couldn’t make a squealing noise even if it wanted to.

So you order up a new control board from RepairClinic because they have great prices, super-fast shipping, and a 365-day no-hassle return policy on all parts, even electronic parts that have already been installed.

The new control board arrives at your door immediately after you click the Send button on the part order at the RepairClinic site. You slap that board in and… it still makes a high pitched squeal!

“Must be a bad board,” you mutter to yourself, while packing up the board to send back to RepairClinic for a replacement. The new board is on your doorstep waiting for you when you return from the Post Office. You slap it in and… it still squeals!

Finally, you go online to the mostest awesomest DIY appliance repair website on the whole Innernet *and* the Outternet– Fixitnow.com Samurai Appliance Repair Man– and you find this very post that you’re reading now. “Dayyam,” you wonder to yourself,”how’d that Samurai know what I was doing with my dishwasher? He must be one o’ them psychotics who can tell the future, an’ all.”

Well, you could say that. Or you could say, “Samurai, what in tarnation is goin’ on wif my dishwasher?”

What’s going is that the circuit board will make a squealing noise when one of the keypads on the touchpanel has an open or shorted keypad. So, when the touchpanel is disconnected, the control still senses an “open” and will squeal– same effect when a keypad on the touchpanel is shorted or stuck.

To fix your dishwasher, replace the touchpanel.

To learn more about your dishwasher, or to order parts, click here.

Weird plastic insert thingies found in the water inlet valves of an LG washer

Water inlet valve filter inserts in an LG washing machine

Those are sediment filters. It’s normal– LG washers come that way.

Samurai Appliance Repair Man

The Samurai Family of Appliance Repair Websites

Parts==> http://parts.fixitnow.com
Forums==> http://appliantology.org
Twitter==> http://twitter.com/fixitnowsamurai
Facebook==> http://facebook.com/fixitnowsamurai
Newsletter==> http://newsletter.fixitnow.com

– Posted using BlogPress from my iPad