Category Archives: Appliance Repair Posts

All appliance repair categories.

Is there a problem with using GFCI outlet with a refrigerator, freezer, or ice machine?

Randall writes:

Upright Freezer kept indoors since 1993. Moved freezer to garage and plugged it into GFCI outlet. The GFCI keeps tripping. The drain was plugged and I cleared it of all ice and debris. Plugged freezer in, compressor came on, temp. got cold then tripped GFCI again sometime during the night. Your diagnosis Samurai is?

To learn more about your refrigerator, or to order parts, click here.

Why does the gasket on the refrigerator and freezer door get very hot and what does it take to fix this problem?

Robert writes:

The gasket on the refrigerator and the freezer get very hot. What causes this problem and what does it take to fix this problem?

Refrigerator and freezer condenser coil cleaning brush with instructions. (Also works great for dryer lint) ==> http://www.repairclinic.com/PartDetail/Long-Handled-Bristle-Brush/5303318693/12859

Refrigerator condenser fan motor (and lots of other refrigerator parts, too) ==> http://www.repairclinic.com/Refrigerator-Parts

You can see an interactive diagram showing the locations of various parts in your refrigerator here ==> http://www.repairclinic.com/Refrigerator-Repair-Help

Another post on this problem that you might like ==> http://fixitnow.com/wp/2010/08/14/why-is-the-cabinet-around-my-refrigerator-door-very-warm-or-hot/

How to fix a dishwasher that drains but later fills up with water even while it’s off

Dave writes:

Whirlpool dishwasher model# du1100xtps8. It drains through hose into disposal but later drains back into washer and onto floor.

Click the play button in the audio player at the end of this post to hear my reply.

Part link to the water inlet valve ==> http://www.repairclinic.com/PartDetail/Water-Inlet-Valve/W10158389/1481085?modelNumber=DU1100XTPS8

Dishwasher Drain Hose Configurations

To learn more about your dishwasher, or to order parts, click here.

Advice for repairing a Whirlpool Cabrio washer that makes a loud noise during spin

A visitor to www.Fixitnow.com surfed in and chatted with the Samurai about his noisy Cabrio washer. Let’s listen in…

Surfer from Santa Monica, CA, wrote during live chat:

I have an Oasis with a loud spin cycle. Is this repair from the top or from below?

Here’s what the Samurai told him during live chat. Obviously, the images were added later but the voice reply is real– that’s how live chat is done at www.Fixitnow.com and www.ApplianceGuru.com

(Cabrio washer teardown images courtesy of Jerry at www.EliteApplianceService.org a.k.a., appl.tech.29501 in the Appliantology Academy)

Kenmore Oasis HE, Whirlpool Cabrio HE, Maytag Bravos HE: Full Disassembly/Outer Tub Replace Guide

Whirlpool Cabrio / Maytag Bravo / Kenmore Oasis Washer Tub Bearing and Seal Replacement Kit

Complete tub and bearing assembly

Tub bearing and seal kit and required special installation tool

What should you consider when thinking about buying a stacked laundry unit?

Susan wrote:

I am in need of a new washer and dryer and have limited space. I am thinking of a stackable washer and dryer and wondering what you think of that option. Are you aware of any problems with this type of washer/dryer? Thanks

To learn more about your washing machine, or to order parts, click here.

James says his gas oven stopped working but the stove still works (I think)

James wrote:

ge gas, model jgbs20bea1wh, oven ing. lites up gas valve has 2.8 ac. oven worked fine till removed painted wall installed gas line top works fine oven stoped

Hi, James. Well, I am trying to understand your cryptic e-mail to me made even more difficult to understand by your sparse use of punctuation. But if I am interpreting it correctly it sounds like maybe you’re getting 2.8 amps of current to the igniter? You did not say what you were actually measuring, you just said “2.8 ac”, I don’t know whether that is current or voltage. “AC” stands for “alternating current” which is a common type of household electrical supply. But AC can be measured in watts (power), voltage, current (amps), usage over time (kw-hours), etc.

I will assume that you measured current since what you reported is a typical under current reading thru a gas range ignitor. Assuming that this is the case, the solution would be to replace the igniter. Here’s the part link to the ignitor you need to fix your oven ==> http://www.repairclinic.com/PartDetail/Oven-Igniter/WB13K21/2494?modelNumber=JGBS20BEA1WH

A good igniter will draw a minimum current of at least 3.2 amps. Since yours is well below that, this would indicate that there is insufficient current flowing through the igniter to open the gas valve and let gas through to the bake burner tube.

I’m not sure about your reference to a painted wall. I will assume that you are referring to cabinetry around the oven that was changed or modified. If so, this in itself should have no effect whatsoever on the operation of the oven bake ignitor. It could however have an affect on the cooling of the oven if there were insufficient ventilation. But again, this does not affect the ignition of the bake burner.

How to fix an electric dryer that stopped working and won’t turn on

CHuckH wrote:

I have a Maytag Perfroma 2300 Series electric dryer. Last night it stopped working. The dryer will not turn on in any setting. Where do I start troubleshooting so that I know what part(s) I may need to replace. I have already checked the house circuit breaker and there is no issue there. Thanks for the help! CHuck

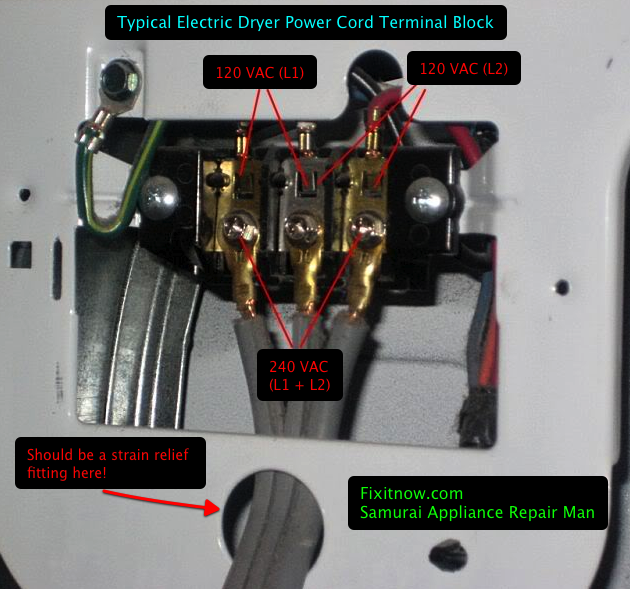
The first step in any appliance no-operation condition is to verify the power supply. In the case of an electric dryer, that means 240vac from L1 to L2 and 120vac from each L1 and L2 to neutral. This is done at the back of the dryer at the terminal block where the power cord connects, like ahso:

If power supply is good, then what you have sounds like a classic case of a bad thermal fuse. Electric dryers are designed so that when the thermal fuse opens, it kills power to the motor and heating element.

Here’s the link to the replacement thermal fuse with a how-to video ==> http://www.repairclinic.com/PartDetail/Thermal-Fuse/3392519/2986

BTW, the number one cause of thermal fuses opening is a dryer vent with excessive back pressure. A vent can be totally free of lint and still be bad. The name of the game is back pressure: crimps, using the slinky material, stuck outside vent hood, etc. Read more ==> http://fixitnow.com/wp/2011/05/14/mailbag-dryer-keeps-blowing-thermal-fuses/

Is it worth fixing a 20-year old Kenmore (Whirlpool) direct drive washer that won’t spin or pump out?

Paul wrote:

I have a Kenmore model 110.82873120 (20 years old) that will agitate but will not pump water out of tub or spin. Is it worth repairing?

Click the play button below to listen to Samurai’s reply right here on the Web! (If the audio player below doesn’t show up in your browser because you’re on an iPad, iPhone or really, really old browser, you can listen to it at this link ==> http://cinch.fm/fixitnowsamurai/401647 )

Part link to the lid switch with how-to video ==> http://www.repairclinic.com/PartDetail/Door-Switch/279347/3406?modelNumber=110.82873120

Kenmore / Frigidaire front load washer won’t do final spin and leaves water in the drum

Randy wrote:

Washer will not final spin in Regular wash. But works fine in all other cycles. It skips to the last part of the spin cycle and leaves water in machine. I just move switch to other cycle and it works fine. Looking for trouble shooting manual or repair manuals for this washer. 417.40042990 washer model #

If the washing machine is not doing the final spin, then it is probably not spinning during the other parts of the cycle, either. You probably haven’t sat in front of the washer to babysit it during a complete cycle to see whether or not this is the case, though I can guarantee you it is.

The fact that the washer is leaving water in the tub is the key to the problem here. The rule with front loaders is this: no pumpy, no spinny.

So, to begin this repair journey, you would begin right at the pump itself. The first thing to find out is whether or not the pump is actually running during the spin cycle. You can do this by listening (if you know what you’re listening for) or by checking for voltage 120vac at the pump wire harness during the beginning of the spin cycle.

If the pump is getting voltage but not running, then the pump is bad; replace it. ==> http://www.repairclinic.com/Washing-Machine-Parts

If the pump is getting voltage and you hear it running– or trying to run– then either the pump is bad or the drain hose is plugged. To proceed in this case, remove the drain hose from the pump, pucker up and blow like a fish. You should clear an initial slug of water and then the drain hose should blow through freely. If the drain hose is clear, and you hear the pump running during the spin cycle, then the the pump is bad; replace it. ==> http://www.repairclinic.com/Washing-Machine-Parts

You can buy the replacement pump right here with a 365 day return policy. 8)

You need repair manuals? We got your manuals right here, pally-boy! In the Appliantology Academy, we can get you any type of manual your little heart desires, including the manual for your washing machine. You will, however, need to be an Apprentice in order to download them. Access to service manuals is just one of the many benefits that comes with an Apprenticeship at the Appliantology Academy. Learn more ==> http://apprentice.appliantology.org

Illustrated tips for repairing a burned spot in a circuit board

Most of the appliances made today have circuit boards in them. This is to help make them more “energy efficient” as mandated by the Energy Star requirements, to save costs over using discreet mechanical switches, and also to make them more amenable to being controlled through the Smart Grid nightmare being unleashed across the country. Point is, if you’ve bought a major appliance recently, then it has at least one, maybe more, over-priced and shoddily-made circuit boards in them that will one day go poof at the worst possible time. I guarantee it.

When that fateful day arrives, you have two choices:

– Buy a new circuit board (thru www.Fixitnow.com, www.Appliantology.org, or www.ApplianceGuru.com 8) 365-day return policy on parts ordered thru those sites!)

– Repair your existing board

If the failure is not something visible, there’s a slim-to-none chance that you’ll be able to repair it because the appliance manufacturers guard the schematic and tech info on the circuit boards like the secret ingredient to Coca-Cola (psst, it’s high-fructose corn syrup).

If, however, you remove the control board in your Bosch dishwasher or the muthaboard in your GE refrigerator and you see an obvious burn spot, well, you got nothing to lose by going ahead and taking a whack at trying to fix it. Worst case scenario: your repair will fail and you’ll have to buy a new control board.

I’ve previously posted some repair tips for working with electronic circuit boards. But here’s an annotated photo describing some common repair techniques for the types of burn damage to circuit boards that you’re likely to actually encounter. Click the image for a larger view.

Tips for Repairing a Burned Circuit Board
Uploaded with Skitch!


If you need more help fixing your appliances, whether or not it has to do with the circuit boards in ’em, come start a new topic in the Appliantology Academy and we’ll help fix y’up ==> www.Appliantology.org

Repairing a cracked outer plastic tub in a top-load washing machine

Jim wrote:

I noticed my washer was leaking water and i took the front cover off and noticed that on the bottom of the outer plastic tub there is a crack would an epoxy cement seal this up .I checked on the replacement of the tub and it is costly.

This is an easy fix using 3M 800 tub sealant adhesive. Or you can use a spiffy product called Slap Stix made for this very purpose. Either way, it’s a pretty easy and reliable repair.

If you need help disassembling your washer to get at the crack in the outer tub, come start a new topic in the Laundry Forum at the Appliantology Academy and we shall reveal that kata to you ==> www.Appliantology.org

How to troubleshoot a Whirlpool refrigerator that keeps icing up the coil in the freezer

Ron wrote:

Hi. I have a 20-year old Whirlpool Fridge; top freezer model # ET18ZKXXW00. I love the fridge, but…about 6 months ago i replaced the defrost timer on the advice of an appliance parts store. Fridge was always running, freezer was full of ice and fridge unit was warm.

i took the back off and it too was covered in ice. I defrosted everything, replaced the timer and the unit is still constantly running.

Last week i unplugged it for a couple of hours to melt some of the ice in the freezer, took the back off and melted the ice that was encasing the coils.

what could the issue be?

Two problems right off the bat:

1. You replaced the defrost timer without knowing or proving that it was the real problem or bad to begin with.

2. You didn’t buy your parts thru Fixitnow.com! 🙁 Fun fact to know and tell: if you had purchased the defrost timer thru this site and it didn’t fix the problem, you could have returned it for a refund! Can you do that at your parts store? No? So… Why do you buy there?

Okay, enough scolding. Let’s get your fridge fixed!

The defrost system consists of three components: the defrost timer, the defrost thermostat, and the defrost heater. If any one of these three components goes bad, then the refrigerator will not defrost and ice will accumulate on the evaporator coil as you are seeing. Since you have already replaced the defrost timer, that only leaves the other two components as possible suspects.

Both the defrost heater and the defrost thermostat are easy to test with a multimeter. For the defrost heater, measure the resistance through the heater with your meter. The resistance should be something in the low ohms; the exact ohm reading is not important as long as it is something low. High resistance in the kilo-ohms or mega-ohms range or open is a bad defrost heater and it should be replaced.

To test the defrost thermostat, remove the thermostat from the evaporator by unclipping it and place it into a glass of ice water. Let the defrost thermostat sit in the ice water for about five or ten minutes and then measure the continuity through the defrost thermostat. Again, if it reads open or very high resistance, then the defrost thermostat is bad and must be replaced.

Not surprisingly, you can buy the new defrost heater or new defrost thermostat right here through this website! 8) Just enter your model number here ==> http://www.repairclinic.com/Whirlpool-Refrigerator-Parts

If you need more help troubleshooting and repairing your refrigerator, come start a new topic in the Kitchen Forum at the Appliantology Academy and we’ll step you thru it for free ==> www.Appliantology.org

Appliantology Newsletter: Burnin’ Down the House!

Appliantology Newsletter
Burnin’ Down the House! Mid-March 2012
The Hottest New Way to Burn Down Your House…
This one innocent and friendly-sounding thing in your kitchen can end up burning down your whole house. Think I’m being hyperbolic just to get you to click a link? Okay, then please DO NOT click this link to learn what it is.
New LG Tech Info Hot Off the Training Press…
Fresh out of the LG training circuit, here’s the latest inside scoop on LG’s new front-load washers and bottom-mount and top-mount refrigerators all arranged in two easy-to-browse photo galleries for your edification and sanctification. I even made a screencast describing them so you can bask in the soothing sounds of my mellifluous voice. Come have a listen and a look.
Enough Appliance Talk– Let’s Go Hiking…
Even though I am the one and only Samurai Appliance Repair Man, appliance warrior extraordinaire, I can only do so much appliance talk before it starts eating my brain. You too? Yeah, when that happens to me, I head for the hills. Specifically, hillstomping in the White Mountains of New Hampshire. Come refresh your spirit on virtual hikes along the Welch n’ Dickey Loop and on Crawford Path to check out the view from Mt. Ignatius.
The Appliantology Academy, www.Appliantology.org

New LG tech training info on their new washers and refrigerators

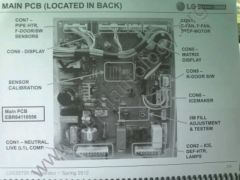
One of the fine Master Appliantologists at the Appliantology Academy, Grand Master Funk appl.tech.29501, recently attended an LG tech training session on their new model front-load washers and bottom-mount and top-mount refrigerators. He was gracious enough to take photos of the training handouts and send them to me. I’ve uploaded them to a couple new albums in the Gallery at the Academy and briefly explain them in a short screencast posted at my blog there. Check it out:

http://appliantology.org/blog/1/entry-401-lg-front-load-washer-and-top-mount-and-bottom-mount-refrigerator-training-albums/