Category Archives: Washer Repair

How to silence a Maytag Atlantis washer that makes a loud clunk and screech when it stops

Typical model number: MAV7600AWW

This topic in the Laundry forum at the Appliantology Academy has a short video clip that shows the problem. It’s basically a brake job. The needed parts are posted along with another video that show exactly how to do it. There’s also some tips on upgrading to the new, improved bearing.

http://appliantology.org/topic/36781-maytag-mav7600aww-washer-loud-cluck-after-spin-cycle/

To learn more about your washing machine, or to order parts, click here.

How to remove a stuck agitator from a washing machine without getting agitated

If you ever need to remove the inner basket to do a repair on a top-loading washer, one of the first things you’ll need to do is remove the agitator. For some older machines with years of accumulated gookus and crudus caked up under the agitator, this seemingly simple and mundane task can be one of the most frustrating and lumbar-damaging experiences for the tender neophyte.

Chief Master Appliantologist DurhamAppliance has put together a nice compendium of illustrated methods for removing a stubborn agitator from a top-loading washer and posted it in the Appliantology appliance repair forums. Grab a cold one and come feast your bulging peepers on the wisdom of the Masters ==> LINK.

To learn more about your washing machine, or to order parts, click here.

Whirlpool Duet Sport Washer powers up, locks door, but drum doesn’t tumble or spin; F21, F26

Here’s a typical problem description for this particular failure:

sundevil6 wrote:

My Whirlpool Duet Sport washer won’t run. Washer has power and turns on. When I start it the door will lock and then nothing else will happen. Push cancel and the the add a garment light blinks and washer won’t do anything and the door stays locked. I have to unplug it to get control of the functions again. Went through codes and found 3 of the F21’s and one F26. Tried to run the diagnostic test but it will only lock door and the light blinks continually for the rinse/spin cycle and will not advance the test.

Replaced the door switch and still the same problem. I had the tech sheet and have already tried to run diagnostic test, and it tells me nothing. I had just cleaned the pump out a month ago and when I had the original drain problems the pump would run, but loud like it was cavitating. It did have alot of blockage in it then, but none now. The pump never even comes on when I try to start, nothing happens but the door locks.

Okay, this is an interesting one and illustrates an important point about error codes and how you can’t just blindly follow them.

According to the tech sheet for this washer (located inside the washer; get it by removing the front bottom panel), F26 is “Door Switch Error: If the door has not been opened for 3 consecutive cycles or the door switch is open while the door is locked for more than 5 seconds.” The tech sheet lists these possible causes and procedures:

■ Door not opened during 3 consecutive cycles.
1. Open and close the door.
2. Verify CCU operation by running a Diagnostic Test or any cycle.

■ Door switch open while door is locked.
1. Push the door and check if it is completely closed.
2. Verify CCU operation by running a Diagnostic Test or any cycle.

Not very helpful and, as we’ll see shortly, not even close to the real problem with the machine.

F21 is the “Long Drain” error and this code could have been stored in the control from the pump problem that was fixed previously. Still not relevant to the present problem.

In any front load washer where the drum doesn’t tumble or spin, you want to keep in mind three key components in your troubleshooting: door latch assembly, motor, motor control board. Usually, the problem will be one of these three parts.

In this case, the door latch has already been replaced so scratch that one.

About the only way to test the motor is to measure the resistance of the motor windings and compare to the specification on the tech sheet.

And matt1 from the Samurai Appliance Repair Forums shares with us this technique for checking out the motor control board:

I’ve seen this problem before. Let’s do this:

– Get access to main control board.
– Find MS2 white connector with two pink wires.
– Use your volt meter to check the AC voltage supply to the board: power up then press Start.

If you see 120 vac for a few seconds but the voltage drops back 0 vac, then you have a problem with motor control. On this model, if the drum won’t turn within a few seconds at start up, the unit will freeze and door will stay locked with no water coming in.

But wait! Don’t take my word for it: you can get access to motor control board from the back of the unit– it’s easier that way– remove the motor control board and do a visual inspection. Just looking at it from the outside, you will think there is not thing abnormal. But if you actually removed the board itself from the plastic casing and look on the back, you will notice the burnt mark on the three transistor area right away. You can purchase the motor control board from this web site. I hope this helps.

Part link for the Motor Control Unit ==> Click Here

If you’re still confoosed and need more free help fixing your washer, come start a new topic in the Laundry Forum at the Samurai Appliance Repair Forums and we’ll confoose you some mo’!

To learn more about your washing machine, or to order parts, click here.

How to replace the Hall Sensor in an LG front-loading washer

So, you tested the Hall Sensor in your LG washer and determined that it’s toast. Now the big questions: 1) Where to get the new sensor? and 2) How to install it?

1. Where to get the new Hall Sensor?

Right here, of course! With fast shipping and a 365-day return policy, the choice of part vendor is clear! Part Link ==> Hall Sensor.

2. How to install the new Hall Sensor?

I’ll let Master john63 from the Samurai School of Appliantology explain that:

1. Unplug washer

2. Remove the rear access panel (4 phillips screws)

3. Remove the large 17mm bolt at the center of the ROTOR
Pull off the ROTOR (has magnetic tension)

4. At the bottom of the STATOR ASSY (Motor Coil) remove the phillips screw on the
metal wire harness-plate. This will allow slack when removing the STATOR ASSY.

5. Remove all of the 10mm bolts from the STATOR ASSY.
Carefully lower the STATOR ASSY & disconnect the HALL EFFECT SENSOR plug.

6. Unclip the *single* tab of the HALL EFFECT SENSOR to remove it from the STATOR.

7. Install new HALL EFFECT SENSOR—verify that all 4 snap/lock tabs are securely
attached to the STATOR ASSY.

8. Re-assembly in reverse order.

To learn more about your washing machine, or to order parts, click here.

How to test the Hall Sensor in an LG front-loading washer

A common symptom of a bad Hall Sensor in your LG washer is the LE error code (read more). A disconnected or damaged motor harness and even a bad main control board can cause the LE error, too, so you may want to check the Hall Sensor itself to see if it’s working. Here are two ways to test the Hall Sensor in an LG front-loading washer.

Ohm Testing the Hall Sensor

Start with an ohms test because it’s easy. But be aware that an ohms test is not conclusive– it’s merely preliminary. The Hall Sensor (and any other electrical component for that matter) can test good on ohms but still be bad because it can fail under load (when voltage is applied). That’s why ohms testing is just preliminary: if it fails the ohms test, it’s bad; replace the Hall Sensor (same for all LG models).

OTOH, if it passes the ohms test, this does not prove the Hall Sensor is good– you have to go on to the voltage test to prove that.

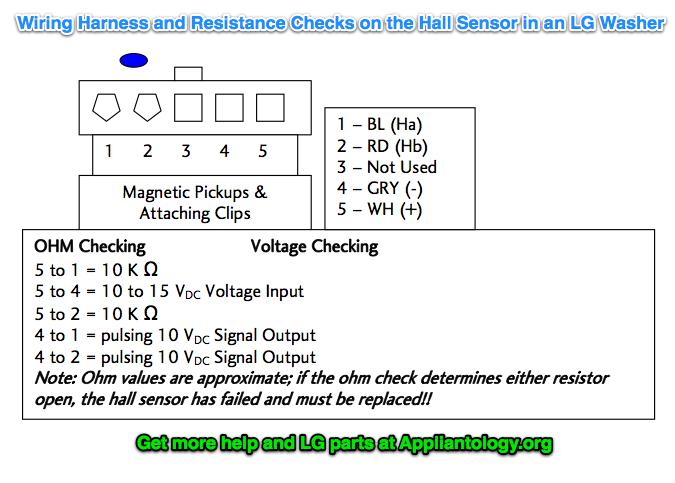
Wiring Harness And Resistance Checks On The Hall Sensor In An LG Washer

If tested off the stator using the diagram above, ohm check the resistors from pin 5 to pin 1 and pin 2. If the hall sensor is good, you should measure approximately 10 KΩ from pin 5 to pin 1 and 10 KΩ from pin 5 to pin 2. If either test shows an open (infinity) the Hall Sensor is defective and must be replaced.

Part link for the Hall Sensor (standardized for all LG models; includes a video showing how to replace it) ==> Hall Sensor

Voltage Testing Hall Sensor at Stator

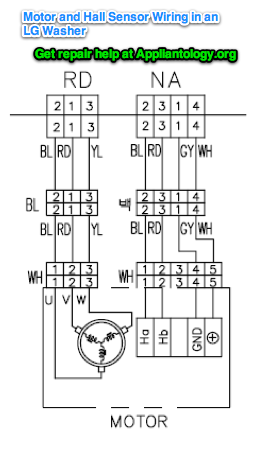
Motor And Hall Sensor Wiring In An LG Washer

If measuring voltage from the control board to the Hall Sensor, follow the following steps:
1. Unplug the power cord.

2. Remove the rear washer panel.

3. Locate the Hall sensor connector on the stator behind the rotor.

4. Place the meter leads on terminals 5 to 4,white to gray.

5. Plug in the power cord,close the door,and press the power button. DO NOT PRESS START!

6. You should measure 10 to 15VDC. If 10 to 15VDC is present,the control board is OK! If not, replace the control board (look up the correct board using your model number).

7. To measure output signal voltage from the Hall Sensor, carefully move test leads to terminals 4 (gray) to 1 (blue). Slowly rotate the motor rotor by hand. You should read a pulsing 10 VDC. If 10VDC is measured from 4 to 1, move the lead on the blue wire to the red wire, terminal 2. Repeat rotating motor rotor by hand. You should read a pulsing 10 VDC.

8. If pulsing 10VDC is measured from pin 4 to pin 1 and pin 4 to pin 2, the hall sensor is OK! If either test netted only 9 to 10 VDC without changing (no pulsing) the hall sensor is likely defective; replace the Hall Sensor (same for all LG models).

To learn more about your washing machine, or to order parts, click here.

How to locate the thermal fuse in a GE Profile “Hydrowave” washer

You know you have a blown thermal fuse in this washer when the control panel lights up but the motor doesn’t run; you check the status LED on the motor (see this post for more on that) and it’s dead, no lights, nuttin’. That’s a blown thermal fuse. Here’s where it lives:

GE Hydrowave Washer Thermal Fuse Location

Here’s what it looks like:

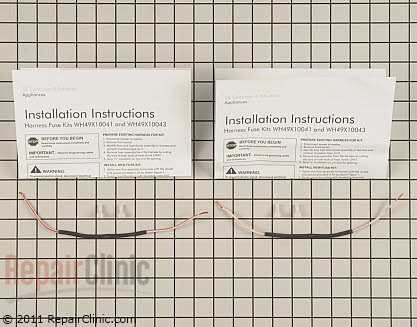
Thermal Fuse
(click image to purchase)

And you can buy the replacement right here ==> Thermal Fuse. The replacement kit comes with complete destructions.

To learn more about your washing machine, or to order parts, click here.

Why does a new-ish Bosch 500 WFMC front-load washer make a ratcheting sound during spin?

Listen to a few seconds of this video (don’t listen to the entire thing because it’ll eat your brain):

Sounds remarkably similar the sound that bad tub bearings will make. This particular washer is only three years old– very early for tub bearing failure.

The actual problem turned out to be something very simple: a loose concrete counterweight mounted to the front of the tub. A few minutes with a wrench and problem solved– no parts needed for this repair!

To prevent the problem from happening again, add Loctite to each of the counterweight mounting bolts.

To learn more about your washing machine, or to order parts, click here.

Whirlpool Duet Sport Washer stops mid-cycle and display beeps and blinks, relay chatter on CCU

The surprisingly simple solution is revealed in this topic at the Samurai School of Appliantology – http://appliantology.org/topic/32407-whirlpool-duet-washer-wfw9150ww00-literally-on-the-blink/

To learn more about your washing machine, or to order parts, click here.

Tips for adjusting the thrust bearing on a Maytag Atlantis or Performa washer

Grand Master appl.tech in the Samurai School of Appliantology shares with us some pearls of wisdom on the finer points of adjusting the thrust bearings in the Maytag Atlantis and Performa washers ==> http://appliantology.org/topic/32360-pav2300aww-not-spinning/

To learn more about your washing machine, or to order parts, click here.

How to tell if you have a worn tub bearing or a broken drum suport in your front loading washer

Got a front-load washing machine that’s making a ruckus during spin and you’re trying to figure out what’s wrong? Best case scenario is a broken shock absorber or the washer is simply off balance. Worst case scenario is a bad tub bearing or broken drum support spider. Sublime Master KurtiusInterupptus in the Samurai School of Appliantology explains how to tell the difference:

Do this test…
open washer door and grab the top edge of the inner wash basket
push straight up on the basket while steadying the outer drum with your other hand
is there any lateral movement? Or is it tight and secure?
hope for the latter, because the former is the telltale sign of a worn bearing, a broken support spider or both…not worth repair if this is the case.

If all is good here, go around back and take off the cover. Look for a loose pulley on the basket shaft. (read more)

To learn more about your washing machine, or to order parts, click here.

How to troubleshoot an F28 error code in a Whirlpool Duet Sport washer

Example model number: WFW9200SQ00

The F28 error code will be accompanied by no drum movement. The drain pump may be inop as well.

Sublime Master Strathy from the Samurai School of Appliantology shares this kata for troubleshooting an F28 error code in a Whirlpool Duet Sport (also sold under the Kenmore label) washer.


OK … going by memory here.


– First ohm out your motor. You should have approx 6 ohms between 1-2,1-3 and 2-3. You should also get 120 ohms on 5-6 which is the tach on the motor. If that is good …

– Open up the little flap on the MCU board. Start a regular wash cycle and check for voltages at the MCU. On the pink wires you should get 120v. (With the wires connected to the MCU – don’t disconnect them to check the voltage.) On the connector with the little blue wires – you should have 5 vDC.

– If you are getting the correct voltages at the MCU and the motor ohms out good, then you have a bad MCU.

– If you are not getting those readings at the MCU, then check continuity on the blue wires and the 2 pink wires from the CCU to the MCU.

– If you have continuity on all wires and the connections look good, then you have a bad CCU.


Part links (click images for larger view and purchase info):

Motor Control Unit - Part #1257029
Motor Control Unit – MCU

Control Module - Part #1257028
Central Control Unit – CCU

To learn more about your washing machine, or to order parts, click here.

Tips for Removing a Stuck Tub in a Whirlpool Cabrio / Kenmore Oasis / Maytag Bravos Washer; OL error code

If you have a Whirlpool Cabrio / Kenmore Oasis / Maytag Bravo Washer that’s throwing an OL error code, the problem is most likely a stuck tub. If the tub isn’t free to float, it causes the motor to draw excessive current that generates the OL (over load) error code.

BTW, this problem is usually caused by using non-HE detergent or too much HE detergent in these machines, read more here. The excess detergent residue forms a cement-like gookus that builds up on the drive shaft and sticks to the outer tub. It can also kill the tub bearing in which case you’ll need to replace the entire outer tub assembly because the bearing comes factory assembled into the new tub.

Here’s the part link for the new tub assembly ==> Drum Assembly

To fix the problem, you’ll need to remove the outer tub and clean the gookus off the drive shaft. This Cabrio washer teardown guide will help with that.

The teardown will all go like a breeze until you get to the part where you actually need to pull the tub out of the cabinet. Then the hernias, dislocated spinal disks, and spleen venting begins. Here are some tips that’ll help you get the tub out:

Tips for removing a stuck tub in a Whirlpool Cabrio washer

To learn more about your washing machine, or to order parts, click here.

How to fix a GE Profile “Hydrowave” washer that doesn’t agitate properly but spins and drains okay

These GE Hydrowave line of washers, example model numbers WPRE6100 and WHRE5550K, use an inverter board to vary the speed of the motor. Instead of transmission, it uses a mode shifter. More on both of these later.

One of the common failure symptoms in this machine is that the agitation cycle gets messed up but the spin and drain continue to work normally. During agitation, you may hear a loud howling or clunking noise or the tub may be rotating with the agitator, causing overflows. The direction of the tub rotation during agitate may change between lid openings. All of these are indications of a bad Mode Shifter.

For the tech junkie out there, here’s an overview of how the mode shifter works:

Shaft and Mode Shifter Overview

The shaft and mode shifter assembly consists of the shaft and tube, mode shifter cam, and mode shifter coil. It operates in 2 distinct modes, spin and agitation. The shaft and tube transfers power to the wash system.

Motor power is transmitted to the shaft and tube from the drive belt to the drive pulley.
The drive pulley is attached to one end of the agitator shaft and the agitator is attached to the other. The tube is fixed to the washer basket at all times.

The mode shifter changes the shaft and tube from spin to agitation. In agitation mode, the tube is fixed to the platform and the agitator shaft rotates freely. In spin mode, the agitator shaft is fixed to the tube and both rotate together.

Mode shifter coil energized for agitate mode; cam teeth disengaged from drive pulley.
(Teeth engaged)

Mode shifter coil de-energized for spin/idle mode; cam teeth engaged in drive pulley.
(Teeth Dis-engaged)

Mode Shifter Operation – Agitation

The mode shifter is controlled by the motor inverter circuit.

When the washer starts the agitation cycle, the inverter energizes the mode shifter coil. The magnetic field of the coil lifts the mode shifter cam, disengaging it from the drive pulley.
Without the cam engaged, the drive pulley rotates only the agitator shaft.

At the beginning of the agitation cycle, the inverter energizes the mode shifter coil with 135 VDC (PWM) for approximately 18 seconds. This high voltage pulls the mode shifter cam up from the drive pulley.

During this time, the motor also rotates clockwise and counterclockwise in short strokes to ensure the mode shifter cam has been released from the drive pulley. This operation is called the Mode Shifter Agitate Program.

It is normal to hear metal-to-metal “clunking” sounds during this time as the cam and drive pulley disengage.

The washer runs this program when the agitation cycle first starts, when power is restored if lost during agitation or when the user restarts the washer if paused.

Once the Mode Shifter Agitate Program has completed (18 seconds), agitation begins. During agitation, the inverter continues to supply 30 VDC (PWM) to the mode shifter coil. This voltage is sufficient to hold the mode shifter cam away from the drive pulley throughout the remainder of the agitation cycle.

The inverter motor controls the speed of agitation. The agitator stroke rate is approximately 30 strokes per minute. This rate is the same for all cycles.

The speed of the motor controls the arc. At fast speed, the arc is approximately 360 degrees.
At slower speeds, the arc is substantially less. It is the distance of the arc that determines normal or gentle wash cycles.

Mode Shifter Operation – Spin

At the beginning of the spin cycle, the inverter runs a short sequence (approximately 30 seconds)
to make certain the mode shifter cam is engaged with the drive pulley. The inverter does not supply voltage to the mode shifter coil during this sequence. Since the coil is not energized, the spring loaded cam drops down into the teeth of the drive pulley.

During this time, the motor also rotates clockwise and counterclockwise in short strokes
to ensure the cam has engaged with the drive pulley. This 30 second operation is called the Mode Shifter Spin Program. It is normal to hear metal-to-metal “clunking” sounds during this time as the cam and drive pulley engage.

Notes:

If the washer is paused while in agitation, it is NORMAL to hear sounds for an additional 30 seconds as the inverter control runs the Mode Shifter Spin Program to de-energize the coil and enter a pause state.

If the washer is in agitation and power is lost, the inverter control will run the Mode Shifter Agitate Program when power is restored.

If the washer is in spin and power is lost, the inverter control will run the Mode Shifter Spin Program when power is restored.

To help prevent out-of-balance conditions, the last 10 seconds of agitation on certain cycles will be short, fast strokes to help redistribute the clothes load prior to entering the spin cycle.

Checking the Mode Shifter

Most of the problems we see in the field with the Mode Shifter are electrical rather than mechanical. The Mode Shifter has a coil inside of it with a two-wire harness, a red and yellow wire, that supplies power to the coil. The most common failure is that the Mode Shifter coil burns out, reads open on a continuity test. Disconnect the red/yellow wire harness and use your meter on Rx1K and check continuity. If it’s open, replace the Mode Shifter assembly.

Here’s what the Mode Shifter looks like, click the image to purchase:
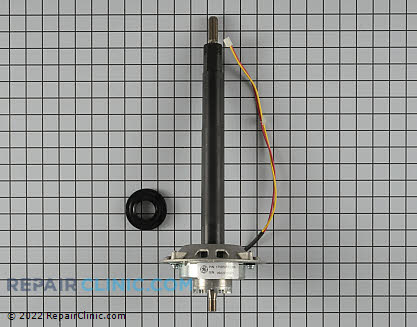
Mode Shifter
(Click image)

Return policy on all parts purchased through this website is 365-days. Even on electrical parts already installed.

To learn more about your washing machine, or to order parts, click here.