Category Archives: Dryer Repair

Replacing the Belt on a Maytag Dryer – Model LDE9824ACE

Sublime Master Trying to help offers some indispensable tips on this repair to a young apprentice in the Samurai Appliance Repair Forums, including a link to the service manual. Come on, let’s listen in…

If you need to buy the belt or any other part for your dryer, buy your appliance parts here. Domo!

To learn more about your dryer, or to order parts, click here.

Electric Clothes Dryer Power Cord Conversion

susan wrote:

I need to change the wiring on Electric clothes dryer from 4 wire to 3 wire plug. original 4 wire was color coded but the 3 wire is not. am i to assume that the middle one is the neutral and the other two can go on either post? Hope you can help me – thanks!

When it comes to electrical stuff, I follow this hard and fast rule: NEVER ASSUME ANYTHING! And the truth is that in this modern age of readily available, inexpensive (even after accounting for inflation), and easy-to-use multimeters, you don’t have to!

Let’s take a look at your three-wire power cord, like this one ratcheer. 3-Wire Dryer Power Cord, click it to git it, Slick. Notice that it has two straight spades set at an angle and the middle spade is L-shaped; this is so that it can only fit into special electric dryer outlets like this one. That L-shaped spade is for the neutral connection and should correspond to the middle conductor. Note that I said “should.” This is where we get to the part about not assuming anything; and we don’t have to ‘cuz it’s easy enough to verify using our multimeter.

What’s that you say, you don’t even have a multimeter much less know how to use one? Well, now, that’s a problem that’s easily remedied! Kommen zie hither, bittë, and grok ye on my world-famous quick ‘n eazy guide to making basic electrical measurements. Go on, click it and read it over real quick-like, I’ll wait. Pay particular attention to the part about making continuity measurements ‘cuz that’s where we’re going with all this.

See? Was easy, da tovarish? Now, just take your multimeter and set it to measure resistance so we can do a continuity check. With one probe on the L-shaped spade and the other probe on the middle terminal at the other end of the cord, you should read full continuity. If you do, then you’re good to go– you have just verified that the middle wire of the cord is the neutral wire.

To learn more sweet mysteries of dryer cord wiring, come hither. And if you need parts, repair manuals, or accessories for your dryer, come git you some!

To learn more about your dryer, or to order parts, click here.

Maytag SE1000 Dryer Flashing Error Code 6E

The 6E error code on this dryer part of this pretty decent stacked laundry unit means there’s a temperature control problem. Le Manuél identifies three suspects: thermistor, wire harness, and control board. Now, if you were to put on the blinders and go by only what Le Manuél says, you may miss something else altogether that’s causing the problem. A clever DIYer posted the results of his struggles with this very problem. I’m posting his report here for your edumucation not so much for what he found, but to illustrate the process of troubleshooting and problem-solving needed to fix anything, whether it’s a broken dryer or a broken economy. The mental skills are the same: you need to be willing the see the problem as it really is so that you can apply the correct remedy. In other words, the first step to problem solution is problem identification. And not all problems have cookbook solutions. The single best tool you have in appliance repair– or in any other problem you’re grappling with– is that oil-based computer betwixt your ears.

I thought the following may be of interest to anyone tussling with the Maytag SE1000 stacked dryer-washer unit. I have been experiencing an intermittent problem of the unit dying with the cryptic message 6E on the dryer readout. I discovered this was fixed by jiggling the connectors to the microprocessor board. But finally, it died and didn’t come back to life, no matter how I harassed it.

So I took the microprocessor board out of the unit and looked it over very carefully with an Optivisor, in the hope of finding a bad connection or something else which might explain this behavior. Because the message 6E is supposed to mean that the ambient temperature is too low, I concentrated on the wiring to and from the thermistor. Then I found that the thermistor, which is off the board, is connected in series with a small potentiometer, which is mounted on the processor board on the opposite side to where the connectors are. So it is hidden until you remove the board and panel unit.

This potentiometer was faulty. It registered a much higher resistance than it should have, and I found it was prone to go open circuit when I stressed the board slightly. So I presume that the frequent temperature changes in the dryer cabinet have, over the years, caused the potentiometer to wear a dead spot in its track. By simply turning the potentiometer very slightly, I was able to get it off the dead spot and found it working properly again.

It doesn’t surprise me at all that a potentiometer in that environment would be a weak link with a high expectation of eventual failure. But tweaking a pot sure beats paying $300 for a new processor board!

To learn more about your dryer, or to order parts, click here.

How to Clean Out the Blower Chute in a Whirlpool-built Dryer

From: Carol
Subject: When you were offline (via LivePerson)

We have an old kenmore gas dryer (model # 110-77884100). The lint trap screen is about 2 feet long by 6-8 inches wide. As I was putting it back into the slot after cleaning the screen off, I pushed some plastic part (about 2 inches long) off of my child’s car seat into the lint trap. I turned on the dryer thinking it was a enclosed box (the lint trap) but it didn’t sound like that after turning it on. I know, most important thing to remember is to not keep stuff on top of the dryer. Now I’ve learned the hard way! My question is how to get to that long lint trap without having to take apart the whole dryer (if possible). Please send me some good news soon as I have two loads of wet clothes sitting in a damp basement and I have no where to hang them!!! Thanks.
Sincerely, Carol

_______________________________
The above message was sent when you were offline, via your Timpani site.

Message sent from IP: 71.63.150.208

Blower Wheel Access on a Whirlpool-built DryerPiece of pie, tovarish! Just remove the back panel (a dozen or so ¼” hex screws around the perimeter, they’re obvious) to expose the blower wheel chute. Then, remove the chute retaining screws and, WALLAH! there you be. Remove the offending debris and you’re back in bidness. Click the thumbnail pic shown here for a closeup shot of this appliantology technique. If you need parts for your dryer, come git you some!

Still confoosed, Grasshoppah? Come see us in The Samurai School of Appliantology.

Replacing a Bad Heating Element in an Electric Dryer

From: Jeffery P.
Subject: When you were offline (via LivePerson)

Quick Question.

I have a Roper Drier and the Heating element is bad. I tested it by disconnecing all wires and check continuity and there is infinite resistance so it is no good. The question is if I replace that, is there anything else I should replace along with that?

_______________________________
The above message was sent when you were offline, via your Timpani site.

Message sent from IP: 64.252.209.91

Quick Answer:

No.

Perspicacious Caveat:

Use all wires and connectors, if any, included with the replacement OEM heating element kit.

Valorous Parts Guidance:

If your Roper or Whirlpool electric dryer is less than 12 years old, this is probably the replacement element you need. And regardless of the brand or age of your dryer, you can find replacement heating elements or any other part, as well as dryer disassembly help ratcheer.

To learn more about your dryer, or to order parts, click here.

Dryer Takes Forever to Dry a Load of Clothes

From: Janice
Subject: When you were offline (via LivePerson)

I am renting a condo which has a Kenmore stackable washer & dryer, model no. 88752. The dryer does not dryer my clothes in 40 minutes, I end up having to run the load another 30-40 min. And I am not overstuffing the dryer. I have cleaned the lint filter, what else could be the problem. Meanwhile, my elec. bill is climbing, I have resorted to an old-fashioned clothes line which actually works well in the Florida sunshine but not always practicable on rainy days. Plus I am a working gal. Please help. My landlord is sending a repairman over but I have a feeling he will say it’s heating okay. Never gets super hot. What do you think?

_______________________________
The above message was sent when you were offline, via your Timpani site.

Message sent from IP: 67.132.198.254

This is a classic case of a bad dryer vent.

Let’s start with a quick, simple review of how dryers work. Dryers get clothes dry by doing two things: 1) heating them up so the water can evaporate and 2) moving lots of air to get rid of that evaporated water so that more can evaporate.

See, you can heat the clothes all day long but if the air above those clothes is already saturated with water vapor (i.e., at 100% relative humidity), then all you’re gonna have is warm, wet clothes because the air can’t hold anymore water vapor. Now you begin to understand why the dryer vent is so crucial… and so misunderstood.

“Yeah, nice theory, Samurai Poindexter, but what does this mean about MY dryer; I, ME, MINE!”

Oh, take a pill already. Pull your stacked dryer monstrosity out from the wall and look behind there. I’ll bet you’ll find that collapsible, spiral wound duct material for your dryer vent. What happens to that material when you push the dryer back against the wall? Right: it gets crushed. And what does that do the air flow through the dryer? Hey, is that a light bulb I just saw go on over your head or is it the light of my own brilliance?

With this enlightened understanding of how dryers work, you are ready to grok the Ultimate Dryer Venting Guide.

Kenmore Dryer Dead

From: Jerry
Subject: When you were offline (via LivePerson)

my kenmore dryer will not do anything. it is getting correct voltage and the door switch checks good. from what i have read here, it could be a thermal fuse. however i can’t find it. it is a 110.63012101

_______________________________
The above message was sent when you were offline, via your Timpani site.

Message sent from IP: 72.150.96.56

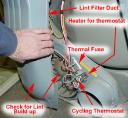
You’re on the right track– an open thermal fuse kills power to the motor circuit in most dryers. To drive this nail home, all you need to do is go to my dryer disassembly page, look up your dryer (Whirlpool-built, with lint filter on the top panel), and sing along with the disassembly instructions.

Once you locate the thermal fuse and have it nestled in your furry palm, test it with your multimeter to see if it’s open or closed; open = bad, closed = good. For common replacement parts, including the thermal fuse, come check out this convenient page, thoughtfully constructed with YOU in mind.

To learn more about your dryer, or to order parts, click here.

Whirlpool Duet Sport Dryer: Diagnostics and Fault Codes

The Whirlpool Duet Sport dryer uses an “electronic control system” consisting of a dime-store calculator LCD display, a plastic touch pad, and a cheesy circuit board, all made in a Chinese sweat shop.

Begin call for sanity:

Dryers are simple, humble machines that do three things: tumble the clothes, get ’em warm, and move a lot of air. Why would you want or even need an over-priced failure-prone “electronic control system” for a friggin’ dryer? I can almost understand it for a refrigerator or a gourmet oven, but a dryer? Putting an electronic control board in a dryer is like installing a GPS nav system on a kid’s tricycle. Enough! Stop the madness! Friends don’t let friends buy dryers loaded with over-blown electronic crap.

End call for sanity.

You can run several diagnostics tests on the Duet’s electronic control system– most of which you’ll use to see if the wanton electronics are working right. Before starting the diagnostics tests, the dryer should be in standby mode, which simply means that all indicators are off and the dryer isn’t running.

To enter the diagnostic mode, choose any selector button other than Pause/Cancel and do this little keyboard dance:

Press and hold for three seconds,
release for three seconds;
press and hold for three seconds,
release for three seconds;
press and hold for three seconds.

A control console guide is shown below, click it for a larger view:

Whirlpool Duet Sport Dryer Console

You’ll know you’ve entered diagnostic mode because all the indicators on the console will light up for five seconds and you’ll see the code “88” in the Estimated Time Remaining display. And you’ll feel love for the Samurai bubbling up from within your heart and an overwhelming desire to buy him a brewski— it’s beautiful and totally normal, just go with it.

If there are no fault codes stored in the board, then all the indicators will momentarily turn off, then come back on and stay on; the “88” will remain in the digital display. OTOH, if there are fault codes stored in the system, the most recent will alternately show (such as F-22), then the display will switch to show “XX.” If there is an active fault code, meaning that a fault code appears in the display when you try to use the dryer to dry some clothes, it will be flashing on the display. A complete listing of all the fault codes in the Duet Sport dryer is shown below, click it for a larger view:

Whirlpool Duet Sport Dryer Fault Codes
Uploaded with Skitch!

Advancing Through the Diagnostic Procedures

Pressing More Time will toggle the left digit on the display; pressing Less Time will toggle the right digit on the display. In both cases, the control should beep. You can quit diagnostic mode at any time by pressing Pause/Cancel.

Now, it may happen that when you toggle these buttons, you don’t see anything happening on the display and you don’t hear any beeping– nuttin’, honey. After cursing superfluous electronics in appliances that just don’t need them and after appropriately berating yourself for not heeding the Samurai’s sage warning against appliances infected by shoddy electronic controls, then it’s time to cinch up your azz strap, Bubbalouie, cuz yer goin’ in. You’ll need to open the control console and check closely for a loose connection on the P5 connector on the electronic control board. Make sure that the control housing assembly is properly inserted in the front console. Next, kill power to the dryer for about five minutes. If, after doing these steps, the indicators still won’t light, then guess what? Yep: fried control board– come git you one. I would say, “I told you so,” but I’m better than that.

While you’re in the diagnostic mode, opening the door should cause a beep and an alphanumeric number should show on the display. When you close the door, there should be another beep and the control should go back to “88.” (For those of you in Palm Beach, “alphanumeric” means they’s a number and a letter; oh yeah, we professional techs know how to work with both of ’em, that’s why we make the big money. )

To test the moisture sensor while in the diagnostic mode, open the door and bridge the metal strips on the face of the lint screen housing with a wet cloth. If the sensor is good, you’ll hear a beep and get treated to another meaningless alphanumeric number on the display.

To test the motor, heater and console ID, close the door and press the Start button. The motor and heater should turn on and the display will show a meaningless console ID, such as 9b, 9C, 9d, 9E, or 9F to give the impression that important information is being presented for your contemplation because, after all, it’s an electronic beep-beep board chock full of codes and other crap that don’t really mean anything but look ominous and important. While the dryer is running during this procedure, pressing the Start button again should turn the motor and heater off, and the display to again show “88.”

If a diagnostic procedure doesn’t give any useful information (hint: usually won’t), then it’s time to get the tech sheet from inside the console and do some real troubleshooting using the wiring diagram, your meter, and that grey jelly betwixt your ears. If you need more help, come start a new topic in the Laundry Forum and we’ll walk you through it.

To learn more about your dryer, or to order parts, click here.

Whirlpool Duet Sport Dryer: Gut Check

The Whirlpool Duet Sport is skulking around the Ameedican market. The one schweet thing about this dryer is that you can get to all the guts via the top or front panels– no need to pull it out from the wall in violation of the 10th Law of the Prophecy.

Whirlpool Duet Sport Dryer:  Guts

Disassembly follows the same procedure as for the Whirlpool-built dryer with the lint filter in the door, see this page.

BONUS: Here’s a field report from Sublime Master of Appliantology Nickfixit on a recent service call he did on one of these dryers:

Hi Guys,

By some stroke of luck I got to work on a Whirlpool yesterday. It was a Duet Sport Dryer about 3 months old. The drum belt was broken, and I was lucky enough to have it on the truck.

My first observation is that it’s sort of a pain to install. I had to take the console and front off to do it.

The second issue is the spring on the idler pulley. I could not believe how strong that idler pulley spring was. It takes both hands and major strength just to push it back enough to get the belt installed. I’m serious, it really is monstrously strong. I’d guess that spring is at least 5 times stronger than the regular Duet.

I’ll bet if you left 100 new ones in the box for 6 months, you would find most had broken belts just from the spring pressure on the idler.

I’ll bet we will be doing a lot of these belt jobs in the near future.

Nick

Kenmore Dryer Stopped Working

My Kenmore Dryer stopped working. It gets power because the cycle dial turns when plugged in. I keep reading about tripped circuit breakers on dryers in the forum but have no idea where they are located. Please help. Thank you

_______________________________
The above message was sent when you were offline, via your Timpani site.

Message sent from IP: 68.37.6.13

Sounds like your dryer has a case of what we professionals call thermal fusitis. That is, the failure of the autonomic nervous system to respond to normal nerve impulses thus preventing the bowels from releasing… oh, wait, sorry, that’s constipation. Thermal fusitis is a malfunction characterized by a thermal fuse which has become electrically open thus disrupting the motor power circuit. This page will help you locate the thermal fuse and this page will help you test it. You can buy the replacement part here. If you’re still tho berry, berry confoosed, come talk to us in the Samurai Appliance Repair Forum.

Venting a Dryer into the Attic

Question: We are building a new house. Want to put in stackable washer and dryer. Can we vent dryer through ceiling into attic or does it need to go out side wall?

_______________________________
The above message was sent when you were offline, via your Timpani site.

Message sent from IP: 4.131.127.104

Ahh, this reminds me of a limerick me Papa-san used to tell me when I was but a whelp:

There once was a yankee from Natick
Who vented his dry’r in the attic
But the attic grew moist
And the black mold rejoic’t
So he fled from his home in a panic.

Thank you, thank you very much. I’m here all week. Tell your friends. 8)

How to Know When to Replace the Drum Rollers in Your Amana Dryer

If your dryer rumbles and bumbles when you run it, then you probably need to replace the drum rollers. This page will help you take the dryer apart so you can check ’em out.

If your drum rollers look like this:

Dryer Drum Roller: Nuked

…then you need new rollers. Come git you some.

Actually, that’s one of the worst cases of roller wear I’ve seen. The rollers are also bad if they’re stiff or if they make a chattering sound when you spin ’em with your fingers.

These rollers are sold individually. As long as you’re going to the trouble to replace one, go ahead and replace the other one for just a few bucks more because it’s not long for this world. So buy two.

You’ll also need these snap ring pliers to remove the snap ring that holds the drum roller on the shaft. And you’ll like this service manual for Amana dryers.

How to Clean Out the Blower in an Asko Dryer

Clues that you may need to clean out the blower (fan wheel) in your Asko dryer:

– The dryer heats but takes a long time to dry the clothes. Also see this page.

– The dryer makes a disconcerting rumbling noise and/or vibrates while running.

How to Clean out the Blower in an Asko Dryer

Just be careful in there, you never know what you’ll find. You may even run into the dreaded dryer blower lint rat:

Lint Rat Retrieved from an Asko Dryer Blower

NOTE: I am a professional– do NOT try handling the lint rat like this at home!

You can order parts for your dryer or get more help in the Samurai Appliance Repair Forum.