Category Archives: General Appliance Wisdom

Cheesedork Alert!

Ralph, from Milwaukee, Wisconsin (IP address: 64.108.132.31), rang me up for live help on his Frigidaire dryer today. As with all chat conversations, the transcripts are saved and I’ve presented it here for your amusement and enlightenment.


Samurai Appliance Repair Man: hi, ralph. how can i help you?

ralph: hello

ralph: on afrigidaire dryer model fdg546resi i need to know where the two fueses [sic] are

Samurai Appliance Repair Man: ok, let me explain how i can help you with this in live help…

Samurai Appliance Repair Man: (below is the pre-written explanation of the Live Appliance Repair Help service offered here at Fixitnow.com that I inserted into the chat window.)

I’m an appliance repair expert and I can help you fix your appliance right here, right now, while we’re chatting. During your live help consultation, I can post illustrations, diagrams, and tricks-of-the-trade, and point out the part(s) that you need to fix it yourself. To help recover the cost of offering live help, I need to charge a very modest consulting fee of only $15. Your live help consultation continues for as many separate chat sessions as it takes to completely solve your problem. It’s a great deal and you’ll save many times that amount by fixing it yourself with the help of an expert!

When you click the button below to make your payment for your Live Appliance Repair Consultation, you’ll be taken to the secure Paypal site where you can safely enter your payment information. You can do this right now, while we’re still chatting. I’ll instantly receive notification of your payment and then we’ll go to work on your appliance. Usually, I can solve your problem in one session. But if it does require more sessions, there is no additional charge. Additionally, at the end of each chat, you’ll have the option of having a transcript emailed to you so you’ll have a permanent record of what we talked about. Let’s get started!


all major credit cards accepted, eChecks, too!

Samurai Appliance Repair Man: do you have any questions about how live help works?

ralph: well then i guess i will go to the libaray [sic] and get the manual and you can take your $15.00 cost and shove it


Cranial-Rectitis:  What are you looking at?As you can see, Ralph is suffering from an acute form of cranial-rectitis, cheesedork variation. This diagnosis is supported by Ralph’s naively mistaken notion that information on the internet, and especially live appliance repair help, should be free. Unfortunately, software makers and website hosting companies do not share in this delusion.

Today’s Cheesedork Alert was brought to you by the letters K and Y.


Appliance Tip of the Day: “How Much is a New One?”

appliance tip of the day archiveOne of the most frequently asked questions we hear from our customers when contemplating whether or not to repair their appliance is, “How much is a new one?” This article gives you some insight into the major appliance market that will help you make the best decision.

The first thing you need to realize is that retail prices for major appliances have stayed flat over the past 15 years even though manufacturing costs and inflation have risen steadily during that time. Manufacturers have been forced to cap their retail prices because their marketing people know that most people won’t pay increased prices for the typical home appliance. So, where $400 would buy you a top-quality washer 15 years ago, that same $400 today would only buy you a low-end machine that you’ll be throwing away or repairing every three to four years. What has changed?

The difference between the $400 washer of today and yesterday (or the $300 dishwasher or the $350 range, or the $300 dryer, or the $600 refrigerator, etc.) is in the internal components used in the machines. The lower end machines today are constructed of lower quality materials than similarly-priced machines 15 years ago. In part, this is attributable to the globalization of manufacturing with various internal parts made at different plants all over the world. While this has allowed manufacturers to cap retail prices for low-end machines over the last 15 years, it has also contributed to a degradation of quality.

You can still buy high-quality appliances but you’ll pay a correspondingly higher price tag for them– one that realistically reflects the increased costs of manufacturing high quality machines. For example, top-end dishwashers go for around $900, washers around $1,100, dryers for around $600, etc.

So, if you’re comparing having your existing machine repaired or replacing it with a low-end machine that is comparable in price with what you paid for your machine 10 to 15 years ago, you’re simply not making a valid comparison because they are not similar machines in either quality or durability. If you were to merely replace your existing appliance with one that costs about what you paid a decade ago, you’ll be repairing or junking the new machine every three to four years. The appliance game today is that you either pay more up front for a new, high-quality machine that will give you another 15 years of trouble-free operation or you pay less up front for a low-end machine and then pay-as-you-go for repairs.

The other cost associated with buying a new appliance are the “aggra-dollars.” That is, the aggravation and time spent that goes along with shopping for a new appliance, having it delivered, getting it installed, and disposing of your old one. If you’ve not experienced this joy recently, you’ll realize that the aggra-dollar factor can be a very significant cost.

So, when asking, “How much is a new one?” you need to consider both the quality of its replacement and the time-saving convenience of having your appliance properly repaired by competent professionals like myself or by fixing it yourself with the help of a genuine manufacturer’s repair manual.

When I do repairs, I use only factory-authorized parts and my work is guaranteed for one year parts and labor. I schedule repair appointments at your convenience and the complete repair cost is quoted up front. I will diagnose and evaluate your appliance to determine if it’s in your best interest to repair or replace it and make a recommendation accordingly.


grasshoppers contemplating the purchase of a new appliance after hearing the master wax eloquently on 'how much is a new one'

Appliance Tip of the Day: The Hard Facts About Hard Water

appliance tip of the day archive
Complaints about the washer or dishwasher not cleaning very well are one of the more common ones I get asked by grasshoppers at my website and from paying grasshoppers in the field–also known as customers. The first thing I always like to figger out in these cases is how hard the water is. What’s water hardness and why’s it so ding-dang important? Well, Hoss, hang on ’cause I’m gonna ‘splain it to you.

Hardness is a term them fancy-pants engineers use to talk about dissolved minerals, mostly calcium and magnesium, in the water. Water picks it up as it flows in rivers or in aquifers under the ground, dontcha know. It varies from place to place according to the types of rocks you got.

Anyway, them fancy-pants engineers went on and created a way of measuring hardness. They call it grains per gallon, and you’ll see ’em write it as "gpg." So, the more grains of calcium or magnesium dissolved in each gallon of water, the harder it is.

So, what’s wrong with having a little calcium and magnesium in the water? Nothing if it’s just a little, like less than 3 gpg. But, when you start getting water with 10 gpg or more, you gots what we in the trade call, "hard water." And if it’s more that 14 gpg, it’s called "damn hard water." Y’see, Hoss, in a washer or dishwasher, these little calciums and magnesiums suck up the soap or detergent leaving less of it available to clean the crud off your clothes or dishes. As a result of water hardness, it takes more soap or detergent to get your clothes or dishes to an acceptable level of cleaness. Now you see why I always wanna find out what the water hardness is when I’m dealing with a poor cleaning complaint?

Now here’s something else to think about. The detergent instructions on the box are based on average hardness. Average hardness in the U.S. is defined as 6.6 gpg and 6.1 gpg in Canada. Now this cuts both ways, Hoss, hang with me for a minute. What if your actual water hardness is only 2 gpg but you’re putting detergent in your washer based on the directions on the box (typically a standard "scoop" or "capful")? Well, it don’t take a certifiable appliance guru like myself to figger out that you’re using too much freakin’ detergent! You’re not only wasting money, but you’re wearing lots o’ that stuff in your clothes, too.

Awwite, what if your actual water hardness was 15 gpg and you’re putting in detergent according to the amount on the box? Why, it means you are one dirty dude ’cause your clothes ain’t getting clean when you wash ’em. Think about that next time you put on a pair of "clean" underwear.

Not only is hardness a problem from the standpoint of cleaning your stuff, it messes up your appliances, too. Oh sure, after a while, all kinds of "scale" from the hardness collects on the innards of your washer and dishwasher and screws it all up. But hey, I love the work it generates so I ain’t complainin’!

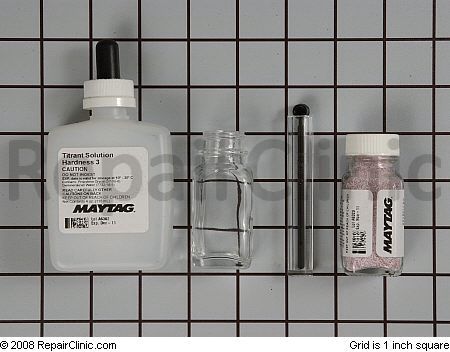
Now, the question you’re all axin’: "how do I measure the hardness of my water?" Piece of pie. Come git you the Maytag Water Hardness Kit. Easy to use and just takes a second.

Water hardness test kit

Well alright then.


grasshoppers sitting with the master wearing freshly washed robes free of detergent residue because they treated their hard water and adjusted their detergent usage accordingly

Appliance Tip of the Day: Use and Care Manuals

appliance tip of the day archiveJust moved into a house or you’re renting a place and you can’t find any of the manuals to your appliances? Ahh, Grasshopper, unforrow that brow and unbunch those panties because you can get replacement owner’s manuals for most major appliances, usually for free and conveniently online, too.


grasshoppers relaxing with the master after flipping through the owner's manuals for their appliances that they downloaded for free on the web

Appliance Service Calls

I’ve always had a bushy head of hair and I usually don’t bother trimming my beard. So, this is how I used to look when I’d go out for a service call:


before the shearing

But I starting thinking maybe I was scaring my customers. I dunno, little things, like I go up to the house and knock on the door and they’d answer with a shotgun in their hands. So, I figgered I better git me a hair cut and now I look like this:

after the shearing

And would you believe that when I go out on service calls, I still get people answering the door armed!? That’s what I love about this bidness–there’s just no telling what people will do!

Appliance Tip of the Day Encore: Genuine Appliance Manufacturer’s Repair Manuals

appliance tip of the day archiveYes, Grasshopper, your journey into appliance repair excellence begins with good technical information. While it’s true that Fixitnow.com is the Muthah of all appliance repair websites and offers an extensive online library of information, a do-it-yourself repair forum, and live help, there’s just no way we can reproduce all the esoteric information contained in genuine manufacturer’s repair manuals. Something about copyright laws, I dunno. Anyway, a good repair manual can be a valuable adjunct to the vast repository of appliance wisdom here at Fixitnow.com. Come git you some.


Whirlpool / Kenmore Repair Manuals GE / Hotpoint Repair Manuals
Washing Machine (Direct-Drive) Repair Manual Washing Machine Step-by-Step Repair Manual
Washing Machine (Belt-Driven) Step-by-Step Repair Manual Dryer Step-by-Step Repair Manual
Dryer Step-by-Step Repair Manual Refrigerator / Freezer Step-by-Step Repair Manual
Dishwasher Step-by-Step Repair Manual Dishwasher Step-by-Step Repair Manual
Ice Maker Do-It-Yourself Repair Manual Electric Range Step-by-Step Repair Manual
Trash Compactor Manual (this space intentionally left blank)
Refrigerator / Freezer Do-It-Yourself Manual (same here, move along)

Maycor Repair Manuals Speed Queen & Amana Manuals
Maytag, Jenn-Air, Magic Chef & Admiral Top-Freezer Refrigerator Amana Washer Repair Manual (newer one-belt style)
Maytag, Jenn-Air, Magic Chef & Admiral Side-by-Side Refrigerator Speed Queen Dryer Repair Manual
Maytag SE100 Stacked Washer and Dryer Sub-Zero Technical Service Mini-Manuals
Maytag Neptune Front-Load Washer Repair Manual Series 500 Models
Maytag Performa Washer Repair Manual Series 600 Models
Maytag Atlantis Washer Repair Manual Series 700 Models
Frigidaire Repair Manuals (this space intentionally left blank)
Next Generation Side-by-Side Refrigerator Repair Manual Microwave Ovens and Ranges
Front Load Washer Manual Repair-master Microwave Oven and Ranges Repair Manual (covers most American built models)

grasshoppers thumbing through genuine manufacturer's repair manuals with the master

Appliance Usage Handbook

Ahh, yes, the Appliance Usage Handbook: the bible of optimal appliance usage. This fine comprehensive reference was compiled by Maytag and is invaluable for answering questions on using your washer and dryer, dishwasher, stove and refrigerator.

Additionally, this valuable handbook contains information on the basic operation of all household major appliances, regardless of brand. I refer to it all the time when answering appliance questions. It’s a two-inch thick, three-ring binder crammed full of arcane and exceedingly useful appliance information such as:

  • answers to common appliance usage questions,
  • solutions to common problems,
  • energy conservation ideas,
  • stain removal for washers and dryers,
  • cooking basics for stoves,
  • what not to wash in your dishwasher and why,
  • and tons of other stuff too detailed to get into here.

Oh, I know what you’re saying. You’re saying, "Ok, Samurai Cyclops, how do I get one?" Great question! I will send this cornucopia of appliance wisdom as a gift to the first five grasshoppers who contribute $25 or more to the United Samurai Beer Fund. That’s right, I only have five copies left. If you’ve been thinking about making a contribution to the Beer Fund but have been putting it off because you had to pull hair outta the drain or something, then this little pearl should be enough to nudge you into going ahead and doing it. Go ahead, all your other friends are doing it.

Appliance Tip of the Day: Troubleshooting and Repairing Major Appliances

appliance tip of the day archive
you need this book!Troubleshooting and Repairing Major Appliances. If you need to learn the fundamentals of appliance repair, like how to make basic electrical tests, how to read a schematic diagram, testing a refrigerator defrost timer, how to read a washer timing chart, and lots and lots of other cool fundamental stuff then buy this book. Don’t tell anyone, but I still look stuff up in this book when I need to freshen up on the fundamentals. And if you’re just getting started in professional appliance repair, this book is a must-have.


grasshoppers sitting with the master thumbing through their copies of Troubleshooting and Repairing Major Appliances

Appliance Tip of the Day: Money Saving Tips for Commercial Kitchens

appliance tip of the day archiveHere are some cool tips from The Gasket Guru for your restaurant or commerical kitchen that’ll save you $$.

Your restaurant’s profit is typically only 3 to 9 percent of total revenue! Money you save on operating costs adds to what you keep. Saving 20 percent on energy operating costs can increase your profit as much as one-third. Wouldn’t savings like that be worth a second look?

Fun Facts to Know and Tell

  • An average restaurateur spends 2-4% of every dollar on utilities.
  • Electricity is typically a restaurant operator�s greatest utility expense.
  • A typical restaurant divvies up its energy dollars to: cooking (23%), space heating (19%), water heating (19%), lighting (11%), and other needs.
  • Compared to a sit-down restaurant, a quick-service restaurant uses about 8% more of each energy dollar for cooling and refrigeration.
  • One broiler can use more energy than six fryers.
  • Saving 20% on energy can boost a restaurant�s profits by up to 33%.

Getting a Grip

  • Make a list of all equipment
    to be included in the program.
  • Develop data on each piece
    of equipment. Include energy source, input, purchase date and warranties. Record this in a book, on cards,
    or in your computer. List maintenance tasks that can be done by regular staff and those that should be
    referred to a qualified agency.
  • Determine exactly what maintenance needs to be done on each piece and the frequency
    with which it needs to be done. Certain functions such as �check for loose parts, grease or oil leaks
    and malfunctions� should be carried out each time the equipment is used. Others need to be done daily,
    weekly, or even once a year. Equipment checks performed each day should be incorporated into cleaning
    instructions and mounted beside or close to each piece.
  • The various maintenance tasks
    to be performed should be placed on a master monthly or yearly schedule and indicate how and by whom each
    function should be done. The master schedule should be referred to regularly.
  • Always list repairs, costs
    and dates completed on the records. As equipment ages, keep close check on repair costs. Although the
    replacement point will vary somewhat between types of equipment, a good rule of thumb is to replace when
    costs in one year total one half the original purchase price.
  • From time to time analyze
    the nature of repairs to determine if procedures should be changed. Frequency of parts failure indicates
    that they should be replaced before malfunction. An example of this is putting new door gaskets on refrigeration
    as soon as signs of wear are noticed.

Refrigeration

  • Tears or gaps in the door gaskets let all that expensive cold air escape into the kitchen. Call Mr. Appliance ASAP to replace the gaskets.
  • Keep the door gaskets clean and clear of unsanitary mold buildup. In addition to being a health code violation, molds produce acids that make the gasket brittle and subject to premature cracking and tearing.
  • Brush and clean the condenser once a month. A dirty condenser causes the compressor to run longer.

Solid-Top Ranges

  • Solid-top gas ranges will reach
    the proper cooking temperature after 10 to 20 minutes preheating. Additional preheating wastes energy.
  • Cooking utensils should make
    flush contact with the cooking surface. Dented pot bottoms increase operating costs.
  • Grouping cooking utensils will
    require fewer burners and uses less energy. Always turn down the flame when proper cooking temperature
    has been reached. The heat may be varied for different sections of the unit, thus eliminating the need
    for maintaining the entire cooking surface at peak heat.
  • While the surface is still
    slightly warm, clean the range with a heavy burlap cloth or steel wool. Remove grease or dirt lodged under
    flanges, lids, rings or plates. Never pour water directly on the range.

Open-top Ranges

  • Open-top ranges do not require
    preheating. To save energy, turn burners off when not in use.
  • Any type of cooking utensil
    may be used because the flame tailors itself to the shape of the utensil. For maximum efficiency and heat,
    regulate burners so the flame tips barely touch the bottoms of the cooking utensils.
  • Power burners should be considered
    for additional energy savings and efficiency. Maintain according to manufacturer�s recommendations.
  • After the range has cooled,
    wash grates, burner bowls and spillover trays. Use hot water and grease solvent if necessary. Clean food
    spillage from burner ports with a stiff wire. Clean entire range top with a solution of grease solvent
    when required. If the range has painted surface DO NOT use oven cleaner, or other harsh chemicals, wire
    brushes, or metal scrubbers, as these can damage the paint.
  • Use sealer strips on range
    batteries. These snap-on channels create a seal between adjoining ranges and help keep the spaces between
    equipment free of spilled food and grease.

Gas Griddles

  • Avoid unnecessarily long preheat
    times or overheating the griddle prior to or during use. Many new gas griddles preheat in 15 minutes or
    less.
  • A low or medium flame is adequate
    for light frying. During slack periods, turn down the burner or thermostat to conserve energy.
  • Cleaning is easier when the
    griddle is slightly warm. Consult manufacturer�s instructions. Some griddle plates are most easily cleaned
    with an abrasive griddle brick or screen. Some of the newer griddle surfaces should be cleaned with a
    brush, recommended griddle cleaner or water, to avoid scratching. After cleaning, wipe dry with an absorbent
    cloth.

Gas Broiling

  • Because gas broilers heat quickly,
    the flame can be turned low between operations. During slack periods, the broiler may be turned off completely.
    The super-fast, infrared broilers that require no preheating may be turned off after each use.
  • To save gas during slack periods,
    turn off the unused portions of a multiple-burner broiler.
  • An oven over a heavy-duty broiler
    should not be used for roasting or baking because it lacks thermostatic controls. It is a finish oven
    only for casseroles, au gratin dishes, meringues, etc.
  • Regular cleaning increases
    the efficiency of gas broilers and reduces operating costs. Empty the grease container at regular intervals.
    Wash and dry thoroughly. Scrape the upper and lower sides of the grids and clean with an oiled cloth.
    Scrub the broiler chamber. Wash and rinse the outside of the broiler, then wipe dry with an oiled cloth.
    Unclog burner ports with a stiff wire. Be careful with ceramic reflector units when cleaning.

Gas Ovens

  • Slow roasting � roasting at
    lower temperatures � reduces meat shrinkage, produces a juicier, tastier product and saves gas.
  • Know how long it takes your
    oven to preheat and schedule preheating according to the oven�s first use of the day. Many new gas convention
    ovens, for example, only take 10 minutes or less to preheat.
  • Because the oven will not preheat
    any faster, nothing is gained and gas is wasted by setting the thermostat higher than baking temperature.
  • Energy usage may be reduced
    by loading the oven to capacity and scheduling baking and roasting to take full advantage of �receding�
    heat. With large ovens, plan baking and roasting so the oven will not have to be brought up to full heat
    more than once or twice a day.
  • Gas convection ovens maintain
    a uniform temperature throughout, permitting use of multiple cooking racks, which increase production
    and save on kitchen space. When preheating and baking in these ovens use the fan at all times. Remember
    that cooking time is reduced and lower temperatures are necessary in the convection oven. With convention
    ovens, remember to include the fan in routine cleaning procedures.
  • A clean oven operates at maximum
    efficiency. Remove spills before the residue has carbonized. When the oven is cool, wipe the bottom. Scrub
    shelves frequently and clean the exterior when dirt and grease accumulate.

Gas Fryers

  • Fill kettle to capacity with
    high quality frying compound specifically designed for deep-frying, (Look for oil level mark stamped on
    the kettle.) If solid or semi-solid shortening is used, melt before adding to kettle, or use the fryers
    melt cycle.
  • Set thermostat for desired
    temperature. (Usually 325-350 degrees.) Never use temperatures higher than 375 degrees.
  • Limit preheat time to 10-12
    minutes.
  • Regular care keeps the gas
    fryer in good working order. Shut down the fryer completely when draining. Filter the fat and wipe the
    kettle clean daily. Once a week, fill the kettle with warm water to a level above the grease ring. Bring
    to a rolling boil and add manufacturer�s recommended cleaning compound. (Never us a caustic or lye solution.)
    Boil 30 minutes and shut off. Drain and refill the kettle with warm water. Boil and drain. Rinse kettle
    until it is free entirely of residue.

Gas Braising Pan

  • The gas-fired tilted braising
    pan, when used for grilling or saut� work, is operated in a manner similar to that of a gas griddle, thus
    the energy saving tops for griddles apply to braising pans.
  • Because braising pans are thermostatically
    controlled, preheating at a temperature higher than needed for cooking wastes gas and does not speed the
    preheating process. Also, preheating is not necessary for boiling or steaming.
  • Braising pans usually are equipped
    with lids so that heat and moisture can be retained, making this appliance a versatile cooking device
    for pot-roasting, steaming vegetables, defrosting frozen food, stewing, or holding foods for servicing.
    Using the lid whenever possible saves gas, while lifting the lid unnecessarily wastes energy.
  • Like a griddle, the pan�s surface
    can be damaged by the sharp edges of spatulas or other utensils.
  • Take care to avoid scratching
    or nicking the pan�s finish. Likewise, avoid heavy metal scrubbers or a wire brush when cleaning.
  • Other than for normal cleaning
    and an occasional greasing of the tilting mechanism, braising pans are relatively maintenance free. After
    food is removed, clean the pan while it is still warm. Soak if needed, and then flush with water to remove
    food particles completely. Scrub with a fiber brush and recommended cleaner. Rinse with clear water and
    dry.

Steam Equipment

  • Steam boilers, on self-contained
    units, require up to 20 minutes to reach operating pressure. Energy usage will be reduced by eliminating
    unnecessary preheating time and planning steam cooking to utilize the steamer�s full capacity. A variety
    of foods may be prepared at the same time if thought is given to their placement in the steamer compartment.
  • Compartment doors must be
    sealed tightly so energy is not wasted and cooking times unnecessarily lengthened. Steam escaping around
    the door�s sealing gasket indicates an incomplete seal caused either by insufficient pressure applied
    to the door handle or wheel when closing, or a worn gasket.
  • Should a pressure steamer
    compartment start taking longer than usual to come to pressure or become slower than other compartments
    on a multi-compartment unit, the automatic steam temperature actuated value, located at the real or side
    outside the compartment, may be defective. A faulty valve, which not only slows cooking times but wastes
    steam, should be replaced with one of the same type.
  • Because steam cooking is fast
    compared to other cooking methods, a timer should be used to prevent over-cooking and wasted energy.
  • Leave doors slightly ajar
    when the steamer is not in use. Daily, wipe the compartment with detergent and water, rinsing well. Keep
    door gaskets and area around opening free of grease. Use a soapy steel wool pad if necessary. Lubricate
    the door wheel (on outside) monthly. Remove the interior racks and run through the dishwasher.
  • Cleaning and maintenance of
    the broiler are vital to steamer performance and energy conservation. If the steam broiler is making steam
    for 8 hours or more, it should be drained or blown down twice daily, or about every four hours. When blowing
    down the boiler, full pressure should be used. Annually, schedule a complete boiler clean and descaling.

Water Heaters

  • Gas water heaters require
    ample combustion air to operate at full efficiency, so do not store items in positions that block equipment
    room air openings.
  • Water heater thermostats usually
    can be turned down to the lowest temperature setting overnight and on days the unit is not in use; however,
    the unit�s heat recovery capability first must be determined to establish the feasibility of such a practice.
  • Exposed hot water pipes should
    be insulated to improve the unit�s operating efficiency and thus save energy.

Sources:

The Gasket Guru
American Gas Association
Environmental Protection Agency


grasshoppers taking a break from a busy day at the tahi restaurant to sip some green tea with the master

Appliance Tip of the Day: Genuine Appliance Manufacturer’s Repair Manuals

appliance tip of the day archiveYes, Grasshopper, your journey into appliance repair excellence begins with good technical information. While it’s true that this website is the Muthah of all appliance repair websites and offers an extensive online library of information, do-it-yourself repair forums, and live help, there’s just no way we can reproduce all the esoteric information contained in genuine manufacturer’s repair manuals. Something about copyright laws, I dunno. Anyway, a good repair manual can be a valuable adjunct to the vast repository of appliance wisdom here at Fixitnow.com. Come git you some.


Whirlpool / Kenmore Repair Manuals GE / Hotpoint Repair Manuals
Washing Machine (Direct-Drive) Repair Manual Washing Machine Step-by-Step Repair Manual
Washing Machine (Belt-Driven) Step-by-Step Repair Manual Dryer Step-by-Step Repair Manual
Dryer Step-by-Step Repair Manual Refrigerator / Freezer Step-by-Step Repair Manual
Dishwasher Step-by-Step Repair Manual Dishwasher Step-by-Step Repair Manual
Ice Maker Do-It-Yourself Repair Manual Electric Range Step-by-Step Repair Manual
Trash Compactor Manual  
Refrigerator / Freezer Do-It-Yourself Manual  


Maycor Repair Manuals Speed Queen & Amana Manuals
Maytag, Jenn-Air, Magic Chef & Admiral Top-Freezer Refrigerator Amana Washer Repair Manual (newer one-belt style)
Maytag, Jenn-Air, Magic Chef & Admiral Side-by-Side Refrigerator Speed Queen Dryer Repair Manual
Maytag SE100 Stacked Washer and Dryer Sub-Zero Technical Service Mini-Manuals
Maytag Neptune Front-Load Washer Repair Manual Series 500 Models
Maytag Performa Washer Repair Manual Series 600 Models
Frigidaire Repair Manuals Series 700 Models
Next Generation Side-by-Side Refrigerator Repair Manual Microwave Ovens and Ranges
Front Load Washer Manual Repair-master Microwave Oven and Ranges Repair Manual (covers most American built models)

grasshoppers thumbing through genuine manufacturer's repair manuals with the master

Appliance News Update

Appliance Tip of the Day: Storing Flesh Meats Safely

Ever had food poisoning? You know, sitting on the toilet at 2 am, clenching a gallon-sized bucket in your trembling hands with the sluices wide open at both ends. Yeah, I hate when that happens. How ’bout we learn how to store flesh meats so we don’t have to deal with that bit of nastiness again? Ok, my little meat-eating grasshoppers, grab hold of those two large lumps right below your lumbar vertebrae and get ready for another wild romp into appliance enlightenment.

The table below shows you the recommended maximum storage times for various flesh meats in your refrigerator and freezer. Read it, learn it, use it, memorize it–pop quiz in the morning. Bon Appétit!

Flesh Meat:
Fresh, Smoked, Processed, Killed, or Run-over
Refrigerator Freezer
Fresh Cow, Pig, Sheep, or Baby Sheep
Chops, Steak, Roasts 3-5 days 4-9 months
Freshly Ground 1-2 days 3-4 months
Pig Meat
Bacon 7 days 1 month
Ham – Fully Cooked, Whole 7 days 1-2 months
Ham – Half 3-5 days 1-2 months
Ham – Slices 3 days 1-2 months
Hot Dogs
Sealed in Package 2 weeks 1-2 months
After Opening 7 days 1-2 months
Lunch Meats
Sealed in Package 1-2 weeks 1-2 months
After Opening 3-5 days 1-2 months
Sausage
Ground 1-2 days 1-2 months
Smoked Links or Patties 7 days 1-2 months
Chicken or Turkey
Whole 1-2 days 12 months
Pieces 1-2 days 9 months
Ground 1-2 days 3-4 months
Chicken Nuggets or Patties 1-2 days 1-3 months
Human Remains
Limbs 1-2 days 4-9 months
Organs 12 hours 4-9 months
Teeth 2-4 weeks 10-20 years
Road Kill
Squirrels 3-5 days 1-4 months
Deer 1-2 days 2-3 months
Moose 1-2 days 1-2 months

Sources: United States Department of Agriculture; Food Marketing Institute; Cooperative Extension Service, Iowa State University; New Hampshire mountain folk lore.

grasshoppers happily munching on various flesh meats with the master secure in the knowledge that they will not get food poisoning and because their bologna has a first name

Appliance Tip of the Day: Use and Care Manuals

appliance tip of the day archiveJust moved into a house or you’re renting a place and you can’t find any of the manuals to your appliances? Ahh, Grasshopper, unforrow that brow and unbunch those panties because you can get replacement owner’s manuals for most major appliances, usually for free and conveniently online, too.


grasshoppers relaxing with the master after flipping through the owner's manuals for their appliances that they downloaded for free on the web

Appliance Tip of the Day: Your Detergents Suck

There are many brands of commercially available detergents out there and they all SUCK. Why do they suck? Because they all contain fillers–inert, abrasive crap added to the detergent mix simply to take up space and to help clean your clothes or dishes by the abrasive action of the added silicates (sand). These fillers actually harm your dishwasher, washing machine, and clothes! Fillers in commercial detergents cause a whole host of problems including: clogging washing machine and dishwasher drain hoses, binding washing machine pumps, gunking up dishwasher impellers, creating foul odors in washing machines by providing nice homes for bacteria, creating leaks in dishwashers by working in between the tub gaskets and surfaces.

In addition to fillers, all commercially available detergents contain fragrances which give many people rashes, especially in sensitive nether regions, and other more subtle forms of allergic reactions, such as headaches and fatigue.

Many commercial detergents also add phosphates. For those customers on septic systems, phosphates are some of the worst things to put into your septic system. This is because phosphates are not readily biodegradeable and can accumulate in your septic tank creating nasty problems like overflowing and backing up.

Unless you enjoy adding these extra afflictions to your life, stop using those polluted detergents you buy at Piggly-Wiggly, SafeWay, or Wal-mart and start using real detergents that don’t have all that extra crap in ’em. “Ok, wise-guy Samurai, got any suggestions?” Sure do, thanks for asking.

Laundry Detergents

Power Formula Basic-L cleans clothes their whitest and brightest – especially when used with Nature Bright All-Fabric Laundry Brightener. Yet it’s easy on fabrics and gentle on sensitive skin. Basic-L also helps to guard against color transfer, so whites stay whiter and colors stay truer. Performs in all temperatures – even in hard water. If you have allergies and sensitivity to fragrances, Power Formula Basic-L Free, with no fragrance, dyes, or masking agents, is the product for you. Has the same powerful cleansing formula as Basic-L. Since it is sold as a concentrate, Basic-L saves you money, too. When used as directed, one nine pound box of Basic-L does the same number of loads as about 3.8 boxes of Arm & Hammer detergent.

Dishwasher Detergents

Use Basic-D Automatic Dishwashing Concentrate for sparkling clean dishes without all the added fillers. Cuts grease and baked-on food without chlorine. Top cleaning performance and phosphate free! Effective even in hard water. Again, this product is a concentrate and so saves you money. When used as directed, one 50-oz. box of Basic-D does the same number of dishwasher loads as 4, 45-oz. boxes of Cascade.

Try these products risk-free because they’re all backed by a 100% money-back guarantee! Best of all, your purchase helps support this free appliance repair website. Domo arigato!

grasshoppers enjoying their robes freshly washed in Basic-L without the embarrassing male itching

Appliance Recall Alert

Whirlpool is recalling the door latch wiring in their dishwashers with model numbers beginning with DU8, DP8, DU9, and GPD. An example model number affected by this recall would be DU8700XY-1. The problem is the wire harness in the door latch can overheat and possibly cause a fire. Whirlpool has issued a repair kit, part number 4387485, to correct this. The kit includes four wire harness connections in the door latch area, two door switches, a door latch bolt, a door latch lever, and instructions.