Download links in this post at the Samurai Appliance Repair Forum.
Frigidaire Double Wall Oven E30EW8CEPS3: Tech Sheet and Wiring Diagram
Leave a reply

Download links in this post at the Samurai Appliance Repair Forum.
Frigidaire Range Model CPLES399ECA: Wiring Diagram, Parts Manual, Timer Info, and (maybe) Service Manual => http://bit.ly/C4qzA
How to Replace the Ignitor in a Gas Oven: A Pictorial Guide– http://bit.ly/NB2ud
A common problem on ovens and ranges with the digital display is that the display starts to go dim after a while. It usually starts gradually and gets progressively dimmer until you can barely see it. You have two choices of repair tactics:
1. Replace the electronic control board, typical cost: $250. And there’s no guarantee that the display won’t dim again in a another couple of years.
2. Replace the capacitors on the control board, typical cost: $10. And you gotta be able to solder on printed circuit boards.
Here’s the inside scoop on what’s happening. The digital display is powered by very specific DC drive voltages. Theses voltages are created by a transformer and stabilized by capacitors, all of which are located on the control board. Most of these capacitors are only rated to a working temperature of 220˚F. Well, it don’t take a brain surgeon, like yours so very frikkin’ truly, to realize that over time the heat will reduce the capacitor’s ability to capacitate thus lowering the drive voltage and dimming the display. Awwite, that’s all the theory we need to know so let’s get into the generic strategery of this repair…
The specifics will vary with the exact layout and composition of the control board you’re working on but, generally, the flow goes like this:
1. Kill power to the unit.
2. Disassemble whatever you need to to get at the control board.
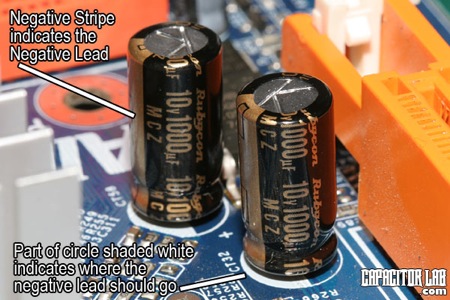
3. Locate the capacitors on the control board. Typically, there are three but, again, go with what you see. They’ll look something like this:
4. Make a list of the capacitors, noting the capacitance, working voltage, and temperature rating printed on each capacitor.
5. Go to your local Radio Shack and buy the replacement caps. It’s OK for the replacements to have a higher working voltage than the original but not lower. Try to buy the ones with the highest temperature rating you can get. And match the capacitance rating (usually given in micro-farads, μf) as close as you can to the original.
6. Unsolder the old caps and solder in the new one – soldering help here. Be careful to observe the correct polarity when installing the new caps!
Now go pop yourself a cold brewski and get me one while you’re at it. Mucho domos!
To learn more about your range/stove/oven, or to order parts, click here.
Lots of these old GE XL44 model family of ranges out there in use today. At some point, you’ll need to run diagnostic tests on the old girl. Could be an error code in the display, incessant beeping, or it just ain’t working right for some reason. In any case, putting the ERC (electronic range control– the digital display and the circuit board connected to it) into diagnostic mode is a good initial troubleshooting step because it’s easy as pie and you can check important stuff like:
Let this sacred scroll from the Appliantology scriptures be your faithful guide and guardian during your XL44 contemplations. And, as a bonus, it includes information on how to get to the door lock motor– another common troublemaker in this range.
To learn more about your range/stove/oven, or to order parts, click here.
GE strikes again! This time, they’re recalling a quarter of a million wall ovens sold under the GE, GE Profile, Monogram and Kenmore labels.
The problem is caused by the extreme heat used in the self-clean cycle escaping if the wall oven door is removed and incorrectly re-attached by the installer or the consumer. This can pose a fire and burn hazard to the hapless folks who bought GE-built appliances.
So far, 28 incidents of minor property damage have been reported in which adjacent kitchen cabinets have been damaged. No injuries have been reported.
The wall ovens were sold in white, black, bisque and stainless steel. The following model and serial numbers can be found inside the oven on the left interior wall. For microwave combination ovens, the serial number can be found on the left interior wall of the microwave.
GE Profile
Model Numbers: JCT915, JT912, JT915, JT952, JT955, JT965, JT980*, JTP20, JTP25, JTP28, JTP48, JTP50, JTP86
Serial Numbers Begin With: TD, VD, ZD, AF, DF, FF, GF, HF, LF, MF, RF, SF, TF, VF, ZF
Monogram
Model Numbers: ZET3058, ZET938, ZET958
Serial Numbers Begin With: TD, VD, ZD, AF, DF, FF, GF, HF, LF, MF, RF, SF, TF, VF, ZF
Kenmore (All model numbers start with 911)
Model Numbers: 4771, 4775, 4781, 4904, 4905, 4923*
Serial Numbers Begin With: 2T, 2V, 2Z, 3A, 3D, 3F, 3G, 3H, 3L, 3M, 3R, 3S, 3T, 3V, 3Z
If you’re a victim of one of these appliances, you should immediately inspect the oven to make sure you don’t have an incorrectly re-attached wall oven door, which will not open into the flat position. If the wall oven door is incorrectly re-attached, consumers should not use the self-clean cycle and call GE for a free repair. You can continue to use normal baking or broiling function in the oven until the oven is repaired.
For additional information, contact GE toll-free at (888) 569-1588 between 8 a.m. and 8 p.m. Monday through Friday, and between 9 a.m. and 3 p.m. Saturday ET.
Since this problem pertains to the self-clean function, this is a good time to review the use of the self cleaning feature in an oven. During self clean, the oven can develop temperatures in excess of 900˚F. I don’t care what the manufacturers say, there isn’t a single oven built today that can withstand very many self clean cycles at these extreme temperatures. In addition to posing a potential fire hazard, using the self clean cycle will eventually cause expensive repairs in your oven such as damaged control boards and burned out temperature sensors.
So, let’s review the two rules for using the self clean feature in an oven:
Rule 1: Never, ever, ever use self clean.
Rule 2: If, in a weak moment, you find yourself thinking about using self clean, refer to Rule 1.
To learn more about your range/stove/oven, or to order parts, click here.
More trouble with cheesy electronics in appliances. This time, it’s the Whirlpool-built (includes KitchenAid) built-in combination microwave ovens.
In this particular inconvenience, error code “door” appears in the display and the microwave oven shuts down in mid-cycle. When restarted, the microwave will shut down immediately again and show the “door” error code.
The microcomputer control board (more on that in a minute) will throw this error code whenever it detects an open circuit in the door interlock switch circuit (such as when the door is actually open– go figure!). Hooold on there, Bubbalouie! Uncross them eyeballs and lemme ‘splain what that means.
The door interlock switches are the little switches inside the cabinet where the door catches go in and hook when you close the door. They call ’em microswitches in the trade (I suppose to distinguish them from macroswitches).
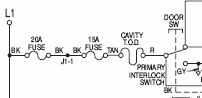 In this case, as seen in this wiring diagram, one of the components at play here is the primary interlock microswitch, usually referred to simply as a switch. To save finger strokes, we’ll refer to the primary interlock switch as the PIS, as in, “that little PISser.”
You can tell the PIS from the secondary interlock switch (the SIS- not shown here) because it’s the one with a red and black wire attached to it. How’d I know that? It’s printed right on the wiring diagram.
You see, Grasshoppah, a wiring diagram is nothing more that a road map for wires (and, more interestingly, electrons). Generally, if you can read a road map and fog a mirror, you can read a wiring diagram well enough for most DIY appliance repairs.
Anyway, you’ll need to get to the PIS (some disassembly required; unplug the microwave first and watch out for the high voltage capacitor— it holds a 2,000 volt charge… even when unplugged!). And then check the continuity of the switch while actuating it (pressing the little tab in and releasing it).
Referring again to the wiring diagram, the PIS is just one of the three components that, if open (or bad) will cause the microcomputer to throw a “door” error in the display. You’ll also notice that there are two fuses in that circuit: a 20amp and 15 amp fuse in series with each other (that means they’re on the same line). If either one of those fuses are open, you’ll get the same error in the display. So, you need to do a continuity check on both those fuses with your multimeter.
If any three of these things are open– the PIS or either of the two fuses– you’ll get “door” on the display.
 If you check all those and they’re good, then you’re probably looking at a bad microcomputer control board. This microcomputer controls the operation of the microwave and monitors the position of the oven door. As you might expect, this is not something that can be adjusted or corrected by replacing the out-of-spec component on the board. No, the entire microcomputer must be replaced.
To learn more about your microwave oven, or to order parts, click here.
 Removing the control panel on a wall oven can be tricky. On some brands, such as the Frigidaire, you need to actually remove the walloven from the cabinet just to remove the control panel. Why they design it like this, I’ll never understand. Nevertheless, this is but one of a plethora of joys we encounter in the field running service calls. This scroll from the Appliantology scriptures will show you how to remove the control panel without breaking anything… too much.
To learn more about your range/stove/oven, or to order parts, click here.
Common model numbers of Jenn Air ranges with this affliction are SVE47XXX and SVG47XXX. The problem is almost always the power relay board (PRB) located on the back panel of the range.

Sublime Master Trying to help explains the why’s and how’s in this topic from the Samurai School of Appliantology.
To learn more about your range/stove/oven, or to order parts, click here.
This is old news, but in case you haven’t heard…
Wolf Appliance Recalls Gas Ranges Due to Burn Hazard WASHINGTON, D.C.
The U.S. Consumer Product Safety Commission, in cooperation with the firm named below, today announced a voluntary recall of the following consumer product. Consumers should stop using recalled products immediately unless otherwise instructed. Name of Product: Wolf Appliance Gas Ranges Units: About 24,000 Manufacturer: Wolf Appliance Inc., of Madison, Wis. Hazard: Delayed ignition of gas in the 18-inch oven can cause a flash of flames to be projected at a consumer when the range door is opened, posing a burn hazard to consumers. Incidents/Injuries: Wolf has received 97 reports of units experiencing delayed ignition, including 15 minor burns. There have been no reports of fires or property damage.
Description: This recall involves the following Wolf Appliance 48-Inch gas ranges with model numbers: P48, PS48 and R48. The gas ranges are stainless steel with a double oven. A “Wolf” appliance logo is on the front of the larger oven door. Sold at: Home builders and appliance stores nationwide from January 1998 through June 2008 for between $5,000 and $9,000. Manufactured in: United States Remedy: Consumers should immediately stop using the recalled gas range 18-inch oven and contact the manufacturer to schedule a free, in-home repair. The large oven and all cooktop burners are not affected and may be used. Consumer Contact: For more information, consumers can contact Wolf Appliance toll-free at (866) 643-6408 between 8:30 a.m. and 5 p.m. CT Monday through Friday or visit the firm’s Web site at http://www.wolfappliance.com/recall.aspx
Gas ranges use one of two types of ignition systems for the oven: pilot flame ignition or hot surface. You can read about each kind and how they work in this scroll from the Appliantology scriptures. Here’s an excerpt:
Within the the world of pilot ignition ovens, two types of pilot flame systems are used:
1. the pilot flame is either always on (called a “standing pilot”) or
2. a spark lights up the pilot flame when you turn on the oven (called a “spark-assisted pilot”).
Today, I’m gonna ‘splain how to replace the thermostat in the first type of pilot ignition oven listed above, the standing pilot ignition.
Lots of these old gas ranges are still out there in use today. I actually prefer these ranges to the newfangled electronified junk they’re making these days. The other distinguishing characteristic of this type of range is that it requires zero electricity to operate. No electrical outlet is required because there’s nothing electric on this range. That makes this type of range a popular choice for homes (and camps) which aren’t connected to the power grid. In fact, the pictures in this article were taken during a repair I did for some friends of ours in Vermont who live off-grid.
This article deals with replacing the thermostat in a standing pilot range. One of the symptoms that the thermostat is bad is that the oven won’t fire up but the stove burners still work. So, does this mean that the thermostat is the only thing that can cause the oven to quit firing up? Nyet, tovarish. You may have a bad gas valve or a fouled pilot assembly. So, how do you verify that the thermostat is the problem? I refer you, once again, to my timeless tome on this topic. Here’s another excerpt from that seminal work:
But when you turn on the oven or the thermostat calls for heat, the pilot flame gets bigger and jumps down so it can heat up the thermocouple bulb. This extra gas to increase the pilot flame size comes from the thermostat. This is important to know because it leads to a couple of fine diagnostic points:
- If the pilot flame jumps upwards or just gets bigger, but doesn’t shoot down, then you need to replace the pilot assembly.
- If the pilot flame size does not increase or jump down when turning on the oven thermostat, then the problem is the thermostat not sending enough gas to the pilot assembly. It’s also possible that the pilot gas supply tube has a hole in it somewhere.
Now, slowly re-read the pearls above several dozen times and savor them like fine saké. It helps to also burn incense and chant “Fixitnow.com Samurai Appliance Repair Man” at least 100 times while meditating on this arcane wisdom.
Once you’re posilootely, absotively certain that the thermostat is the bad actor here, then you may proceed with the pictorial guide that tip-toes you ever-so-gently through the tulips of this repair. And you remember the deal with thumbnail pics, da? That’s right, grasshoppah: you gotta click ’em to see the larger picture with the enlightening annotations.
And if you need to buy a new thermostat for your range, type your model number into the parts search box below and you you can buy it right there. It may give you a warm, fuzzy feeling in your navel to know that when you purchase parts through the links at my website and repair forum, it lets me write how-to articles like this one and save you wads of cash on service calls. Domo! 
OK, when you’re ready, grab ‘hold of those two large lumps at the base of your spine and let’s romp…
 On this range, the thermostat is located in the middle of the control panel. You can access it by removing the grills and lifting the hood, as shown here.
 The thermostat temperature sensing bulb is connected to the thermostat via a copper capillary tube. This tube is bonded with the thermostat body at the factory and pressure charged with a gas that expands in response to the temperature. OK, you can uncross your eyes now ‘cuz that’s about as techie as I’m gonna git in the article. The take-away point is that you cannot replace the thermostat separately from the sensing bulb and the new thermostat comes with a factory-fitted sensing bulb.
Notice how the thermostat capillary tube is routed through the top of the range and into the oven and the bulb is mounted on the side of the range. You’ll copy this when you install the new one.
 When working on an electric appliance, the first thing you do is unplug it before disassembling it. Similarly, when working on a gas appliance, you need to shut off the gas supply before taking it apart. In a properly installed gas range, the shutoff valve is located behind the range, as shown here. Note that the gas supply line here is copper. This is an older installation where this was the norm. Nowadays, the preferred practice is to use steel flex tube.
 Shown here I’m starting the disassembly. The burners are removed and the two aluminum gas tubes are unscrewed from the back of the thermostat body.
 To remove the thermostat body from the gas manifold, you’ll need to remove its mounting bolts. In this case, the mounting bolts are located underneath the thermostat. A piece of gasket material between the thermostat body and the manifold tube creates a gas-tight fit. Remember: any connection that passes gas (
 ) must be leak-checked when you’re finished.
 Here’s the manifold with the old thermostat removed. The gasket material that I mentioned above is stuck to the underside of the old thermostat. The new thermostat kits usually come with a new gasket. That’s about it for the thermostat.
 While we have this beast torn apart, let’s feast our bloodshot squinties on the gas valve as an enriching excercise. Here it be. Notice that it has its very own capillary tube and bulb. Wassup wit dat, yo? That’s the flame sensing bulb. It’s a safety feature that prevents the gas valve from opening (and letting gas through) if there’s no flame present. In other words, that bulb has to sense a flame before the gas valve can open. Does this sound like diagnostically useful information? Ya sure, ya betcha! Tuck that away and ponder it during your next morning constitutional.
 And here’s a closeup of the pilot assembly itself. This can be another source of problems, as mentioned in my prolegomena comments.
 On the back side of the pilot assembly is a plug with a small, precision drilled hole in the middle of it. If this hole gets dirty or partially clogged, which it will on occasion, then the pilot flame will not put out enough heat to open the gas valve.
If the pilot assembly seems to be in good shape otherwise, you can simply clean out this orifice with isopropyl alcohol and compressed air (about 50 psig will do it). Use an air nozzle with a rubber tip so can get a good seal when you squirt compressed air through it.
OTOH, if the pilot assembly looks too boogared up to use any longer, then just replace it.
 Here’s the pilot assembly reinstalled and re-connected to its gas supply tube.
 Here I’m checking my work by firing up the oven to make sure it fires the burner tube. This is an exciting action shot showing the pilot assembly in the ready position, just waiting for the oven thermostat to be turned on.
Needless to say, we had normal ignition and all systems were go. The Samurai whupped-up on another insolent appliance and restored its design function. Now, go and do likewise. 
To learn more about your range/stove/oven, or to order parts, click here.
If your gas oven isn’t firing up, start your diagnosis by checking the ignitor for the proper current draw. “Uh, do what?” you ax, with glazed eyes. Don’t be intimidated by techie-sounding procedures. This is simple stuff– if you can fog a mirror, you can measure current draw. This article explains how to make simple electrical measurements and this one explains what you’re looking for in the gas oven ignitor.
Once you’ve proven that the ignitor is drawing insufficient current (and, therefore, is the correct part to replace to fix the problem), use this handy pictorial guide to hepya change it out.
 The wiring for most range ignitors is accessed underneath the oven by removing the pots drawer, as shown here. Why do you need to access the wiring? Two reasons: 1) so you can measure the current draw and 2) it’s part of replacing the ignitor since the new one has to be wired in the same way as the existing one. Take note of where the wires go. The ignitor wires are not polarity-sensitive so don’t worry about “reversing” them.
 In this particular range (a Maytag), I had to remove a covering panel to expose all the wires.
 Here, I have my clamp-on ammeter on one of the ignitor wires to make a current draw measurement. You can see the closeup of the meter in the next pic.
 You can see the current draw reading is 2.4 amps. For a square ignitor, such as this one (you’ll see it in a subsequent picture), the minimum acceptable current draw is 3.4 amps, well above what I’m measuring here. Obviously, in order to make this measurement, the oven has to be turned on and the ignitor getting voltage. This is a LIVE test, meaning there’s live voltage on the circuit. Fire in the hole! Fry yo ace if’n you ain’t careful, Hoss, so… BE CAREFUL!
 On some ranges, you’ll need to remove the back panel to get to wiring for one or both ignitors (there’s one each for bake and broil). Yes, this means the range needs to be pulled out from the wall. In the case of a wall oven where the freakin’ engineers didn’t bother to make it service-friendly, you’ll need to remove the entire wall oven from the cavity. If this is the case with yours, you’ll quickly understand why I abhor wall ovens.
 Here’s a typical bake ignitor. Note that this one is square. Some ranges, such as older Whirlpools and GEs, use a round ignitor. These two types of ignitors have different current draw specs and are made to be used with different types of valves. This means they are not interchangeable. So, if your range uses the square ignitors, you can only replace it with another square ignitor. The brand doesn’t matter since, by convention, all square ignitors have the same current draw and all round ignitors have the same current draw. For replacement square ignitors, I find that the Maytag universal square ignitor kit is the most cost-effective and reliable. I use this kit in all brands that require a square ignitor.
 Note the finesse with which the Master handles his ¼” nut driver. It’s such beautiful poetry in motion that it makes me all verklempt. Or maybe it’s just allergies…
Sometimes, the head breaks off one of the ignitor retaining screws or, worse yet, the retaining screws are phillips screws and they wallow out on you. That’s what we call a Plot Complication (PC). A PC can be any event that results in the failure of the voluntary nervous system to contain a spontaneous convulsion of the autonomic nervous system as it spews voluminous streams of choice adult language, causing any casual observers present to wet themselves uncontrollably.
I can usually work the screw loose using my little channel lock pliers on the threaded of the screw. I’ll then replace the screw with a slightly bigger diameter machine screw with a pointed end and course threads so it cuts itself into the bracket. It ain’t gotta be perfect or purdy, all it’s gotta do it securely hold the ignitor in position.
 Lots of times, you’ll need to remove the bake burner tube to allow enough room so you can run the wires for the new ignitor. You’ll usually find two screws securing the burner tube: one in back and…
 …one in front.
 Here’s the bottom of the oven, with the bottom pan, flame spreader, and burner tube all removed so we have unencumbered access to the bake ignitor wires.
 On this range, I also removed the broil burner tube and the broil ignitor is left dangling, just itching to be replaced.
 Again, on this particular range, and maybe in the one you’re working on, you’ll have to remove the back panel behind the range. Shown here is the wire harness connector for the broil ignitor. so you just need to connect the new ignitor wires to this harness connector– no need to go all the way back down to the gas valve, like in the bake connector.
So, there you be, Buddy-ree. Easy as pie and 1-2-3. If’n you need parts for your range, come buy ’em from me. Merci! 
To learn more about your range/stove/oven, or to order parts, click here.
Dave wrote:
My maytag gas oven is taking longer to pre-heat. What do I check?
 You need a new ignitor, such as the one shown here in the thumbhail pic. Click it to git it, install it and you’re good to go. Slam dunk.
Some background reading, if you want to know more:
Troubleshooting a Gas Oven That Won’t Fire Up
Making Basic Electrical Measurements
To learn more about your range/stove/oven, or to order parts, click here.
So, you’ve determined that your oven sensor is bad. You did this by getting an error code on the ERC and then looking up the code with a little help from your Master Appliantologist friends at the Samurai Appliance Repair Forums. As a dutiful Apprentice Appliantologist, your next step is to test the sensor resistance using this pearl of appliantological wisdom as your Spirit Guide. You know how to measure resistance with an ohm meter because you’ve read this basic primer on making simple electrical measurements. But now a new problem confronts you: which wires do you put your meter probes on to measure the resistance?
Ahh, grasshoppah, unfurl that brow and unbunch those panties while you swill your flavorite fermented beverage. Then let the Samurai take your trembling hand and gently guide you to Appliance Nirvana®.
 First, open the door to your oven and peer intently at the upper left hand and right hand corners of the oven cavity. There, nestled discreetly and out of the main view, ye shall find something looking like unto this picture (click it for a larger view). Behold the sensor! In this picture, it’s shown dangling from its wires because I already removed the two mounting screws. Normally, it’s pointing strait out toward the door. Notice the color and diameter of the two wires attached to the sensor. Notice also how they run back behind the oven cavity. On some models (most Maytags, for example), you can ever-so-gently coax the wires through the hole and a quick release connector will come through, allowing you easy access to the ends of the wires from which you can make your resistance reading and even replace the entire sensor without having to pull the range out from the wall.
 On other models, whose engineers were not as thoughtful (notably GE), you’ll need to pull the entire range out from the wall, presenting a significant scratching hazard to your floor and eliciting one or more adult words from your lips. After removing the back panel you’ll see where the sensor wires connect to another pair of larger wires that run up to the ERC in the control panel. The connection will either be a quick connect harness or wires nuts, like the ceramic ones shown here. Either way, simply undo the connection and then you have the free ends of the sensor wires on which to make your resistance measurements (and to replace the sensor).
If you need to buy a new sensor for your oven or range, come git you one ratcheer.
To learn more about your range/stove/oven, or to order parts, click here.
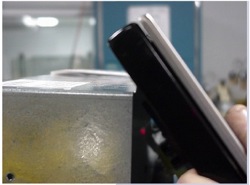
So, you pulled the door off your Thermador range because you and your buddy were doing shots of cheap vodka and, well, it seemed like a good idea at the time. Or maybe you had another reason that sounds almost as good as that one. Whatever. But now, you can’t figger out how to get that half-ton piece of stainless steel back on the hinges. Never fear, grasshopper-dear, for the repair wisdom you seek is ratcheer.