Category Archives: Stove Repair

How Much Money Will You Save by Doing Your Own Appliance Repairs?

MESSAGE SENT THROUGH YOUR WEBSITE

IP Address: 75.4.238.6
name = Alex
country =   USA

NO, I’m not gay. Ijust wanted to know about how much am I saving, by replacing the spark switch/es myself ? I’m trying to figure out if it’s worth a couple of hours of my fun time. Thanx great web-site, can you put up another one on auto mechanics please?

It’s hard to say how much money you’ll save doing your own repairs because labor charges vary by locale and company, although my edumucated guesstimate is that they would run between $100 and $200. But it’s not really about money now is it, my leetle grasshopper? Nay, it’s much, much bigger than that. Isn’t it really about convenience, pride of workmanship, and big brass kohonas? Or how ’bout independence, self-reliance, and just a touch of cheekiness?

I think the real question you meant to ax was, “How hard will it be to fix?” Hard to say exactly without knowing the model and brand of your range but, in general, replacing burner switches inside the control console of a gas range runs about three mugs on the world-famous SUDS-o-meter. The hardest part of this job is getting to the switches. We can help you with this in the Samurai Appliance Repair Forum by posting diagrams and pointers.

Of course, the foregoing assumes that you’ve properly diagnosed the problem and have determined that the switches are bad in accordance with the Ichiban Law of the Prophecy. And you may wish to review this parchment from the sacred scrolls of Appliantology.

Complete Listing of All Error Codes for All Thermador Cooking Products

It’s an all-you-can-eat error code buffet on Thermador cooking products! Come and git it: sooo-WEEE!

In order to download the error code file, you’ll need to be an Apprentice Appliantologist in the Samurai Appliance Repair Forum. All your other friends are doing it. How ’bout you?

For more tidbits and insight into Thermador error codes, read this repair forum topic.

Your Online Jenn Air Stove Cartridge Store

In stock and ready to ship; 30-day money-back guarantee; 100% safe and secure ordering; next-day delivery available. Click it to git it.

Jenn Air Cartridge - Conventional Coil, Stainless Steel Jenn Air Cartridge – Conventional Coil, Stainless Steel (Manufacturer’s Number A100) – Designer Collection. Stainless steel.


Jenn Air Cartridge - Conventional Coil, Black (Manufacturer's Number A100B) - Designer Collection. Black.Jenn Air Cartridge – Conventional Coil, Black (Manufacturer’s Number A100B) – Designer Collection. Black.


Jenn Air Griddle - Electric (Manufacturer's Number A302) - Electric Designer Line. Griddle for electric range or cooktop.Jenn Air Griddle – Electric (Manufacturer’s Number A302) – Electric Designer Line. Griddle for electric range or cooktop.


Jenn-Air Griddle for Gas Range - Designer Line (Manufacturer's Number AG302) - Jenn-Air Designer Line griddle for gas range. (Manufacturer Number AG302) Jenn-Air Griddle for Gas Range – Designer Line (Manufacturer’s Number AG302) – Jenn-Air Designer Line griddle for gas range. (Manufacturer Number AG302)


Jenn Air Cartridge - Gas Two-Burner Module (Manufacturer's Number AG202MG) - Porcelain-on-cast-iron burner grates. White with matte gray grates.Jenn Air Cartridge – Gas Two-Burner Module (Manufacturer’s Number AG202MG) – Porcelain-on-cast-iron burner grates. White with matte gray grates.


Jenn Air Cartridge - Radiant Element (Manufacturer's Number AR141B) - Expressions Collection. Black.Jenn Air Cartridge – Radiant Element (Manufacturer’s Number AR141B) – Expressions Collection. Black.


Jenn Air Cartridge - Radiant Element (Manufacturer's Number A122W) - Smooth top stove cartridge, white trim. Designer Line. WhiteJenn Air Cartridge – Radiant Element (Manufacturer’s Number A122W) – Smooth top stove cartridge, white trim. Designer Line. White

Jenn Air Cartridge - Radiant Element (Manufacturer's Number A122B) - Stove cartridge assembly, smooth top, black. Designer Line.Jenn Air Cartridge – Radiant Element (Manufacturer’s Number A122B) – Stove cartridge assembly, smooth top, black. Designer Line.


Jenn Air Cartridge - Energy Saver Electric Grill Assembly (Manufacturer's Number A158) - Designer Line. Excalibur nonstick grill grate finish. 2800-watt grill element. For cooktop or range.Jenn Air Cartridge – Energy Saver Electric Grill Assembly (Manufacturer’s Number A158) – Designer Line. Excalibur nonstick grill grate finish. 2800-watt grill element. For cooktop or range.


Jenn Air Grill Cover (Manufacturer's Number A341) - Electric Designer Line. Black.Jenn Air Grill Cover (Manufacturer’s Number A341) – Electric Designer Line. Black.

Fahrenheit or Celsius Temperature Selection in GE Ovens

If you’ve accidentally switched the oven control on your GE oven from Fahrenheit to Celsius (or vice versa), it can seem like an oven control problem; the keypad will accept some temperature selections and not others. Easy enough to switch back to the way you want it– this excerpt from your owner’s manual explains the technique:

Your oven control is set to use the Fahrenheit

temperature selections but you may change this

to use the Celsius selections.

Press the BAKE and BROIL HI/LO

pads (on double oven models use

the upper oven controls) at the same

time for 3 seconds until the display

shows SF.

Press the BROIL HI/LO pad. The

display will show F (Fahrenheit).

Press the BROIL HI/LO pad again. The

display will show C (Celsius).

Press the START pad.

NOTE: On double oven models the new setting

will be displayed for both ovens.

Removing the Door Gasket on a Dacor Range

Dacor Oven Door Gasket ReplacementThose braided door gaskets in Dacor oven doors are nice and fluffy and springy when they’re new. As you use the oven and spill grease on the door, the gasket will begin to compress allowing heat to escape. At some point, it will bother you enough that you’re gonna need to replace the gasket. This photo set shows some of the steps involved in removing the old gasket. Easy job, two mugs on the world-famous SUDS-o-meter.

You can buy your replacement gasket here.


Jenn Air Electric Range Beeps Incessantly; No Fault Code

This is usually a bad touchpad. The way to tell for sure is to kill power to the unit, take the control panel down and unplug the ribbon connector that connects touchpanel to the clock. Put it back together and reapply power. The clock will just sit there blinking and, obviously, the buttons won’t work, either. Wait the length of time it takes to leisurely swill a decent beer, such as Tuckerman’s Pale Ale. If your beer drinking reverie is uninterrupted by beeping, then the touchpanel is bad; come git you one.

If it still beeps, then you have a bad clock.

Frigidaire 30″ Free-Standing Ranges with Mini-Oven: Beeping Sound from Control Panel but No Fault Code

Service Flash from Electrolux on the 30″ Frigidaire Free-Standing Ranges with lower mini oven and warmer drawer combination:

Beeping sound coming from the control panel area with no fault code displayed in the Electronic Oven Control (EOC). The consumer can set the oven lock out feature and the beeping stops.

Possible open or shorted mini oven sensodprobe circuit, or mini oven control. The mini oven control will beep constantly when it detects a fault condition in the temperature sensor/probe circuit. This may be caused by a runaway heat condition, open or shorted temperature sensor/probe, or faulty sensor/probe connection or harness.

The technician should test the temperature sensor/probe circuit by disconnecting the P3 connector at the mini oven control board and then measuring the resistance between the two purple wires. The resistance of the mini oven temperature sensor probe should read the same as that of the main oven temperature sensor/probe. If the sensor/probe circuit and harness are good, then replace the mini oven control board.

Thanks to our forum moderator, Pegi, for sharing this with us.

Maytag, Amana, Jenn Air, and Magic Chef Range F1 Codes

Here are some juicy pearls of appliantology wisdom from our friends at Maytag for understanding F1 fault codes. In some models, there are subcodes that make diagnosis even easier. Here’s a simple explanation of what’s going on and how to troubleshoot:

The F1 code indicates that:

a. The electronic range control (ERC) is sensing heat in the oven when in a time-of-day (i.e., not cooking) mode or

b. The ERC is receiving information to run multiple heat functions simultaneously.

Although different components (depending upon the model) could generate the code, simple and straightforward testing using your ohm meter is all you gotta do to test for it.

1. Check the oven temperature sensor. The oven sensor gotsta be within spec or it will cause the F1 code. As an example of being out-of-spec, the ERC will generate an F1 fault code when the sensor shows 1650 ohms during a time-of-day mode. This is equivalent to 350°F in the oven. The resistance isn’t high enough to generate an F2 code (runaway temp) or an F3 or F4 code (shorted/open sensor circuit). The ERC monitors the sensor circuit after a heat cycle and expects the resistance to drop back to 1050-1100 ohms. The fault code is generated when this doesn’t happen. Checking the sensor circuit means also checking the harness, harness connections and the sensor itself.

2. If the oven sensor circuit checks okay, then turn your inquisitive eyeballs to the touchpad. If the range has a separate touchpad/keyboard, the keypad may have moisture that is shorting several circuits simultaneously. If the F1 code is given immediately (instead of during or after a heat cycle), remove the ribbon connector from the touchpad to the ERC after clearing the F1 code. If the F1 code does not return in five minutes, then cast a suspicious gaze upon the touchpad/keyboard. Shorts may be caused by using an ammonia-based glass cleaner. The touchpad surface will absorb ammonia-based cleaners that are sprayed directly on the glass surface. When heat is applied, the surface material can break down causing shorts. If you’re gonna use ammonia-based cleaners on your control panel, then you should spray it on the rag and then wipe the touchpanel –don’t spray directly onto the surface of the touchpad.

3. On Amana ranges with a rotary temperature dial, be sure that the knob is in the OFF position when performing tests.

4. If these tests all check good, then replace the ERC.

To learn more about your range/stove/oven, or to order parts, click here.

Burner Flame on Gas Stove Won’t Shut Off Completely

Doug wrote:

Please help! On my gas stove, one burner will NOT turn off. When the knob is
in the off position, a small blue flame is just barely visible at the burner.
It does not go out. Ever. Please enlighten me!

Doug

_______________________________
Message sent from IP: 64.91.149.236

This is a bad burner valve, slam dunk. To see what and where this bad boy lives, click here and and then select the detailed diagram for either Gas Free Standing or Gas Cooktop— either will show you the same thing. Once you know where that valve is, you can order it right here using your model number.

Mailbag: Gas Stove Burner Ignition Problems

When I turn on the element of my gas stove the gas ignites, but the spark
continues to click on all 4 burners. I can’t stop it. We clean in and around the
burner and this eventually stops the problem, but I would love to know exactly
where the flame sensor is loacted so we can fcus on cleaning just that one spot.
Your help will be appreciated.

Don

_______________________________
The above message was sent when you were offline, via your Timpani site.

Message sent from IP: 64.231.116.98

The most likely cuprit here is a stove burner switch that either got wet or has grease-gookus built up on its contacts. Lots more detailed help on troubleshooting gas stove burner ignition problems here. Warning: some reading required.

To learn more about your range/stove/oven, or to order parts, click here.

Appliance Repair Revelation: Troubleshooting a Gas Oven That Won’t Fire Up

If you have a gas oven that’s not firing, don’t be bonehead and automatically assume the valve is bad (hint: it’s usually not). What else could it be? Ah, Grasshoppah, read and learn.

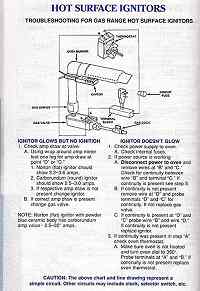
Gas Oven Service Sheet--click for larger viewYou may even see the orange “glow plug” (called a hot surface ignitor) glowing orange and so assume that it’s OK. But you would probably be wrong. Many $$ wrong. You gotsta measure the current drawn by the ignitor before you can say it’s OK or not. The gas valve has a bi-metal that snaps open when a certain amount of current flows through it to heat it up. The ignitor is wired in series with the gas valve. As the ignitor ages, its resistance increases to the point where not enough current is flowing to the gas valve bimetal to open it up. Consequently, the gas valve never opens up. BTW, a common symptom of the early stages of this problem is erratic temperature control in the oven due to delayed firing of the bake burner while cooking. This service sheet illustrates the main players in the ignition system and how to test them.

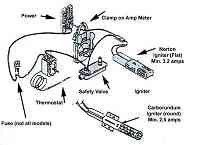
Gas Range Components--click for larger viewHere’s another picture that shows the main components in a gas oven. The big thing to notice is the difference in current draw between the round and flat ignitors. Look, there’s just no substitute for measuring the current draw–this is the gold standard for diagnosing gas oven ignition problems. I’ll let you in a little secret, though: if the ignitor glows but the oven takes longer than three minutes to fire up then, 97.98745987% of the time, the problem is a bad ignitor. Here’s another tip: if you buy the ignitor through this parts link and that doesn’t fix it, you can return the ignitor for a refund. Who else but the Samurai will make you a deal like that?

I’ve talked to lots of shotgun parts-changers about this problem. These are guys who can’t be bothered with the theory of operation. Besides, they already know everything anyway, so they just shoot from the hip and end up replacing a bunch of parts that were still good. They blew beaucoup bucks on a new valve and just can’t understand why the oven still won’t fire up. But now, you know why.

To learn more about your range/stove/oven, or to order parts, click here.