Category Archives: Washer Repair

Getting to the Lid Switch in a Kenmore Top-Loading Washer

what is the best way to get to the lid switch on a kennmore washer, model # 110.28812790. It looks as if I need to remove the whole outer shell.

_______________________________
The above message was sent when you were offline, via your Timpani site.

Message sent from IP: 12.24.236.162

You are correctum! The technique is illustrated below. If you need more verbose instructions, come hither.

Opening up Whirlpool (or Kenmore) Direct-Drive Top-Loading Washer

To learn more about your washing machine, or to order parts, click here.

Maytag and Samsung Brand Front-Load Washers Recalled Due to Fire Hazard

Another one for the “Oops!” file:

The U.S. Consumer Product Safety Commission, in cooperation with the manufacturer, announced in mid-March a voluntary recall of about 250,000 Maytag-brand and about 20,000 Samsung-brand front-load washers made by Samsung Electronics Co. Ltd., of South Korea.

Consumers should stop using recalled products immediately. Water leakage onto the electrical connections to the washing machine’s thermal sensor could cause an electrical short and ignite a circuit board, posing a fire hazard to consumers. Maytag has received five reports of incidents involving the hazard. Samsung has received one such report. No injuries, fires or property damage outside the washing machine have been reported.

The Maytag washers have model numbers beginning with MAH9700 or MAH8700. The Samsung washers have model number WF306BHW or a model number beginning with WF316. Not all serial numbers are subject to the recall. The model and serial numbers are located on a tag at the bottom of the door opening. Maytag models with a serial number ending in the last two letters GA, GC, GE, GG, GJ, GL, GN, GP, GR, GT, GV, GX, JA, JC, JE, JG, JJ, JL, or JN; and Samsung models with the six- digit number 100001 through 799999 prior to a letter at the end of the serial number are subject to the recall.

The products were sold at department and appliance stores nationwide from April 2005 through August 2006 for between $1,000 and $1,200. Consumers should immediately contact Maytag or Samsung for information on how to receive a free repair.

Call Maytag at 1-800-868-5109 between 9 a.m. and 9 p.m. E.T. Monday through Friday, or go to Maytag’s Web site: www.washerrecall.com. Samsung customers can call 1-800-515-7902 between 9 a.m. and 9 p.m. E.T. Monday through Friday, or go to Samsung’s Web site: www.Samsung.com/washerrecall.

Tired Mom Fixes Her Kenmore Washer

Oh Great Samurai, I am most indebted to your great wisdom and guidance. The husband (who is totally repair disabled) and I (who repairs because there is no other option) replaced the drive coupler on our Kenmore washer in about an hour. Your diagrams and tips were right on, and the fact that I can go back to washing the ten million loads of laundry my sweet children gift me daily is most rewarding. One interesting tip is that we used a couple of wood blocks (my son’s toy box type) to hold up the motor. It made putting the couplers back together much easier. Many thanks and blessings.

_______________________________
The above message was sent when you were offline, via your Timpani site.

Message sent from IP: 65.11.213.177

Congratulations on your successful repair, my worthy apprentice. Good repair tip, too. Domos and blessings back atcha. 8)

How To Remove the Tub in a Whirlpool Duet / Kenmore HE Washer

This excellent little video from Whirlpool Corporation shows how to tear down and remove the tub in a Whirlpool Duet washer (the Kenmore HE3t / HE4t is the same machine but with a "Kenwhore" label slapped on it). Oh, I know what you're saying, "Gee, Samurai, that's real nice an' all, but how likely is it that I'm gonna need to remove the tub in my new $1,000 washing machine?" Well, Mary B. didn't think it was very likely either until her washer’s tub self-destructed and she was left holding ye olde colostomy bag.

Since removing the tub requires a complete tear down of this machine, the procedure illustrated here has application to many other repairs, such as replacing the tub shocks.

Other resources:

Genuine Whirlpool service manual for this washer.

To learn more about your washing machine, or to order parts, click here.

How to Replace the Brushes in a Frigidaire Front Loading Washer Motor

Brush failure in these motors is the most common cause for motor failiure. A new motor costs about $200; new pair of brushes about $60. The real kick in the shorts is that Frigidaire does NOT sell the brushes separately! BTW, this also applies to Kenmore washers built by Frigidaire. (If you believe there is an actual Kenmore factory somewhere cranking out Kenmore appliances, you need to read this now.)

Unbunch thy panties, Grasshoppah, for the Samurai is here to save you wads of hot, wet, stinky cash! And here’s some more good news: replacing motor brushes is a snap, less than two mugs on the world-famous SUDS-o-meter!

The brushes are located on the back of the motor (that is, the opposite end from the motor shaft). Looky here (click the picture for illustrative annotations):

Frigidaire Washer Motor Brushes

Just remove the obvious phillips screws and install the new brushes.

“But, mighty and myopic Samurai, how can I get the replacement brushes if Friggidaire is attempting to screw me over by not selling them because they want me to by a whole new motor for a lot more money?”

Good question, Grasshopper, it warms my heartburn to see you thinking so hard. Careful though– you might get a hernia in your brain. Obviously, I have the solution or I wouldn’t be writing this silly post. Use these Asko brushes:

Asko Washer Motor Brushes

Yes, I said Asko. Turns out these Asko motor brushes work great in Frigidaire washer motors, too.

Motor brushes are sold individually and you should always replace ’em in pairs, so buy two. Conveniently, you can buy the new brushes ratcheer.

To learn more about your washing machine, or to order parts, click here.

Whirlpool Duet / Kenmore HE3t and HE4t Washers: A Peek Under the Hood

At some point during your tenure of owning this machine, you’ll need to remove the top panel (three screws in back) to chase a gremlin. The flowmeter and the CCU in particular have been troublemakers. This will help…

Under the Top Panel of a Whirlpool Duet / Kenmore HE3/4 Front Load Washer

You can buy a printed copy of the genuine service manual for this washer. Or, I may email you a pdf version out of convulsive, spasmodic, twitching gratitude for your sufficiently-generous love-offering to my flavorite charity. Come and gleefully rummage through my other pearls on this machine.

To learn more about your washing machine, or to order parts, click here.

Staber Washer Fan Mail

Thank you Thank you. We love our Staber washer. We’ll be getting a dryer as soon as ours breks. Thank you for the direction. I’ve tried to wear it out and now I understand why there are no used Stabers for sale out there. I wish I’d known about them when I was 20…I WAS 20 once. lol.

_______________________________
The above message was sent when you were offline, via your Timpani site.

Message sent from IP: 165.201.90.70

Interested in a Staber washer? You can check out all the stuff I’ve written about Staber washers and even our podcast episode comparing them to other washers. For purchase information, check out Samurai’s Staber Store.

How to Replace the Door Switch on a Whirlpool Duet or Kenmore HE3t (and HE4t) Front Loading Washing Machine

Replacing the door lock latch assembly is a common repair on this washer. Fortunately, it’s also an easy and inexpensive repair… relative to, say, replacing the entire drum assembly. I’d rate this one a single mug on the world-famous SUDS-o-meter.

Broken Door Latch on a Whirlpool Duet or Kenmore HE3 WasherLots of times, you can tell the door lock assembly is bad by noticing if this little nub is broken off– click the pic, Slick. If it is, well, slam-dunk: come git you a new door lock latch assembly.

The door latch could also be bad electrically, meaning that one of its little inner switches finally switched off for good. But to know that, like, fer sher, Dude, you’ll need this service manual and a multi-meter.

Otay, Buh’weet, replacing the door lock latch assembly is about as easy as cleaning out the p-trap under your sink, but not nearly as interesting. Just download this pdf file from the forum– it lays it all out for you, complete with “purdy pitchers.” You’ll need to be a member of the forum to download the file; this link explains how to join.

Maytag Neptune Washer Tripping GFI Circuit Breaker

Affected Models: MAH2400AW*, MAH2440AW* and MAH2440BG*

So, your nearly-new Maytag Neptune washer is tripping the GFI outlet for no apparent reason. If you’re sure the GFI outlet itself isn’t at fault, then the problem may be moisture running down the wire harness and into the motor harness connector. This can cause corrosion of the terminals, premature motor failure and, by the way, trip the GFI.

Maytag Neptune Motor Wiring Harness - click for larger viewIf the wire harness and terminals in the motor connector are still in good shape, Maytag recommends wrapping the wire harness with special foam tape to keep water out of the harness. The better fix is to replace the entire wire harness because it includes a drip loop for additional protection.

Do I really need to say, “Click the thumbnail for a larger view?”

Whirlpool Duet Front Loading Washer Walks or Vibrates During Use

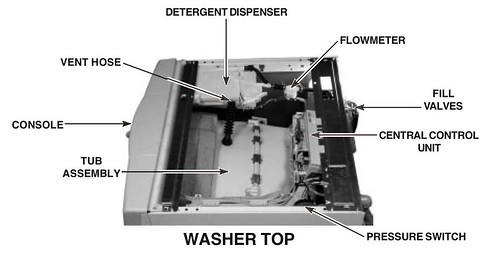
Affected Models: GHW9150P_0, GHW9160P_0, GHW9300P_0, GHW9400P_0, GHW9460P_0 with serials numbers CSR2600001 through CST0600001

Here’s a punch list for tracking down this emerging problem with this otherwise decent washer.

NOTE: If the washer is installed on a pedestal, begin at Step 1. If the washer is not installed on a pedestal, start at Step 3. For more detailed information, start a new topic in the repair forum.

Whirlpool Duet Washer Footing
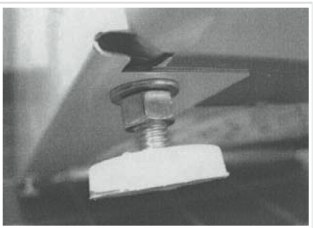
1. Make sure that each of the washer footings has a foot pad– see photo. I know, this seems like such a no-brainer that it’s hardly worth listing. But after running this site for 10 years, I’ve learned not to over-estimate my grasshoppers.

2. Make sure the four screws attaching the washer and pedestal together are tight.

3. Check the levelness of the washer. Now, level means more than just bubble level, although that’s part of it. It also means to ensure that each footing is bearing about 25% of the machine’s weight. How to do this? Keep reading…

4. Verify that all four feet are in firm contact with the floor. To do this, push and pull on the opposite corners (left rear/right front, right rear/left front) of the washer. If there is any movement front to back, you will need to adjust the feet. Adjust the appropriate front leveling foot to eliminate the movement. If the right front corner is moving, adjust the right front foot. If the left front corner is moving, adjust the left front foot. Is easy, da?

5. Ensure that the leveling feet locknuts are tight against the bottom of the washer or pedestal cabinet, not the footpad. See the photo.

6. Tighten the leveling foot locknuts, if necessary.

7. Run a test load consisting of 11-12 medium-size towels in the Rinse/Spin cycle and determine if the washer is a vibrating or walking. If the washer is not walking, proceed to Step 11.

8. If the washer is walking, clean the floor and leveling footpads thoroughly and be sure they are dry.

9. Repeat step 7 to confirm improvement.

10. If the washer does not walk, but there is vibration that is still unacceptable, skip to Step 12.

11. If there is only vibration, is it an acceptable amount of vibration felt in either the home or washer? This is obviously a subjective call; you can get as anal as you want here. Just remember that when you have something big like a washer drum spinning at 1,000 rpm, you’re gonna have some vibration, Hoss. As Scotty told Capt. Kirk, “I canno’ change the laws of physics, Captain!”

12. If you’re still not satisfied, replace the suspension dampers and tub springs with this kit. It comes with an instruction sheet.
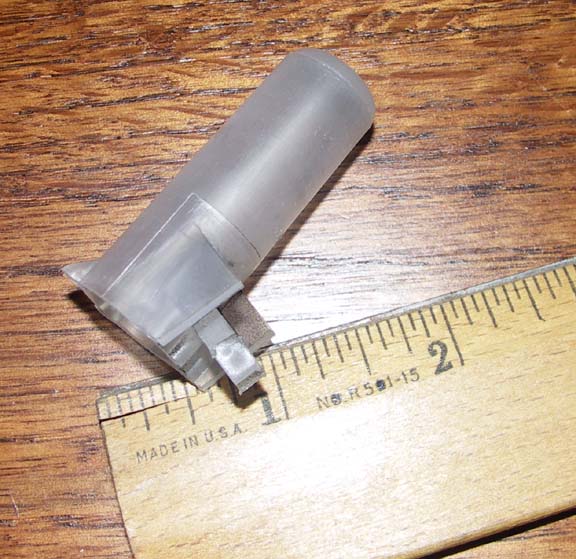